Searching the Help
To search for information in the Help, type a word or phrase in the Search box. When you enter a group of words, OR is inferred. You can use Boolean operators to refine your search.
Results returned are case insensitive. However, results ranking takes case into account and assigns higher scores to case matches. Therefore, a search for "cats" followed by a search for "Cats" would return the same number of Help topics, but the order in which the topics are listed would be different.
| Search for | Example | Results |
|---|---|---|
| A single word | cat
|
Topics that contain the word "cat". You will also find its grammatical variations, such as "cats". |
|
A phrase. You can specify that the search results contain a specific phrase. |
"cat food" (quotation marks) |
Topics that contain the literal phrase "cat food" and all its grammatical variations. Without the quotation marks, the query is equivalent to specifying an OR operator, which finds topics with one of the individual words instead of the phrase. |
| Search for | Operator | Example |
|---|---|---|
|
Two or more words in the same topic |
|
|
| Either word in a topic |
|
|
| Topics that do not contain a specific word or phrase |
|
|
| Topics that contain one string and do not contain another | ^ (caret) |
cat ^ mouse
|
| A combination of search types | ( ) parentheses |
|
Step 3 - Define your targets
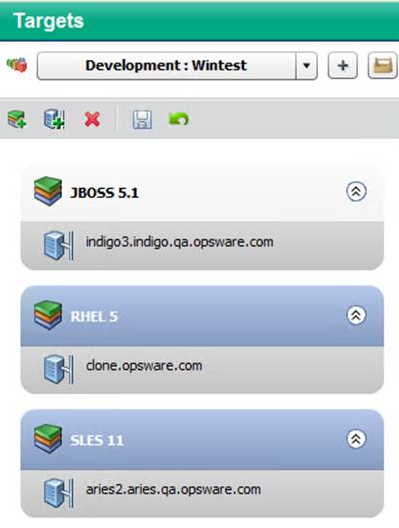
Targets are sets of servers to which your application will be deployed. Each target must include the tiers that your application requires.
Target with three tiers

Two levels of permission are required before you can successfully set up targets. Your SA administrator must grant you Write permission to the pertinent environment (see Environment permissions).
Before you can add servers to tiers, you must also have permission to work with those servers. This is managed in the SA client (see Action permissions).
Targets are defined on the Targets screen in the Application Deployment tool.
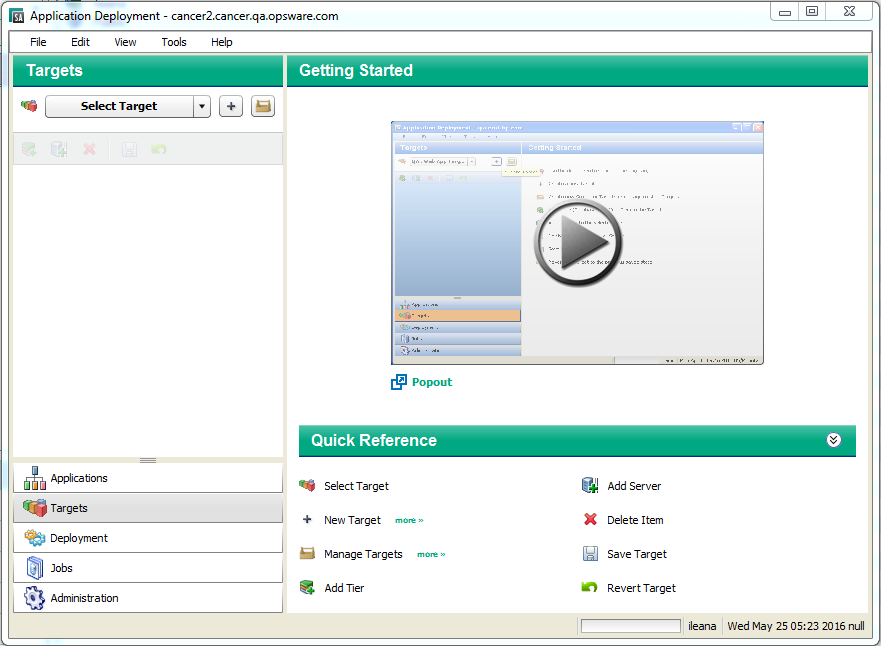
When you are accessing the Target screen for the first time, it will be displayed as shown in the following figure:
Targets Screen

Click the ![]() button to start a short video demo that demonstrates the function of the Targets screen. To play the video in a separate window, click
button to start a short video demo that demonstrates the function of the Targets screen. To play the video in a separate window, click ![]() .
.
The Quick Reference area lists the functions of the tool bar buttons available on this screen. Click the more>> links to open related online help topics in a separate browser window.
The following instructions assume that you are creating a new target. These instructions also assume that, for the purpose of this Quick Start, your target will include only servers.
To create and configure a new target:
- Go to the Targets screen (click Targets in the lower left corner).
- Click the “Create a New Target” button:
 . The Create New Target dialog opens.
 - Enter the target name. Target names must be unique within the environment.
-
In the Location drop-down field, select the environment that will contain this target.
There are two ways to populate your target with tiers: you can add them manually (as described in step 6), or you can create them automatically.
To automatically create the same set of tiers in your target that are used in an existing application, select “Use Application's Tiers” and select a version of the application.
Note A specific version of a particular release of the application must have been previously created before it will appear in the Select Version drop-down list.
- Click OK.
- Follow these steps to add each tier that your application requires:
- Click the Add Tier
 button.
 - Select the type of tier to add. You must create the same set (or a superset) of tiers that are used by your application.
A group of standard tiers are provided with your software. If a tier that you need is not available, your Application Deployment administrator may need to add it. - Click the Add button.
- Click the Add Tier
- For each tier that you added in step 6, follow these steps to specify the server (or servers), that will run this tier:
- Select the tier that you want to work with.
- Select the Add Server
 button to add a server to this tier.
The list of available servers is filtered by platform. Make sure that you select suitable servers for your tier. For example: You should select only Red Hat Enterprise Linux 5 servers if your components for that tier are intended for Red Hat Enterprise Linux 5. - In the Add Servers to Target dialog, locate and select the managed server that you want to add. If you are setting up a multi-server tier, use the CTRL key to select multiple servers.
- Click OK.
- Repeat step 7 to add servers to all remaining tiers.
- Click the Save Target button
 to save your changes.
We welcome your comments!
To open the configured email client on this computer, open an email window.
Otherwise, copy the information below to a web mail client, and send this email to hpe_sa_docs@hpe.com.
Help Topic ID:
Product:
Topic Title:
Feedback:


