


Configure an existing Microsoft 2012x64/2012r2 DHCP server for SA provisioning
Configure Windows 2012x64/2012r2 DHCP servers using the SAS DHCP Helper. The SAS DHCP Helper adds a callback .dll which enables Windows DHCP server to provide option 252 during PXE boot. Option 252 instructs Server Automation PXE to select the appropriate WinPE image when booting the target servers.
Without the SAS DHCP Helper, the Windows DHCP server supplies the default WinPE image because option 252 is not part of the STD PXE boot request.
To configure an existing Windows 2012x64/2012r2 DHCP server:
-
Use the Server Manager to add a DHCP server role on your Windows 2012 or above system.
-
Go to SA Client > Library > Opsware > Tools > OS Provisioning and download the microsoft_windows_external_dhcp.exe file.
- Copy and run the microsoft_windows_external_dhcp.exe file on the Windows machine where the DHCP server is available. This installs the SAS DHCP Helper:


-
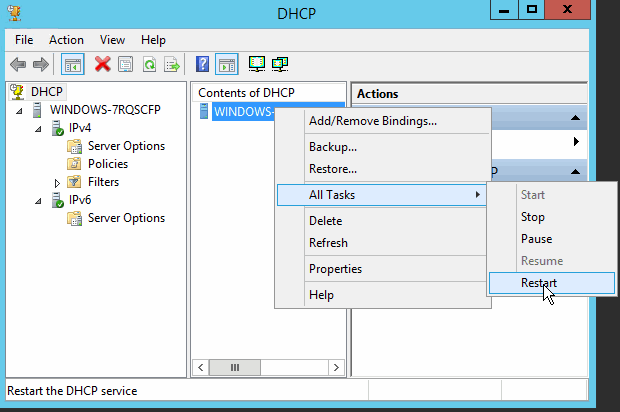
Restart the DHCP service and verify that the callout dll is loaded by checking in Event Viewer > Windows Logs > System.

-
Create vendor class to identify target server boot mode. Open DHCP console, Right Click on IPv4 icon under the server and select Define Vendor Classes option.

- Create a vendor class named PXEClient (Legacy x64) with the value in ASCII: PXEClient:Arch:00000.

- Create a vendor class named PXEClient (UEFI x64) with the value in ASCII: PXEClient:Arch:00007

- Create a vendor class named PXEClient (UEFI x64 for HyperV) with the value in ASCII: PXEClient:Arch:00007:????:??????

-
Right-click on IPv4 and select Set Predefined Options. From that screen, you can add the following options to your DHCP server IPv4 global settings:

- Name: buildmgr_ip
- Data type: IP Address
- Code: 186

- Name: buildmgr_port
- Data type: Word
- Code: 187

- Name: wpad
- Data type: String
- Code: 252

-
To create your scope configuration, Right click on IPv4 and select New Scope option and complete the wizard.

-
Next we have to create the policies. In case only Legacy pxeboot will be used please ignore the UEFI part. Right click on Policies folder inside IPv4 > Scope and select New Policy, add policy with the following values:

Policy for Legacy Targets:
-
Add:
Policy Name: Legacy x64
Description: Policy for Legacy targets
-
Click Next. In Conditions window, click Add to create new condition with following values.
Criteria: Vendor Class
Operator: Equals
Value: 'PXEClient (Legacy x64)'
Select Append wildcard(*) option
Click 'Add' and 'OK'
-
Click Next. In "Configure Settings for Policy" window, select No and click Next.
-
Set following policy specific DHCP option (for Vendor class: DHCP Standard Options):
'066' 'Boot Server Host Name' to <Deployment IP address of appliance>
'067' 'Bootfile Name' to 'pxelinux.0'
'252' 'wpad' to '\Boot\BCD'

Policy for UEFI Targets:
-
Add:
Policy Name: UEFI x64
Description: Policy for UEFI target
-
Click Next. In Conditions window, click Add to create new condition with following values:
Criteria: Vendor Class
Operator: Equals
Value: 'PXEClient (UEFI x64)'
Select Append wildcard(*) option
Click 'Add' and 'OK'
-
Click Next. In Configure Settings for Policy window, select No and click Next.
-
Set following policy specific DHCP option (for Vendor class: DHCP Standard Options):
'066' 'Boot Server Host Name' to <Deployment IP address of appliance>
'067' 'Bootfile Name' to 'grub.efi'
'252' 'wpad' to '\Boot\BCA_UEFI'

Policy for UEFI Targets booted in HyperV:
-
Add:
Policy Name: UEFI x64 for HyperV
Description: Policy for UEFI HyperV targets
-
Click Next. In conditions window, click Add to create new condition with the following values:
Criteria: Vendor Class
Operator: Equals
Value: 'UEFI x64 for HyperV'
Select Append wildcard(*) option
Click 'Add' and 'OK'
-
Click Next. In "Configure Settings for Policy" window, select No and click Next.
-
Set following policy specific DHCP option (for Vendor class: DHCP Standard Options):
'066' 'Boot Server Host Name' to <Deployment IP address of appliance>
'067' 'Bootfile Name' to 'grub.efi'
'252' 'wpad' to '\Boot\BCA_UEFI'

-
Click on Policies folder inside the IPv4 and select the "UEFI x64 for HyperV" policy. Right click it and click "Move Up" until is above the "UEFI x64" policy.
-
-
In your DHCP scope, right-click on Scope Options and select Configure Options, assign the following values to the DHCP options:

- Code: 186 / Option name: buildmgr_ip / Value: Deployment IP Address of appliance
- Code: 187 / Option name: buildmgr_port / Value: 0x1F51
-
Final configuration:
