


Install an SA Agent using the CLI
Perform the following tasks to install an Agent on an unmanaged server using the Agent Installer Command Line Interface.
- Obtain the Agent Installer package
- Obtain the Agent bootstrap certificate
- Run the Agent Installer command
- Agent installer options
- Verify the Agent functionality
Obtain the Agent Installer package
The Agent needs administrator-level privileges (root on UNIX servers and Local System on Windows servers) to manage a server. Therefore, Agent installation needs to be performed as root on UNIX operating systems and as administrator on Windows operating systems.
You can install an agent on any server listed in the SA Support and Compatibility Matrix.
Perform the following steps to download an Agent Installer for an unmanaged server.
From the Command Line
- Locate the appropriate Agent Installer on a Core server in the directory
/var/opt/opsware/agent_installers. Each operating system version has a different package for the Agent Installer. -
Windows:
opsware-agent-<version>-<system_name>-<system_version>.exe - UNIX:
opsware-agent-<version>-<system_name>-<system_version> - Copy the Agent installer package onto the target server.
From the SA Client
If you do not have remote shell access to the SA Core from an unmanaged server, you may need to manually export the Agent Installer package locally on SA Core machine and copy it to the unmanaged server. To export the Agent Installer package, perform the following tasks.
- Launch the SA Client.
- From the Navigation pane, select Library > Packages.
Select the appropriate operating system from those listed under packages as shown in the following figure.
Selecting an Agent Installer Package
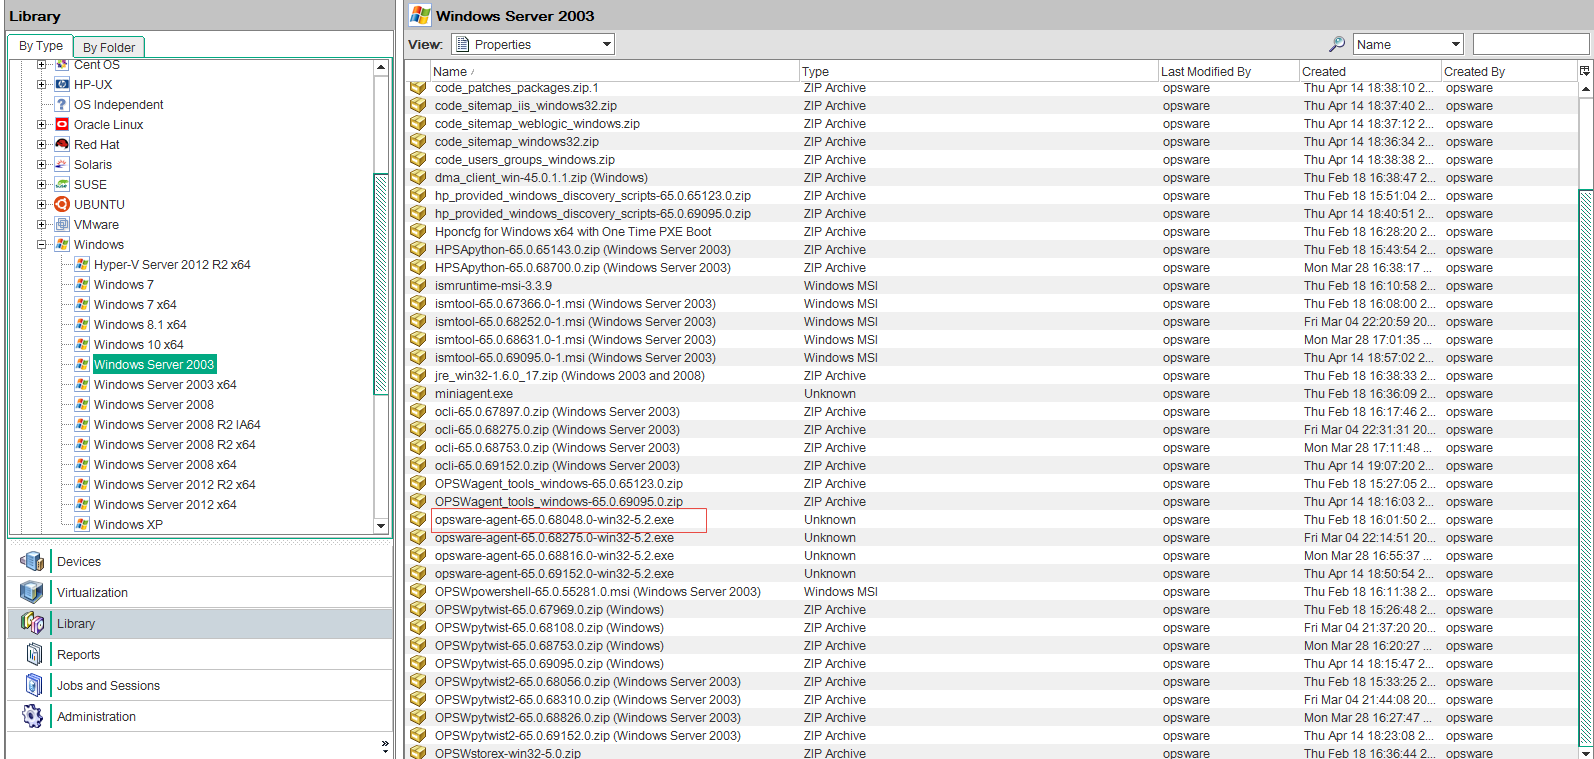
Select the SA Agent. The filename will be in the format:
Windows:
opsware-agent-<version>-<system_name>-<system_version>.exe- UNIX:
opsware-agent-<version>-<system_name>-<system_version>
- Click the package name for the Agent installer that you want to export. From the Actions menu, select Export Software. The Browse window appears.
- In the Browse window, specify the download location for the package and click Export. The package is exported to the specified location.
- Copy the Agent installer onto the target server.
Obtain the Agent bootstrap certificate
Download from the Agent Deployment Tool (ADT)
- Launch the SA Client.
-
Go to Devices > Servers > SA Agent installation and scan for unmanaged servers using the IP or the hostname of the server. Select the unmanaged servers on which you want to download the SA Agent bootstrap certificate.
- Specify your login and installation options to control the way the Agent is installed on the server. See Install the SA Agent using ADT for information on these options.
- In the Options section, select the Verify prerequisites and copy agent installer to servers option and enable the Download Agent Bootstrap Certificate check box. This downloads the Agent Installer package and the Bootstrap certificate (agent.srv) file to your server.
Export from the SA Library
- Launch the SA Client.
- Go to Library > By Folder > Opsware > Tools > Agent Support.
-
Select agent.srv from the list and click Actions menu > Export Software.
-
Specify the download location for the file and click Export.
- Copy the Agent bootstrap certificate onto the target server.
Run the Agent Installer command
- Log into the unmanaged server using a remote shell. On UNIX, log in as root. On Windows, log in as administrator.
- From the directory where the Agent installer was copied, run the installer by entering the correct executable and options for the installation environment. The options are listed under Agent installer options
For example, the following command installs the server agent on a Solaris 5.10 server in the default directories, connects to the gateway on the server core2.hpe.com using port 2010, and logs the results of the installation in the log file named agent.log:
% opsware-agent-45.0.0.0.98-solaris-5.10 --logfile agent.log --loglevel info --opsw_gw_addr core2.hpe.com:3001
Agent installer options
Use the options listed below with the Agent Installer command. You must use either the --opsw_gw_addr option or the --no_opsw_gw option. All others are optional.
|
Option |
Description |
|---|---|
|
|
Specifies the complete path to the file that contains the trusted authorities in PEM format. |
|
|
Install initialization scripts in the proper location for the core server. |
|
|
Assigns the managed server to the specified customer. This option requires the |
|
|
Deletes the list of gateway addresses. |
|
|
Forces the Agent to be installed even if environment check errors occur. This option is useful when the server is not connected to an SA core. When using the |
|
|
Specifies the fingerprint of the core certificate. If you specify a value for this option, the Agent installer will verify that the Certificate Authority certificate used to sign the core's SSL certificate matches the value you provided. Specifying a value for this option increases security during the Agent installation process by ensuring that the Agent attaches itself to the correct core. To obtain the correct value for the core certificate fingerprint option, log on to the core as root (you may need to have an SA System Administrator perform this task for you) and run the following command:
The output looks like the following:
The fingerprint is the string of hexadecimal numbers following the equal sign:
|
|
|
Causes a full hardware registration to be performed on the server after the Agent is installed. The default is for a minimal hardware registration to be performed. For more information, see Software and hardware inventory. |
|
|
Causes a software registration to be performed on the server after the Agent is installed. By default, the software registration is not performed until the regularly scheduled time. For more information, see Software and hardware inventory. |
|
|
Force full virtualization registration (default is no registration). |
|
|
Displays all the options available with the Agent installer command. |
|
|
Specifies the path and file name of the Agent installer log file. By default, the current directory is set as the path. By default, the log file is:
|
|
|
Sets the log level for log messages. The level |
|
|
Disables anonymous SSL. This option configures the Agent so that browsers cannot connect to its web interface without a valid certificate. This option applies to dormant Agents only. If specified, the dormant Agent will require clients that connect to its web interface to have a valid certificate. |
|
|
Suppresses a reachability check. The default is to perform a reachability check during fresh installs, and not to perform this check during upgrades. |
|
|
Does not open the Windows firewall to communicate with the SA core. By default, the Agent installer will modify the Windows firewall configuration on Windows 2003 (r2) or Windows 2008 servers to allow the core to contact the managed server on port 1002. If you specify this option, the firewall configuration will not be modified and the server may not be manageable by SA. |
|
|
Specifies that no gateway is needed. Either this option or the |
|
|
Prevents the Agent from starting after installation. By default, the Agent is started immediately after installation. See also Start an Agent after installation. |
|
|
Specifies the host and port number of the gateways used during Agent installation. Either this option or |
--opsw_src_addr ${LOCAL_IP}
|
Connects to the core using the network interface that has the associated IP address,
|
|
|
Specifies the password for the user specified in the |
|
|
Causes the server to be rebooted after the Agent is installed, but only if required. During Agent installation on a Windows server, the Agent installer copies the file ogshcap.dll to the following location:
If the file is open or is in use, the Agent installer is unable to copy this file. The Agent installer then asks the user whether to restart the machine and copies the file after restart. You can also specify |
|
|
Remediates the server against any software policies attached to the server, including all software policies specified in the |
--resetconf -r |
Resets the Agent configuration file to the default settings. |
|
|
Specifies the path to the RPM handler to use for RPM operations. Use this option, when an RPM handler is already installed on the server. If an RPM handler is not already installed on the server, use the It is not necessary to use this option with the |
--settime -t |
Sets the time on the server to that of the core. If the managed server’s clock is significantly ahead of the clock on the SA Core, the clock on the managed server will be set back. Since this can cause problems, do not use the If a managed server’s clock is significantly behind the clock on the core, the Agent installation might fail. To install an Agent successfully, use the |
|
|
Attaches the software policy <ID> to the server. <ID> must be the name of a software policy in the SA Library. If you want to remediate the software policy immediately, specify the |
|
|
Specify the host name or IP address of the Data Access Engine component. If you specify this option, you must also specify the |
|
|
Specifies an SA user name. This option requires the |
|
|
Installs Windows MSI 2.0 along with the Agent. If Windows MSI 2.0 is already installed, this option has no effect. Works with Windows 2000 and Windows 2003 or later. |
|
|
Installs the RPM handler with the Agent. By default, an Agent is not installed. It is recommended that you always include the Use this option only with the Agent installers for Solaris 5.8, 5.9 and 5.10. On Solaris 5.8 and 5.9, RPM 3.0.6 is installed in the directory On AIX, RPM 3.0.5 is installed in the directory If an RPM handler is already installed, you can use the |
|
|
Specifies the path to the Agent installer temporary working directory. Use this option if the default working directory causes problems with installation. |
--cert_gen_enabled
|
Installs the SA Agent in third-party certificate mode. In third-party certificate mode, you can use an external Certification Authority (CA) to sign the SA Agent certificate. The Agent installer generates a Certificate Signing Request (CSR). You are responsible for signing this CSR and for providing the Agent installer with the certificate issued by your CA. The SA Agent installation completes only after the SA Agent can pick up the valid certificates from your specified location. |
--crypto_dir
|
Specifies a custom location for the SA Agent certificate. |
--cert_gen_timeout
|
Changes the default timeout waiting for the third-party SA Agent certificate before the SA Agent installation stops. The default timeout value is 3600 seconds. |
--wsus_cfg_args <args>
|
Arguments (double quote enclosed if more than one) for the WSUS configuration script:
|
| --wsus_cfg_skip | Does not run the WSUS configuration script. |
Start an Agent after installation
You can manually start the Agent on a server as follows:
UNIX:
- For systemd agents:
systemctl start opsware-agent.service - For other startup configurations:
/etc/init.d/opsware-agent start
HP-UX:
/sbin/init.d/opsware-agent start
AIX:
/etc/rc.d/init.d/opsware-agent start
Windows:
net start opswareagent
Verify the Agent functionality
To verify the Agent functionality:
- From the navigation panel in the SA Client, select Devices > All Managed Servers. The All Managed Servers list appears. Browse the list to find the server whose Agent installation you want to verify. If necessary, open the server and select the correct customer and facility for the server and then click File > Save.
Or, search for the server whose agent installation you want to verify. - Verify that the server appears in the All Managed Servers list and has the correct properties.
See Search for servers based on agent information and for more information. - If you want to discover reasons why a server is unreachable, you can run a Communication Test. See Running server communication tests - SA Client for more information.