


CML Tutorial 1 - Create an Application Configuration for a simple web app server
This section demonstrates how to set up and manage a simple configuration file for a Web Application Server running on two servers. Each server runs the Web Application Server and needs to be configured separately. This tutorial shows how to create an application configuration, a configuration template, value sets and two instances of the application configuration, one for each server. Finally it shows how to push the application configuration to each server.
1. Determining the configuration files to be managed
The web application server uses one configuration file named WASconfig.txt. This file is located in the directory /opt/WAS/WASconfig.txt. The contents of this file are as follows:
size=1000
dir=/tmp/WAS_001
primary=yes
2. Creating a template for the configuration file
You can create a template in either of two ways:
- Create a template in a text file and import the text file into the SA Library.
- Create a template directly in the SA Library.
Both methods are described below. Choose one method and follow the steps.
Creating a template file and importing it into SA
- In a text editor, copy the configuration file into an empty file:
size=1000
dir=/tmp/WAS_001
primary=yes - Create a template that models this file using CML. First add a comment block and the required CML metadata defining the name space and the target configuration file name.
- The name space defines the key where information for this template will be stored in the database.
- The file name key defines where the default file name will be stored in the database.
The default file name specifies the name that will be used for the resulting configuration file.
@#####################################################
# /opt/WAS/WASconfig.txt                             #
# Version 1.0                                        #
# Author <name>                                      #
######################################################@
@!namespace=/WAS-server-namespace/@
@!filename-key=”/WAS-server”@
@!filename-default=”/opt/WAS/WASconfig.txt”@
size=1000
dir=/tmp/WAS_01
primary=yes
-
Next change the variable parts of the configuration file to variables using CML tags:
@#####################################################
# /opt/WAS/WASconfig.txt                             #
# Version 1.0                                        #
# Author <name>                                      #
######################################################@
@!namespace=/WAS-server-namespace/@
@!filename-key=”/WAS-server”@
@!filename-default=”/opt/WAS/WASconfig.txt”@
size=
@value_of_size;int@
dir=@value_of_dir;string@
primary=@value_of_primary;boolean@ - Save the file with an extension of “.tpl”, for example
WASconfig_txt.tpl. - Import the template file into the SA Library. Follow the steps at Import and validate a template file.
Creating a template file directly in SA
- In the SA Client, select the Library tab.
- Select the By Type tab.
- Open the Application Configurations node and the Templates node. Navigate to the OS family and the OS version where the application runs. For this example, select Red Hat Enterprise Linux AS 4.
- Select Actions > New. This displays the Templates screen.
- Enter the template name “WASconfig_txt.tpl” and a brief description. Select the location in the SA Library to store the template file. Set the version string. Set the Type to “Template file”. Set the Parser Syntax to “CML Syntax”.
- Select the Content view to display a text editor.
- Type or paste in the CML text. This is the same CML text as shown above.
- Select Actions > Validate to check the syntax of your CML. Make any needed corrections.
- Select File > Save to save your template.
- Close the template screen.
3. Creating an Application Configuration object
Create an application configuration object to contain the configuration template.
- In the SA Client, select the Library tab.
- Select the By Type tab.
- Open the Application Configurations node and the Configurations node. Navigate to the OS family and the OS version where the application runs. For this example, select Red Hat Enterprise Linux AS 4.
- Select Actions > New. This displays the Configuration screen.
- Enter the name “WAS-app-config”, a brief description and version string of your application configuration. Select the location in the SA Library to store the application configuration.
- Select File > Save to save your application configuration.
4. Adding the template file to the Application Configuration object
- Open the “WAS-app-config” application configuration object you created in the previous step.
- Select the Configuration Values view.
- Select the “+” button or select Actions > Add. This displays the Select Configuration Template screen.
- Select your “WASconfig_txt.tpl” template file and select OK.
- Select File > Save to save your changes to the application configuration object.
- Select File > Close to close the application configuration object.
5. Attaching the Application Configuration object to servers
Two servers are running the web application server, RHEL001 and RHEL008. RHEL001 is the primary server and RHEL008 is the secondary server. Create two instances of the application configuration by attaching the application configuration object to these two servers as follows:
- Locate the primary server RHEL001 in the SA Client.
- Select the RHEL001 server and select Actions > Open.
- Select the Management Policies tab.
- Select the Configured Applications node.
- Select the Actions > Add Configuration menu.
- Select the “WAS-app-config” application configuration object.
- In the Instance Name field, enter “Primary Instance of WAS-app-config” and select OK.
- Select Save Changes. This creates an instance of the application configuration for the server RHEL001.
- Repeat the above steps with the secondary server RHEL008 except in the Instance Name field, enter “Secondary Instance of WAS-app-config” and select OK. This creates a second instance of the application configuration for the server RHEL008.
6. Setting default values
The required values for the configuration files for the two servers are shown below:
|
Server: RHEL001 |
Server: RHEL008 |
|---|---|
|
|
|
You can set default values for the configuration file that can be inherited by the individual servers or that can be overridden by each individual server. If an individual server does not override the default value, it uses the inherited default value.
The following table shows which values will be set with default values and which will be set by individual servers:
|
Default Value |
Description |
|
|
Set this to a default value of 1000 at the application level. All servers attached to this application configuration will use this value unless they override it. |
|
|
Do not set this to a default value. Each server will set this value at the server level or at the server instance level. |
|
|
Set this to a default value of “no” at the application level. All servers attached to this application configuration will use this value unless they override it. |
Setting application level default values
- Open the application configuration object you created above.
- Select the Configuration Values view.
- Select the WAS-config-template.tpl template file.
- Select File Values in the view drop-down list. This displays the default values for the template at the application level.
-
Set “value_of_size” to 1000 and “value_of_primary” to “False” (case matters), as shown below. Do not set a default value for “value_of_dir” because each server will need to set this value.
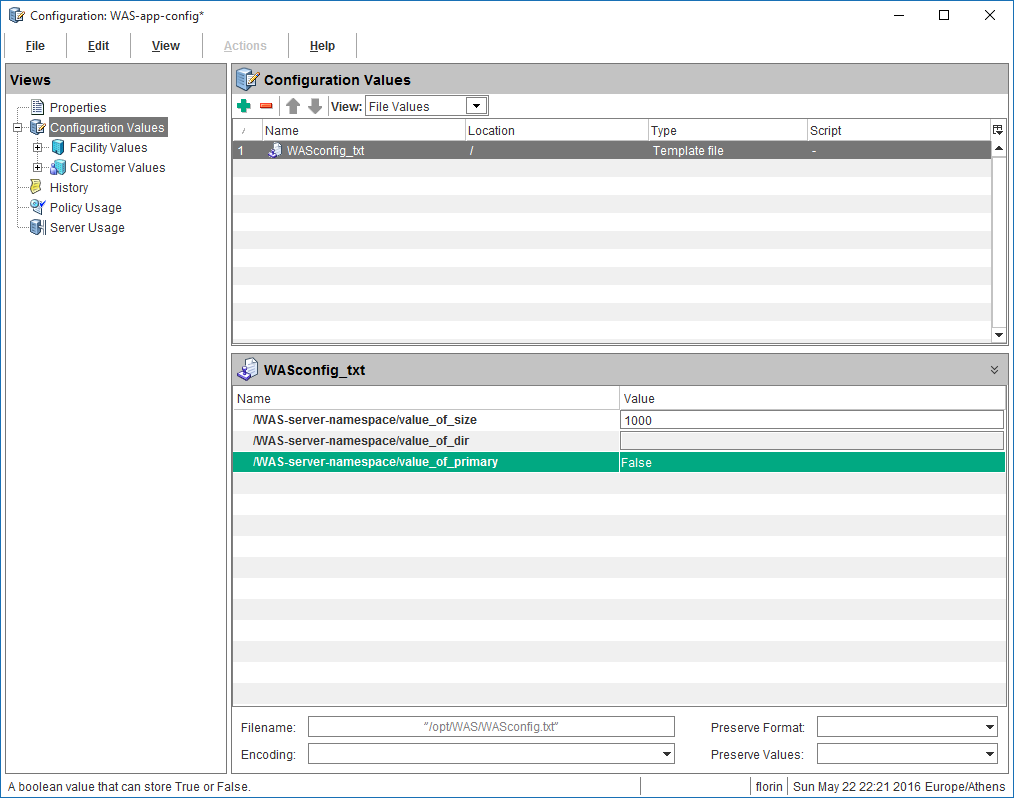
- Select File > Save to save your application level default values.
- Select File > Close.
Setting server level default values for RHEL001
The server RHEL001 needs to set dir=/tmp/WAS_001 and primary=yes at the server level. It does not need to set size because it can use the value set at the application level.
- Locate in the SA Client the RHEL001 server.
- Select the RHEL001 server and select Actions > Open.
- Select the Management Policies tab.
- Open the Configured Applications node to reveal the “WAS-app-config” application configuration object.
- Select the “WAS-app-config” application configuration object attached to this server. This displays the default values set at the server level. Values set at the server level apply to all instances of the application configuration on the server unless overridden at the server instance level.
-
Set the server level default value for “value_of_dir” to “/tmp/WAS_001”, as shown below. Do not set a default value for “value_of_size” or “value_of_primary” because these values will be inherited from the application level.

- Select the Save Changes button or the File > Save menu to save your server level default values.
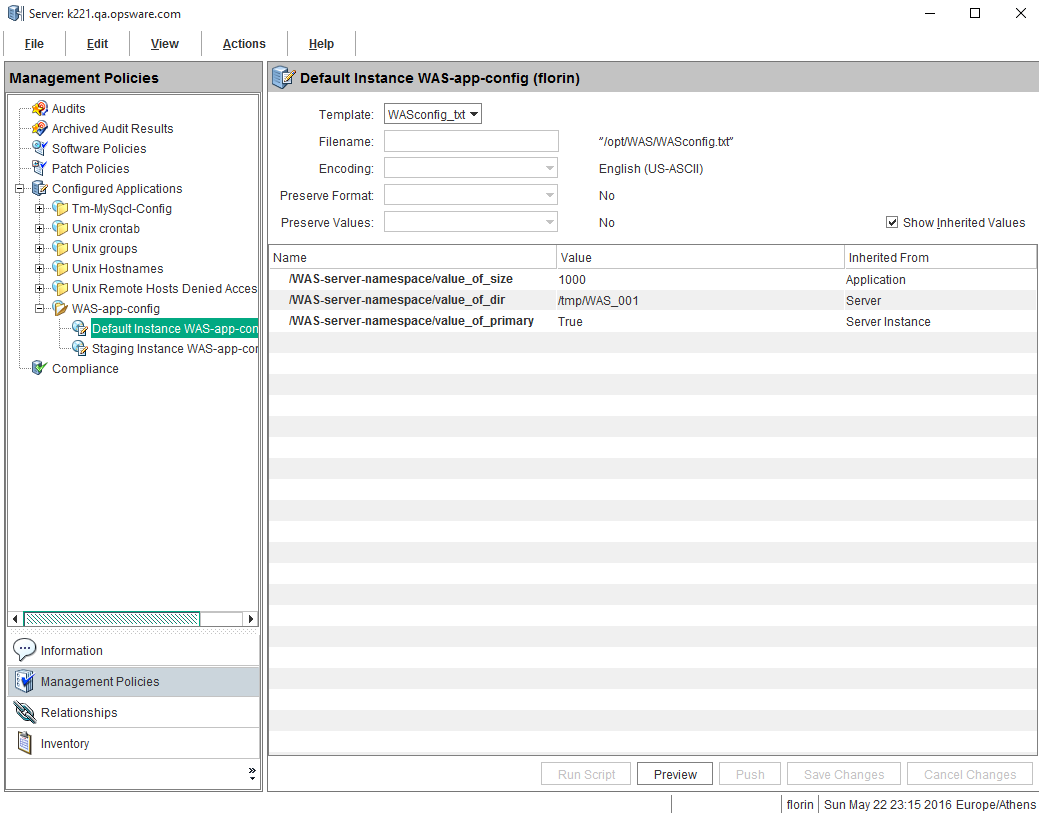
- Open the WAS-app-config node to reveal the application configuration instance “Primary Instance of WAS-app-config”.
- Select the instance “Primary Instance of WAS-app-config”. This displays the instance level default values. This is the lowest value set level and overrides all other levels. Notice that no values have been defined at the instance level.
- Select “Show Inherited Values” to show the values that will be inherited from the application level defaults and the server level defaults. Notice that “value_of_size” and “value_of_primary” are inherited from the application level and “value_of_dir” is inherited from the server level.
- Uncheck “Show Inherited Values” so you can set the instance level default values.
- Set “value_of_primary” to “True” (case matters).
- Select the Save Changes button or the File Save menu to save your instance level default values.
-
Select “Show Inherited Values” again to show the values that are inherited from the application level, the server level and the instance level. Notice that “value_of_size” is inherited from the application level, “value_of_dir” is inherited from the server level and “value_of_primary” is inherited from the instance level, as shown below.
Setting server level default values for RHEL008
The server RHEL008 needs to set dir=/tmp/WAS_008 at the server level. It does not need to set size or primary because it can use the values set at the application level.
- Locate in the SA Client the RHEL008 server.
- Select the RHEL008 server and select Actions > Open.
- Select the Management Policies tab.
- Open the Configured Applications node to reveal the “WAS-app-config” application configuration object.
- Select the “WAS-app-config” application configuration object attached to this server. This displays the default values set at the server level. Values set at the server level apply to all instances of the application configuration on the server unless overridden at the server instance level.
- Set the server level default value for “value_of_dir” to “/tmp/WAS_008”. Do not set a default value for “value_of_size” or “value_of_primary” because these values will be inherited from the application level.
- Select Save Changes or the File > Save menu to save your server level default values.
- Open the WAS-app-config node to reveal the application configuration instance “Secondary Instance of WAS-app-config”.
- Select the instance “Secondary Instance of WAS-app-config”. This displays the instance level default values. This is the lowest value set level and overrides all other levels. Notice that no values have been defined at the instance level.
- Select “Show Inherited Values” to show the values that will be inherited from the application level defaults and the server level defaults. Notice that “value_of_size” and “value_of_primary” are inherited from the application level and “value_of_dir” is inherited from the server level.
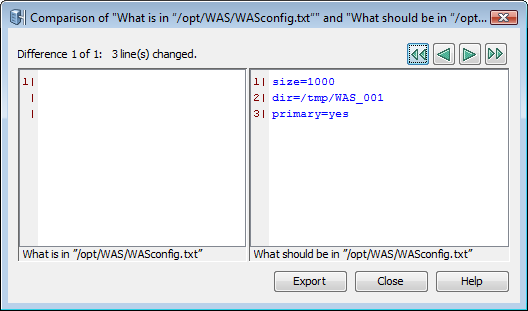
7. Comparing the actual configuration files with the configuration template
You can optionally compare the values specified in the application configuration to the actual values in the configuration file on the server by selecting the Preview button from the server screen. The following shows the comparison on RHEL001 when there is no configuration file on the server yet:
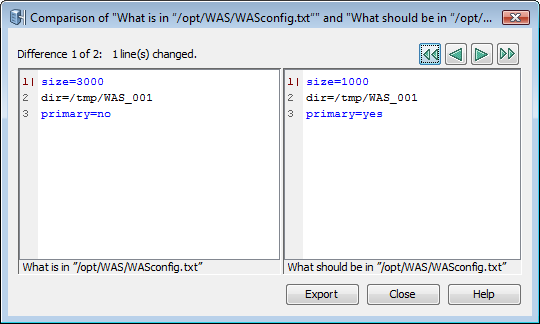
The following shows the comparison when there is an existing configuration file on the server that differs from the values specified in the application configuration:
8. Pushing configuration changes to the server
- Locate in the SA Client the RHEL001 server.
- Select the RHEL001 server and select Actions > Open.
- Select the Management Policies tab.
- Open the Configured Applications node to reveal the “WAS-app-config” application configuration object.
- Open the “WAS-app-config” application configuration node to reveal the “Primary Instance of WAS-app-config” instance.
- Select the “Primary Instance of WAS-appconfig” instance.
- Select the Push button.
- You can select the Start Job button to accept the job defaults for scheduling and notifications, or select Next.
- In the Scheduling screen you can specify when you want the push configurations job to run. Select Next.
- In the Notifications screen you can specify one or more people to receive an email message when the job succeeds or fails. You can also specify a ticket identifier. Select Next.
- Select Start Job. SA generates the configuration file from the template and value set, pushes the resulting configuration file to the server and displays the results.
- Select Close.
For a tutorial showing a more complex configuration file, see CML Tutorial 2 - Create a template of a web server configuration file.