


XML Tutorial 2 - Create an XML-DTD configuration template
This section shows how to create an XML-DTD configuration template to manage an XML configuration file that references a DTD, using the Travel Manager application as an example. For background on the Travel Manager example, see Example: Travel manager application and XML configuration file.
You will first create the XML-DTD template as a text file and then import the text file into the SA Library and add it to an application configuration object. You will then attach the application configuration to a managed server. Finally you will edit some values in the application configuration and push those changes to the target XML file on the managed server.
Sample Travel Manager DTD-based XML file: mysql.xml
For the Travel Manager application, below is the mysql.xml XML configuration file. It is stored in /var/www/html/we/mysql.xml.
<?xml version="1.0"?>
<!DOCTYPE db-config PUBLIC "-//Williams Events//Travel Manager//EN" "mysql.dtd">
<db-config>
	<db-host>localhost</db-host>
	<db-name>wrightevents</db-name>
	<db-user>root</db-user>
	<db-password>hp-pass</db-password>
</db-config>
Sample Travel Manager XML DTD file: mysql.dtd
For the Travel Manager application, below is the accompanying mysql.dtd DTD. It is stored in /var/www/html/we/mysql.dtd.
<!ELEMENT db-config (db-host,db-name,db-user,db-password)>
<!ELEMENT db-host     (#PCDATA)>
<!ELEMENT db-name     (#PCDATA)>
<!ELEMENT db-user     (#PCDATA)>
<!ELEMENT db-password (#PCDATA)>
1. Creating XML-DTD template in a text editor
In this task, you will create the source for the XML-DTD configuration template using a text editor.
To create an XML-DTD configuration template in a text editor:
-
In a text editor, enter the following information:
<!--
ACM-TIMEOUT = 1
ACM-FILENAME-KEY = /files/TravelManager
ACM-FILENAME-DEFAULT = /var/www/html/we/mysql.xml
ACM-NAMESPACE = /TravelManager/
ACM-DOCTYPE = db-config
ACM-DOCTYPE-SYSTEM-ID = mysql.dtd
ACM-DOCTYPE-PUBLIC-ID = -//Williams Events//Travel Manager//EN
-->
This information is required (except ACM-TIMEOUT) and is used by the application configuration parser to read both the XML-DTD and the XML file you want to manage:
-
ACM-TIMEOUT: (Optional) Represents the number of minutes that are added onto the configuration template’s default timeout value (ten minutes) during a push. ACM-FILENAME-KEY: Defines the location in name space where themysql.xmlfilename will stored.ACM-FILENAME-DEFAULT: Defines the default location (absolute path) of themysql.xmlfile on the managed server.ACM-NAMESPACE: This value defines the location where values read from themysql.xmlfile on the managed server will be stored in the database. This name space must be unique, and the path must start with a forward slash (/).ACM-DOCTYPE: Defines the name of the root element in the XML file. The root element follows the opening<!DOCTYPEdeclaration found in the target XML configuration file.ACM-DOCTYPE-SYSTEM-ID: Defines the name of associated DTD file on the managed server. This value can typically be found in the XML configuration file as the SYSTEM attribute in the DOCTYPE element.ACM-DOCTYPE-PUBLIC-ID: Defines a string that represents a public identifier of the XML document. This value can typically be found in the XML configuration file as the PUBLIC-ID attribute of a DOCTYPE element.
-
- Save the file, giving it the name
mysql-dtd.tpl. Keep the file open for the next task.
2. Add custom settings for element descriptions in the Value Set Editor
In this task you will add some extra information to the XML-DTD template file that allows you to customize the display of each element from the target XML file as seen in the value set editor in the SA Client.
There are two optional settings you can add to your XML-DTD configuration template that allow you to customize how elements from the target XML-DTD configuration file are displayed in the value set editor in the SA Client:
ACM-PRINTABLE: Defines a label for each element from the XML file that will be displayed in the value set editor when the XML-DTD template is shown in the SA Client.ACM-DESCRIPTION: Defines mouse-over text when a user moves a mouse pointer over the field defined inACM-PRINTABLEin the value set editor in the SA Client.
See the XML-DTD template figure for an example of how these elements appear in the value set editor in the SA Client.
This example uses the explicit method for placing these custom settings inside the XML-DTD template. For more information on this method of placing custom settings, see Explicit versus positional display settings.
To add custom settings in the XML-DTD template:
- In the text editor with the
mysql-dtd.tplfile, add the following information for each XML element being referenced by the DTD. For example, after the main information in the template, add a list of each element contained in the source XML file and then for each element, make an XML comment using these three ACM setting tags:ACM-ELEMENT: Declares the element from the XML file that the following theACM-PRINTABLEandACM-DESCRIPTIONsettings will describe. This option defaults to whatever element or attribute came before this section in the DTD file.ACM-PRINTABLE: Set a short, descriptive label for the element when it is displayed in the value set editor.ACM-DESCRIPTION: Set mouse-over text for the element.The example XML-DTD template file should look like this:
ACM-TIMEOUT = 1
ACM-FILENAME-KEY = /files/TravelManager
ACM-FILENAME-DEFAULT = /var/www/html/we/mysql.xml
ACM-NAMESPACE = /TravelManager/
ACM-DOCTYPE = db-config
ACM-DOCTYPE-SYSTEM-ID = mysql.dtd
ACM-DOCTYPE-PUBLIC-ID = -//Williams Events//Travel Manager//EN
-->
<!ELEMENT db-config (db-host,db-name,db-user,db-password)>
<!ELEMENT db-host     (#PCDATA)>
<!ELEMENT db-name     (#PCDATA)>
<!ELEMENT db-user     (#PCDATA)>
<!ELEMENT db-password (#PCDATA)>
<!--
ACM-ELEMENT = db-config
ACM-PRINTABLE = database configuration
ACM-DESCRIPTION = The db-config element specifies the data structure that contains the information needed to connect to a database.
-->
<!--
ACM-ELEMENT = db-host
ACM-PRINTABLE = database hostname
ACM-DESCRIPTION = The db-host element specifies the name of the host computer (the server) on which the database engine is running.
-->
<!--
ACM-ELEMENT = db-name
ACM-PRINTABLE = database name
ACM-DESCRIPTION = The db-name element specifies the name of the database.
-->
<!--

ACM-ELEMENT = db-user
ACM-PRINTABLE = database user
ACM-DESCRIPTION = The db-user element specifies the user identification used to connect to the database.
-->
<!--
ACM-ELEMENT = db-password
ACM-PRINTABLE = database password
ACM-DESCRIPTION = The db-password element specifies the password used to connect to the database.
-->
- Save and close the file.
3. Import the XML-DTD configuration file
In this task you will import your template file and create a new configuration template that will manage the target XML and DTD files.
To import the XML-DTD configuration file into the SA Library:
- From the SA Client navigation pane, select Library and then select the By Type tab.
- Locate and open the Application Configuration node. Open the Templates node. Open an operating system group and navigate to the operating system that the template file applies to. Note that a template can apply to multiple operating systems. For example, you could select one of the Red Hat operating system versions.
- From the Actions menu, select Import Template.
- Navigate to the file you created in the previous step and select it. Set the encoding if it is not the default.
- Select Open. This imports your template file and displays it in the Templates screen.
- Select the Properties view and enter the following information:
- Name: mysql-dtd.tpl
- Description: This is the template for the mysql.dtd (mysql.xml) file for the Travel Manager application.
- Location: Specify where in the SA Library you want to store the template.
- Version: 0.1.
- Type: Template file
- Parser Syntax: XML DTD Syntax.
- OS: Select the appropriate operating system.
- Select the Contents view to display the contents of the template file you just imported.
- Select the Validate button to confirm that the syntax is valid before proceeding.
- Select File > Save.
- Select File > Close.
4. Creat an Application Configuration object
An application configuration is a container for configuration template files. In this step you will create an application configuration and import the template.
- From the SA Client navigation pane, select Library and then select the By Type tab.
- Locate and open the Application Configuration node. Open the Configurations node. Open the operating system group and select the operating system that the application configuration applies to. Note that an Application Configuration can apply to multiple operating systems. You can change this in a later step.
- Select the Actions > New menu. This displays the File Configuration screen where you can specify the properties and contents of the Application Configuration.
- In the Properties view, specify the following:
- Name: TM-mysql-dtd
- Description: This is the application configuration for the mysql.xml and mysql.dtd files for the Travel Manager application.
- Location: Specify where in the SA Library you want to store the Application Configuration.
- Version: 0.1
- OS: Select the appropriate operating system.
- In the Content view, select the Actions > Add menu or the “+” button to add a template to the Application Configuration.
- In the Select Configuration Template screen, select the mysql-dtd.tpl template file.
- Select OK.
- Select File > Save to save your Application Configuration.
- Select File > Close.
5. Attach the Application Configuration to a managed server
In this task you will to attach the application configuration to the server where the Travel Manager application is installed, and then enter the path name to the mysql.dtd configuration file.
To attach the application configuration to a server:
- From the SA Client navigation pane, select Devices > Servers All Managed Servers.
- Select a server, and from the Actions menu, select Open. Make sure the operating system of the server you select matches the operating system specified on the application configuration and the template.
- Select the Management Policies tab.
- Select the Configured Applications node.
- Select the Installed Configurations tab.
- From the Actions menu, select Add Configuration.
- In the Select Application Configuration screen, select the application configuration TM-mysql-dtd.
- In the Instance Name field, enter “Value set 1 for mysql.xml”.
- Select OK. The application configuration is attached to the server.
- Select the Save Changes button.
- Leave the application configuration screen open for the next step.
6. Import values from the configuration file
The next step is to set values in a value set. While you can set values in a value set manually, the easiest way is to import the values from an existing configuration file. In this step you will import the values from a configuration file on the server.
To import the values from the configuration file as described below, copy and paste the XML listed in Sample Travel Manager DTD-based XML file: mysql.xml above into the target file /var/www/html/we/mysql.xml on your managed server. Copy and paste the DTD listed in Sample Travel Manager XML DTD file: mysql.dtdabove into the target file /var/www/html/we/mysql.dtd. This will enable the import step below.
- In the server Management Policies, open the Configured Applications node. This displays the application configuration attached to the server.
- Open the TM-mysql-dtd node. This displays the server instance value sets, which are the node under the TM-mysql-dtd node.
- Select the “Value set 1 for mysql.xml” node. This is the server instance value set for the mysql-dtd.tpl configuration template.
- Right-click on any value under the Value column and select the Import Values menu.
- In the Confirmation Dialog, select Yes. This imports the values from the file /var/www/html/we/mysql.xml into the value set at the server instance level.
- Select the Save Changes button. The following figure shows the XML-DTD template with the server instance value set and the mouse-over text displayed from the ACM-DESCRIPTION element.
Value Set and Mouse-Over Text for XML-DTD Configuration Template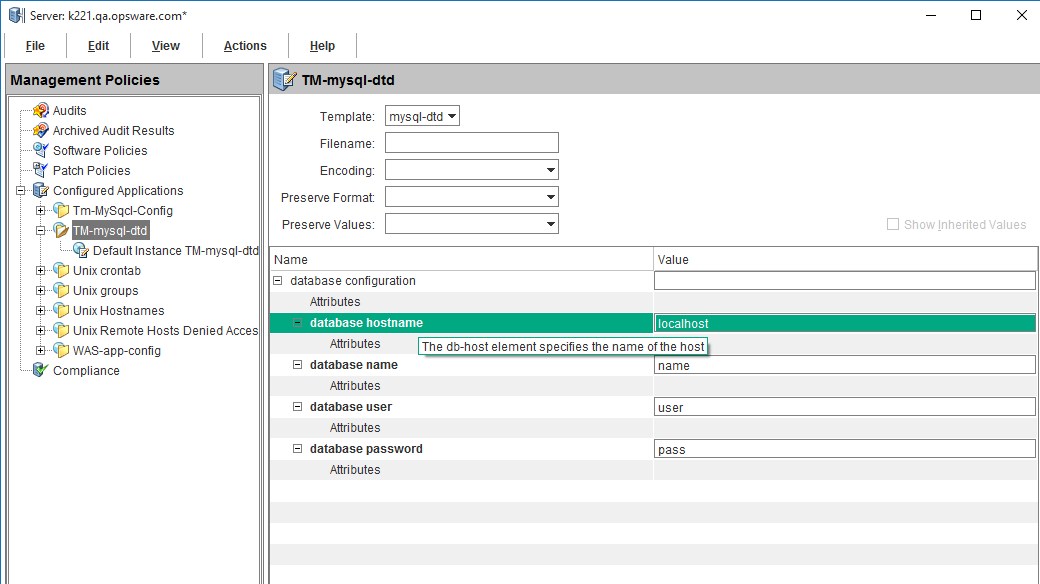
- Leave the application configuration displayed for the next step.
7. Edit values and push the configuration
The last step is to edit values in the value set editor and then push the configuration to the server. When you push an application configuration, all the values in the value set replace the values in the configuration files on the target managed servers. All scripts in the application configuration are also executed. If the configuration file does not exist on the target server, the file is created as part of the push.
To edit values and push the application configuration:
- Make sure that the server instance level value set is displayed by selecting the “value set 1 for mysql.xml” node in the navigation pane.
- Modify the password value under the Value column.
- Select Save Changes.
- Select Preview to display the difference between the existing configuration file on the server and the configuration file that will be pushed to the server.
- After examining the comparison screen, select the Close button.
- Select Push. This displays the Push Configurations wizard.
- Select Start Job. This starts the push operation.
- Examine the Job Status of the push job. Select any step to display details on that step.
- When the job completes, select the Close button.
- You can log on to the server and examine the
mysql.xmlconfiguration file to verify that it was updated on the server.