


XML Tutorial 1 - Create a non-DTD XML configuration template
This tutorial shows how to create a configuration template for a non-DTD XML configuration file. It shows you how to create a configuration template using XML syntax, add it to an application configuration and then attach the application configuration to a managed server. Then you will import values from the mysql.xml configuration file on your managed server, make changes to some of those values, and push the new configuration file back to the managed server.
This tutorial is based on the Travel Manager example application described at Example: Travel manager application and XML configuration file.
Sample non-DTD XML mysql.xml file
Below is the contents of the XML configuration file for the travel manager application:
<?xml version="1.0" ?>
<db-config>
  <db-host>localhost</db-host>
  <db-name>wrightevents</db-name>
  <db-user>root</db-user>
  <db-password>hp-pass</db-password>
</db-config>
1. Create an XML configuration template
Create a configuration template based on the mysql.xml configuration file using the SA Client.
- From the SA Client navigation pane, select Library and then select the By Type tab.
- Open the Application Configuration node, then open the Templates node. This shows all the operating system groups.
- Open an operating system node and select a specific operating system under one of the operating system nodes. For this example, select the operating system of one of your servers where you can install this application configuration.
- From the Actions menu, select New.
- In the Properties view, enter the following information:
- Name: TM-MySql
- Description: This is the template for the mysql.xml configuration file for the Travel Manager application.
- Location: You can leave the default location in the SA Library of /, or select another location to store your template file. Note that the customer setting of the folder containing the template must include the customer setting of the application configuration object. Otherwise the template will not be included in the list of available templates. For more information on folder settings, see the “Folder Permissions” section in the SA
- Version: 0.1.
- Type: Template file
- Parser Syntax: XML Syntax
- OS: Select all the operating systems that the configuration template can be installed on.
- Select File > Save.
- Keep the Template window open for the next task.
2. Add XML settings
Since the XML configuration file mysql.xml provides most of the structural settings needed to parse the file’s contents, an XML configuration template in SA only requires three pieces of information in an XML comment: ACM-NAMESPACE, ACM-FILENAME-KEY and ACM-FILENAME-DEFAULT.
-
Select the Content view in the navigation pane.
<!--
ACM-NAMESPACE = /TravelManager
ACM-FILENAME-KEY = /files/TravelManager
ACM-FILENAME-DEFAULT = /var/www/html/we/mysql.xml
--> - Copy and paste the following XML into the Content pane:
- Select the Validate button to make sure the XML is valid.
- Select the File Save menu to save your template.
- Select the File Close menu.
These XML lines define the following:
ACM-NAMESPACE: Specifies a unique name space which is required for each configuration template. In this example, since a name space for the Travel Manager application has already been established, you could reuse the root name space and append the service name. For example:ACM-NAMESPACE = /TravelManager/web/mysqlACM-FILENAME-KEY: Specifies a path to the key in the name space that stores the file name of the file being generated.ACM-FILENAME-DEFAULT: Specifies the path on the target server where the Travel Manger application’smysql.xmlfile is stored. This can be overridden for specific servers or groups of servers.
3. Create an application configuration to contain the template
In this step, you create an application configuration object to contain your configuration template.
- In the SA Client navigation pane, select Library and then select the By Type tab.
- Open the Application Configuration node, then open the Configurations node. This shows all the operating system groups.
- Open the operating system node and select the same operating system you used when you created the template in the previous steps. The OSs specified for the application configuration must be a subset of the OSs specified for the template.
- From the Actions menu, select New.
- In the Properties view of the File Configuration screen, specify the following properties:
- Name: Tm-MySql-Config
- Description: This is the application configuration for the mySQL configuration file for the Travel Manager application.
- Location: You can leave the default folder location in the SA Library of /, or select another folder to store your application configuration. Note that the customer setting of the folder containing the application configuration must include the customer setting of the managed servers where you intend to push the application configuration. For more information on folder settings, see the “Folder Permissions” section in the SA
- Version: 0.1.
- OS: Select one or more operating systems of managed servers that the application configuration can be installed on.
- Select Configuration Values.
- Select the add button “+” or the Actions > Add menu to add the template.
- In the Select Configuration Template screen, select the TM-MySql template and then select OK. This adds the template to the application configuration object.
- Select File > Save and then File > Close. The application configuration and the configuration template inside of it are ready to be attached to a server where the configuration file is stored.
4. Attaching the Application Configuration to a managed server
Now that you have created the configuration template and application configuration object, you need to attach the application configuration to the server where the Travel Manager application is installed and specify the path to where the mysql.xml file is stored on the managed server.
To attach the application configuration to a server:
- From the SA Client navigation pane, select Devices, then select Servers > All Managed Servers.
- Locate a server where you can simulate installing the Travel Manager application configuration. The server’s operating system must match one of the operating systems specified in the application configuration.
- Select the server, and from the Actions menu, select Open.
- In the server screen, select the Management Policies tab.
- In the navigation pane, select Configured Applications. This displays the application configurations that are attached to the server.
- Select the Installed Configurations tab.
- From the Actions menu, select Add Configuration.
- In the Select Application Configuration screen, select the Tm-MySql-Config application configuration.
- In the Instance Name field, enter “Default mysql config values”. This creates a value set at the server instance level. For details, see Value Set Editor at the server level.
- Select OK. The application configuration is now attached to the server.
- Select the Save Changes button. Leave the server screen open for the next step.
The following figure shows the Tm-MySql-Config application configuration attached to the server and the “Default mysql config values” value set. This value set is at the server instance level.
Application Configuration Attached to a Server, with the Value Set at the Server Instance Level Highlighted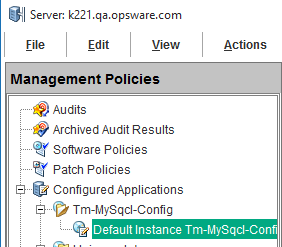
Note
Note that at this point, if the server you are adding the application configuration to has more than one instance of the mysql.xml configuration file because the server is hosting several instances of the application, you can right-click the “Default mysql config values” node of the configuration and select Duplicate. This creates another value set where you can set the file name path to point to the other instance of the application. For more information on the different levels of value sets, see Value set levels and value set inheritance.
5. Configure Application Configuration settings for the server
Now that you have attached the application configuration to the managed server, you need to configure it for the server and set values for the configuration file.
To import the values from the configuration file as described below, copy and paste the XML listed in Sample non-DTD XML mysql.xml file into the target file
/var/www/html/we/mysql.xml on your managed server. This will enable the import values step below.
- Expand the Tm-MySql-Config node to show the value set at the server instance level. This value set is named “Default mysql config values”.
- From the Contents pane, configure the following settings in the application configuration’s Value Set Editor:
- Filename: The original path and file name of the target XML file on the managed server is displayed to the right of the Filename field. This value is the same value for FILENAME-DEFAULT defined in the template. If this path name is acceptable for this server, you can leave this field empty. If you want the configuration file placed in a different location on this server, set the correct path to the target XML file on the target server in the Filename field.
- Encoding: Select the character encoding for the managed configuration file. The default encoding is the encoding used on the managed server. (Note that UTF-16 encoding is not supported.)
- Preserve Format: Select this option if you want to keep comments and preserve as much of the ordering and spacing of the original XML configuration file from the target server. SA will preserve as much of the target file as possible. For more information, see Setting fields in the Value Set Editor.
- Preserve Values: To preserve the values contained in the actual configuration file on the server when no value is provided in a value set, select Yes for this option. With this option set to Yes, the target file’s values will be used unless overridden by values at any level of the inheritance hierarchy. If this option is set to No, and no value exists in the value set, no entry will be placed in the configuration file. For more information, see Setting fields in the Value Set Editor.
- Show Inherited Values: Select this option to show the values in the value set and the inheritance level. When unchecked, only the values set at the current inheritance level are displayed. When checked, all values in the value set are displayed, those set at the current level and those that are inherited. This view is read-only.
- Right-click inside the value set editor and select Import Values. Importing values will read the XML file on the managed server and copy the XML file’s contents to the value set at the server instance level.
- To save changes, select the Save Changes button. Leave the server screen open for the next step.
6. Editing values and pushing the configuration
The last steps are to edit values in the value set editor and then push the configuration to the server. When you push an application configuration, all the values in the value set replace the values in the configuration files on the target managed servers. Any scripts contained in the application configuration are executed based on what type they are. If the configuration file does not exist on the target server, the file is created when you perform the push.
To edit values and push the application configuration:
- Modify one or more values of the value set by editing in the Value column. For a description of the columns, see Columns in the Value Set Editor.
- After you have set values for the application configuration, select Preview to see the existing file on the server and the file that would be pushed to the server.
- Select Push to copy the new application configuration to the server.
- In the Push Configuration screen, select Start Job. Examine the status and results of the push job.