


Administer application settings
You can manage the application settings that determine how Application Deployment functions.
To modify the application settings:
- Go to the Administration screen (click Administration in the lower left corner).
- In the left pane, select Application Settings.
- Modify one or more of the following settings:
- Click Save to save your changes
You must have permission to Manage Application Deployment to modify these settings.
Version numbering
This group contains the following three settings:
Initial version
Specifies how the initial version of a release should be named or numbered. The default is 1. If you specify a number, Application Deployment will attempt to increment that number each time that it creates a new version.
The value that you specify here will appear in the Version box in the Create New Version dialog whenever a user creates the very first version of the release. The user can override the initial value.
Version context
Specifies how the version label should be constructed.
Select Use Release Name if you want to concatenate the release name with the Initial Version number to form the version label.
Software deploy method
Select the default method for deployment of Code and Package components.
Whenever you create a new version, Application Deployment creates a package that contains the files or package specified and any scripts required. In addition, you can specify one of the following options:
- Attach Policy as Default – Also create a policy when a new version is created; when this version is deployed, attach and remediate this policy on each target server.
- Install Package as Default – Perform an “ad hoc” install of the package on each target server.
- Always Attach Policy – Always create a policy; attach, and remediate.
- Always Install Package – Always perform an “ad hoc” install of the package.
If you select one of the “as Default” options, the user can override the Deploy Method when creating or editing components (see Components).
If you select one of the “Always” options, the “Locked” indicator is displayed, and the user cannot override the Deploy Method.
Just-in-time targets flow
This setting specifies the Operations Orchestration (OO) flow that Application Deployment will use to create just-in-time targets at deployment time (see Just-in-time targets).
This flow must exist in your OO library. For more information, see Finding and selecting an item in the library.
This setting is only available when SA is configured to integrate with OO.
Code and configuration file component base directories
These settings enable you to create separate “sandboxes” for Code and Configuration File component deployment. This is useful when you want files created by these components to only be installed in controlled file system locations.
The following example describes how the sandboxing mechanism works for a Code component. It works the same way for Configuration File components.
How it works
When sandboxing is enabled, you can specify a list base directories (sandboxes) for Code components and Configuration File components. These directories then appear in the Base Path drop-down list in the component properties editor on the Applications tab.
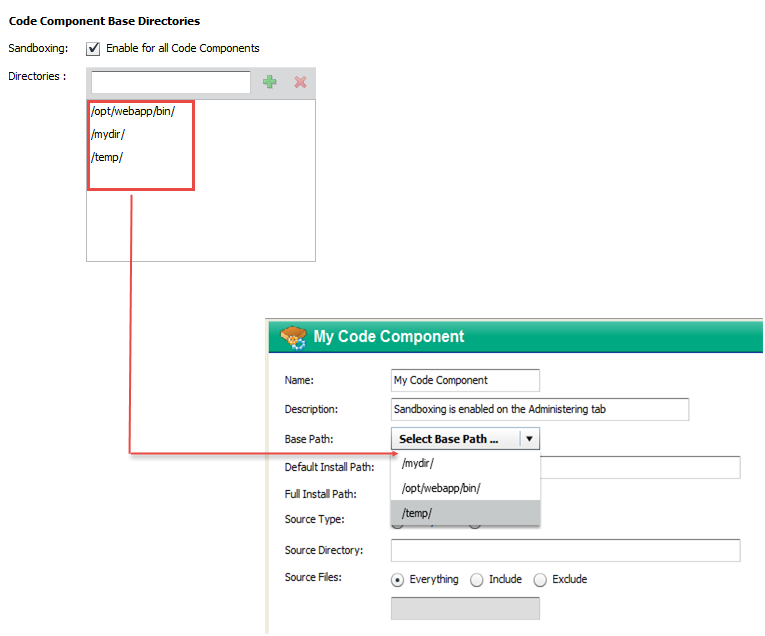
In the Code component, the selected Base Path is combined with the specified Default Install Path to form the Full Install Path—where the files will be placed on the target.
Code component with sandboxing
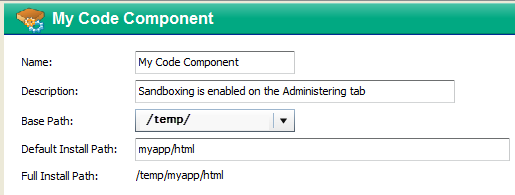
When sandboxing is enabled, the application designer must specify a Base Path when creating a Code or Configuration File component. A version cannot be created for release that contains a Code or Configuration File component whose Base Path has not been specified (when sandboxing is enabled).
If you remove a Base Directory that is used by a component in an existing release, new versions of that release cannot be created until a new Base Path is specified in the component. Existing versions, however, can still be deployed.
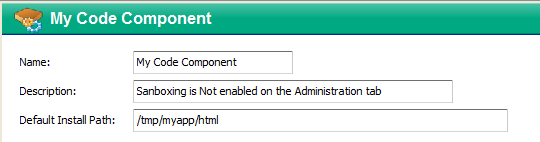
When sandboxing is not enabled, the Base Path and Full Install Path fields do not appear in the Code component properties editor.
Code components without sandboxing
How to configure
You can configure sandboxing for Code components, Configuration File components, or both.
To configure sandboxing:
- In the left pane of the Administration screen, select Application Settings.
- In the right pane, select one or both of the following options:
- Enable for all Code Components
- Enable for all Configuration File Components
- For each component type that you want to sandbox, follow these steps:
- Click Save to save your changes
To remove an existing base path directory:
- In the Directories box, select an existing directory.
- Click Remove directory choice.
- Click Save to save your changes.
You can only modify the Directories list when sandboxing is enabled.
Global parameters
Global parameters are available to all applications. SA users who have permission to create applications or edit a specific application can reference global parameters when specifying the default value of a component parameter or the value of a release parameter (Parameters and Special variables see Parameters and special variables).
SA users who have Deploy permission for an application and Write permission for the pertinent environment can use global parameters to override the default parameter values at deployment time by following similar steps in the Parameter Editor (see Customize deployment parameters).
To define or modify a global parameter:
- On the Application Settings page, scroll down to the Global Parameters table.
- To add a new global parameter, follow these steps:
- Click Add New Global Parameter.
- Enter the Name of your new global parameter. The name must be unique among the global parameters. The name cannot include any of these characters: @, \, {, or }.
- Click OK.
- Click anywhere in the Value column for this parameter.
- Specify the value of the parameter (for detailed instructions, see Specifying the value of a parameter).
You can reference special variables and other global parameters in the value specification. For example: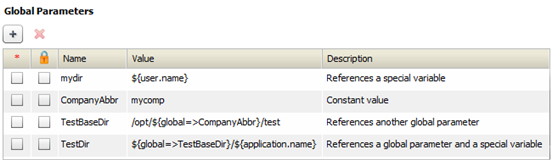
- Optional: To encrypt the parameter value, select the box in the
 (encrypted) column.
Note that the (required) column is not pertinent in this context.
 - Click Save on the tool bar to save your changes.
You can also delete any global parameter that is not currently referenced by any other parameter.
To delete a global parameter:
- In the Global Parameters table, select the parameter that you want to delete.
- Click Delete Global Parameter. A confirmation dialog appears.
- Click Yes to confirm the delete.
- Click Save on the tool bar to save your changes.