


Integrate CSA with CA SiteMinder
CSA, as well as SiteMinder (also called CA Single Sign-On) with a reverse proxy solution, must already be installed and configured before you can integrate them. The LDAP server shared by CSA and SiteMinder must be configured for the CSA provider and consumer organization (from the Cloud Service Management Console) before integration between CSA and SiteMinder is started.
SiteMinder is made up of several components that work with CSA and your LDAP server to provide secure access. The information provided in this section configures CSA to work with a reverse proxy solution, as shown in the following diagram.
Note When CSA is integrated with SiteMinder, and CAC or SiteMinder is enabled, secondary authentication is not supported against keystone. In this case, Openstack providers cannot be used with SiteMinder. You must set idm.keystone.enabled to false.
Supported CA SiteMinder Deployment Architecture Diagram

For more information about how to install and configure CA SiteMinder for a reverse proxy solution, refer to the Configure Reverse Proxy Servers section in the Web Agent Configuration Guide (a Web Agent guide). Documentation for SiteMinder can be found using the following URL:
https://support.ca.com/irj/portal/anonymous/DocumentationSearch
Complete the following steps to integrate CSA and SiteMinder:
- Configure the CSA Provider Organization's LDAP Server
- Configure the CSA Consumer Organization's LDAP Server
- Configure the SiteMinder Policy Server for CSA Integration
- Configure the SiteMinder Web Agent for CSA Integration
- Configure CSA for SiteMinder Integration
Configure the CSA Provider Organization's LDAP Server
You must configure the CSA provider organization to use the same LDAP server used by the SiteMinder Policy Server. If you do not configure this access point before integrating CSA and SiteMinder, you will not be able to access CSA after integration.
Caution
LDAP must be configured for the CSA
provider organization before
you begin the integration between CSA and
SiteMinder. After integrating CSA and
SiteMinder, you can only log in to the Cloud Service Management Console via SiteMinder
using a valid user from this LDAP directory. The
CSA built-in users can no longer be used to log in to
CSA.
When using the REST API, the built-in CSA
users are still valid after integration.
To configure the provider organization's LDAP server, do the following:
-
Launch the Cloud Service Management Console by typing the following URL in a supported web browser:
https://<csahostname>:8444/csawhere<csahostname>is the fully‑qualified domain name of the system on which the Cloud Service Management Console resides.Launch the Cloud Service Management Console using an IPv6 address by typing the following URL in a supported web browser:
https://<ipv6_address>:8444/csa/login -
Log in to the Cloud Service Management Console as a CSA Administrator.
-
Click the Administration tile.
- In the left-navigation frame, select the provider organization.
- From the provider organization's navigation frame, select LDAP.
- Update the LDAP server information.
-
Click Save.
Configure the CSA Consumer Organization's LDAP Server
You must configure each CSA consumer organization to use the same LDAP server used by the SiteMinder Policy Server. If you do not configure this access point, no one will be able to access the Marketplace Portal.
To configure a consumer organization's LDAP server, do the following:
-
Launch the Cloud Service Management Console by typing the following URL in a supported web browser:
https://<csahostname>:8444/csawhere<csahostname>is the fully‑qualified domain name of the system on which the Cloud Service Management Console resides.Launch the Cloud Service Management Console using an IPv6 address by typing the following URL in a supported web browser:
https://<ipv6_address>:8444/csa/login -
Log in to the Cloud Service Management Console as the CSA Administrator.
-
Click the Administration tile.
- In the left-navigation frame, select a consumer organization.
- From the consumer organization's navigation frame, select LDAP.
- Update the LDAP server information.
- Click Save.
- Repeat these steps for every consumer organization configured in CSA.
Configure the SiteMinder Policy Server for CSA Integration
Complete the following steps to configure the SiteMinder Policy Server for CSA integration.
-
Navigate to Control Panel > Administrative Tools > Services.
-
Right-click on the HPE Marketplace Portal service and select Stop.
- Configure the SiteMinder Policy Server to use the LDAP server that will be shared between CSA and SiteMinder.
-
Configure the SiteMinder Policy Server idle timeout, the Cloud Service Management Console session timeout, and the Marketplace Portal session timeout to be the same amount of time, regardless of the units (minutes or seconds) used by the parameters in the respective configuration files. By default, the session timeout value for the Cloud Service Management Console is 60 minutes, and for the Marketplace Portal, it is 1800 seconds.
The session timeout for the Cloud Service Management Console is configured using the
session-timeoutparameter in theCSA_HOME/jboss-as/standalone/deployments/csa.war/WEB-INF/web.xmlfile:...
<session-config>
...
<session-timeout>60</session-timeout>
... -
To process image file names that contain spaces, from the SiteMinder Policy Server, either comment out the
BadUrlCharsparameter or modify the SiteMinder Policy Server to allow image file names that contain spaces. -
Navigate to Control Panel > Administrative Tools > Services.
-
Right-click on the HPE Marketplace Portal service and select Start.
Configure the SiteMinder Web Agent for CSA Integration
Configure proxy mapping for the SiteMinder Web Agent. To configure proxy mapping:
-
Map the
/csaproxy to the CSA deployment.Caution Use only
/csaas the alias. Using another alias may cause CSA to fail.For example:
ProxyPass /csa/ https://<csahostname>:8444/csa/
ProxyPassReverse /csa/ https://<csahostname>:8444/csa/ -
Map the
/idm-serviceproxy to the Identity Management component deployment. For example:ProxyPass /idm-service/ https://<csahostname>:8444/idm-service/
ProxyPassReverse /idm-service/ https://<csahostname>:8444/idm-service/ -
Map the
/mppproxy to the Marketplace Portal deployment. For example:ProxyPass /mpp/ https://<csahostname>:8090/mpp/
ProxyPassReverse /mpp/ https://<csahostname>:8090/mpp/Note The port number must match the value configured for the
portattribute of theproxyelement in theCSA_HOME/portal/conf/mpp.jsonfile. By default, this port is 8090.
If you are configuring a remote instance of the Marketplace Portal, use the hostname of the system on which the remote instance of the Marketplace Portal is installed.
Configure CSA for SiteMinder Integration
To configure CSA for SiteMinder integration, you must:
- Stop CSA
- Configure the Cloud Service Management Console
- Configure the Marketplace Portal
- Configure the Identity Management component
- Start CSA
Stop CSA
See Stop CSA for instructions.
Configure the Cloud Service Management Console
Complete the following steps to configure
the Cloud Service Management Console for a
SiteMinder reverse proxy solution. Update the applicationContext-security.xml file:
-
Navigate to the
CSA_HOME/jboss-as/standalone/deployments/csa.war/WEB-INFdirectory where
. For example:CSA_HOMEis the directory in which CSA is installed.Windows:
C:\Program Files\HPE\CSA\jboss-as\standalone\deployments\csa.war\WEB-INFLinux:
/usr/local/hpe/csa/jboss-as/standalone/deployments/csa.war/WEB-INF - Make a backup copy of the
applicationContext-security.xmlfile. - Open the
applicationContext-security.xmlfile in a text editor. -
Locate the comment
SiteMinder Configurationand uncomment the following content:<http pattern="/dashboard/index.jsp" use-expressions="true" entry-point-ref="idmEntryPoint"> <intercept-url pattern="/dashboard/index.jsp" access="isAuthenticated()"/> <custom-filter ref="tokenValidityFilter" before="PRE_AUTH_FILTER" /> </http> -
Locate the
<beans:constructor-arg value="/ssologout.jsp"/>and uncomment. -
In the same section of the file, comment out the following content (if it is not already commented out):
<beans:constructor-arg value="/logout.jsp"/> - Save and exit the file.
-
Navigate to the
classessubdirectory (CSA_HOME/jboss-as/standalone/deployments/csa.war/WEB-INF/classes). - Open the
csa.propertiesfile in a text editor. -
Edit the following line to configure the URL to display for the organization in the Cloud Service Management Console:
csa.subscriber.portal.url={protocol}://{host}:8089/org/{orgName}You can define a hard-coded URL or a URL that is replaced by information as known by the client-side browser. The following tokens are supported:
protocol(httporhttps),host(the host in the browser URL used to access the Cloud Service Management Console), andorgName(the organization name of the selected organization in the browser). For example, if the client URL ishttps://csa-server.company.com:8444/csa, for a selected organization named devteam, then after the token replacement, the client displays a URL ofhttps://csa-server.company.com:8089/#/login/devteam. No port is defined, and the mpp context is added to the URL. The context should be the same as is defined for the Marketplace Portal in thempp.jsonfile. -
Locate the comment
Needed for SSOand uncomment the following content:enableSSO=true - Save and exit the file.
Configure the Marketplace Portal
Complete the following steps to configure the Marketplace Portal for a SiteMinder reverse proxy solution.
-
Open the
CSA_HOME/portal/conf/mpp.jsonfile in a text editor. -
In the
idmProvidersection, forreturnUrl, changeproxyto the IP address of the SiteMinder Web Agent proxy and addredirectUrlwith its value set to the IP address of the SiteMinder Web Agent proxy:"idmProvider": {
...........
"returnUrl": "https://{proxy}/mpp",
"redirectUrl": "https://{proxy}",
............
}For example:
"idmProvider": {

    ...........

   "returnUrl": "https://101.32.24.101/mpp",
   "redirectUrl": "https://101.32.24.101",
   ............
} -
Enable the proxy element to be used by the SiteMinder Web Agent by setting
enabledtotrueas follows:"proxy": {
"enabled": true,
"port": 8090,
"contextPath": "/mpp"
}To enable single sign-on for the Marketplace Portal, you must also set up proxy mapping on the SiteMinder Web Agent for the Marketplace Portal and for the Identity Management component service. The proxy mapping for the Marketplace Portal must use the same context name (
/mpp) and port (8090) as defined here.
Configure the Identity Management component
Complete the following steps to configure the Identity Management component for a SiteMinder reverse proxy solution.
Note If you wish to configure SiteMinder without HP SSO, do the following in this order:
- Follow the instructions to manually disable HP SSO, see "Disable Single Sign-On" in Integrate with HP Single Sign-On.
- Continue to follow the steps below, but you should skip steps 4, 6, and 9. These steps are only relevant when HP SSO is used in CSA (HP SSO is enabled by default).
- Navigate to the
CSA_HOME/jboss-as/standalone/deployments/idm-service.war/WEB-INF/springdirectory. - Make a backup copy of the
applicationContext-security.xml,applicationContext.xmlandapplicationContext.propertiesfiles. - Open the
applicationContext-security.xmlfile in a text editor. -
(Skip this step if HP SSO has been disabled manually.) Locate the
START SiteMinder SSO (with HP SSO)section and uncomment the following content:<security:http pattern="/idm/v0/login" use-expressions="true" auto-config="false"> <security:http-basic /> <security:csrf disabled="true" /> <security:custom-filter ref="requestTokenCompositeFilter" position="FIRST" /> <security:custom-filter ref="hpssoProvidedFilter" before="PRE_AUTH_FILTER" /> <security:custom-filter ref="hpssoIntegrationFilter" after="PRE_AUTH_FILTER" /> <security:custom-filter ref="ssoHeaderFilter" before="CAS_FILTER" /> <security:custom-filter ref="ssoFilter" before="LAST" /> <security:custom-filter ref="noPromptFilter" position="LAST" /> </security:http><bean id="ssoFilter" class="com.hp.ccue.identity.filter.sso.SSOFilter"> <property name="generateTokenUtil" ref="generateTokenUtil" /> <property name="tokenFactory" ref="tokenFactory" /> <property name="loginRedirectionHandler" ref="loginRedirectionHandler" /> <property name="tokenWriter" ref="hpssoTokenWriter" /> <property name="userAndRepFactory" ref="siteMinderUserAndRepFactory" /> <property name="groupMembershipHeader" value="${idm.sso.group_membership_header}"/> <property name="groupMembershipDelimiter" value="${idm.sso.group_membership_delimiter}"/> <property name="defaultTenantOrganization" value="${idm.sso.default_tenant_org}" /> <property name="enableDefaultOrg" value="${idm.sso.enable_default_org}" /> <property name="headerMetadataMap" ref="customHeaderMapping"/> </bean><util:map id="customHeaderMapping" map-class="java.util.HashMap"> <entry key="header1" value="metadataName1" /> <entry key="header2" value="metadataName2" /> </util:map> -
Locate the
START SiteMinder SSO (all)section and uncomment the following content:<security:authentication-manager id="ssoAuthManager"> <security:authentication-provider ref="ssoAuthenticationProvider"/> </security:authentication-manager><bean id="ssoHeaderFilter" class="org.springframework.security.web.authentication.preauth.RequestHeaderAuthenticationFilter"> <property name="principalRequestHeader" value="${idm.sso.username_header}"/> <property name="authenticationManager" ref="ssoAuthManager" /> <property name="exceptionIfHeaderMissing" value="true" /> </bean> -
(Skip this step if HP SSO has been disabled manually.) Locate the
START HP SSO ONLY Configurationsection and comment out the following content:<security:http auto-config="false" pattern="/idm/v0/login" use-expressions="true"> <security:csrf disabled="true"/> <security:custom-filter position="FIRST" ref="requestTokenCompositeFilter"/> <security:custom-filter before="PRE_AUTH_FILTER" ref="hpssoProvidedFilter"/> <security:custom-filter after="PRE_AUTH_FILTER" ref="hpssoIntegrationFilter"/> <security:custom-filter before="FORM_LOGIN_FILTER" ref="noPromptFilter"/> <security:http-basic/> </security:http><security:http auto-config="false" pattern="/idm/v0/logout" use-expressions="true"> <security:csrf disabled="true"/> <security:custom-filter position="FIRST" ref="requestTokenCompositeFilter"/> <security:custom-filter before="PRE_AUTH_FILTER" ref="hpssoProvidedFilter"/> <security:custom-filter after="PRE_AUTH_FILTER" ref="hpssoIntegrationFilter"/> <security:http-basic/> </security:http> -
Locate the
START Simplified Logout Configurationsection and uncomment the following content:<!-- START Simplified Logout Configuration --> <!-- <security:http pattern="/idm/v0/logout" use-expressions="true" auto-config="false"> <security:csrf disabled="true" /> <security:custom-filter ref="simpleLogoutRedirect" position="FIRST"/> <security:http-basic /> </security:http> <security:http pattern="/idm/v0/logout/close" use-expressions="true" auto-config="false"> <security:csrf disabled="true" /> <security:custom-filter ref="hpssoIntegrationFilter" after="PRE_AUTH_FILTER"/> <security:http-basic /> </security:http> <bean id="simpleLogoutRedirect" class="com.hp.ccue.identity.filter.RedirectFilter"> <property name="url" value="/idm/v0/logout/close"/> </bean> <!-- END Simplified Logout Configuration --> - Open the
applicationContext-v0.xmlfile in a text editor. - Open the
applicationContext.xmlfile in a text editor. -
Locate the
START SiteMinder SSO Configurationsection and uncomment the following content:<bean id="ssoAuthenticationProvider" class="org.springframework.security.web.authentication.preauth.PreAuthenticatedAuthenticationProvider"> <property name="preAuthenticatedUserDetailsService"> <bean id="userDetailsServiceWrapper" class="org.springframework.security.core.userdetails.UserDetailsByNameServiceWrapper"> <property name="userDetailsService" ref="ssoPreAuthenticatedUserDetailsService" /> </bean> </property> </bean> <bean id="ssoPreAuthenticatedUserDetailsService" class="com.hp.ccue.identity.filter.sso.SSOUserDetailsServiceImpl"> <property name="restRole" value="ROLE_REST" /> </bean> - Open the
applicationContext.propertiesfile in a text editor. -
Locate the property
idm.sso.username_headerand change its value toSM_USER:idm.sso.username_header=SM_USER
Start CSA
See Start CSA for instructions.
Launch the Marketplace Portal
After completing the Marketplace Portal changes and restarting
CSA, launch
the Marketplace Portal using the URL:
https://<proxy_server_ip>/mpp/. Depending on the Web agent
configuration being used, a proxy server port may be required.
Note If the single sign-on prompt appears multiple times when accessing the Marketplace Portal, you may need to configure the Marketplace Portal to use the fully-qualified domain name of the SiteMinder Web Agent.
Customize the Marketplace Portal Landing Page (Optional)
When accessing the Marketplace Portal during a single sign-on session, the user lands on the landing page displaying a button to be clicked to get to the Marketplace Portal dashboard. By default, the button is labeled "Log In." This might cause confusion as the authentication has already been completed using a single sign-on login prompt. To avoid this confusion, the label of the button can be modified:
-
Edit the
CSA_HOME/portal/node_modules/mpp-ui/dist/locales/<locale>/rb.jsonfile. The location of the file depends on the locale being used. For example, for English, the file isCSA_HOME/portal/node_modules/mpp-ui/dist/locales/en/rb.json:Modify the label of the login button. For example, to change the label to "Click to continue," make the following modification:
"login": {

.......

"login": "Click to continue",

.......

} -
Restart the HPE Marketplace Portal service:
Windows:
- Navigate to Control Panel > Administrative Tools > Services.
- Right-click on the HPE Marketplace Portal service.
- Select Restart.
Linux:
From a command prompt, type
service mpp restart.
Customize the Logout Page (Optional)
After clicking the Log out link from the Cloud Service Management Console
or the Marketplace Portal, the user is directed to a logout page. This
page is customizable.
The following is the name and location of the logout file. There is one file for the Cloud Service Management Console and another file for the Marketplace Portal.
-
Cloud Service Management Console:
CSA_HOME/jboss-as/standalone/deployments/csa.war/ssologout.jspwhere
. For example:CSA_HOMEis the directory in which CSA is installed.Windows:
C:\Program Files\HPE\CSA\jboss-as\standalone\deployments\csa.war\ssologout.jspLinux:
/usr/local/hpe/csa/jboss-as/standalone/deployments/csa.war/ssologout.jsp -
Marketplace Portal:
CSA_HOME/portal/node_modules/mpp-ui/dist/locales/en/rb.jsonwhere
. For example:CSA_HOMEis the directory in which CSA is installed.Windows:
C:\Program Files\HPE\CSA\portal\node_modules\mpp-ui\dist\locales\en\rb.jsonLinux:
/usr/local/hpe/csa/portal/node_modules/mpp-ui/dist/locales/en/rb.jsonIn the above example, the
rb.jsonfile is for the English locale (language) and is therefore in theenfolder.You customize the logout message for your locale by modifying the
youAreOuttext. For example, for English locales, you can modify the text as follows:"logout":{
...
"youAreOut": "Please close your browser window. This prevents the possibility of someone pressing the ''Back'' button on your browser and possibly viewing confidential information.",
...
},For other locales, modify the corresponding
rb.jsonfiles.
Note
By default, after logging out, the user must close the Web browser to completely clear the SiteMinder session.
The logout page can be customized to point to a SiteMinder logout page if one is
available.
Configure the Marketplace Portal to Use the Fully-Qualified Domain Name of the SiteMinder Web Agent (Optional)
The single sign-on prompt might appear multiple times when trying to access the Marketplace Portal when the domain name generated in the SiteMinder cookie (SMSESSION) does not match the address that is used to access the Marketplace Portal. If this problem occurs, do the following:
- If the system (from which the browser that accesses the Marketplace Portal is launched) is unable to recognize the fully-qualified domain name of the SiteMinder Web Agent, update the system configuration to define an alias for the fully-qualified domain name to the IP address of the SiteMinder Web Agent. For example, define an alias in the host file.
-
On the system on which the Marketplace Portal is installed, do the following:
-
Update the following properties in the
CSA_HOME/portal/conf/mpp.json"idmProvider": {
.......
"returnUrl": "https://<FQDN_OF_SITEMINDER_WEB_AGENT>/mpp",
"redirectUrl": "https://<FQDN_OF_SITEMINDER_WEB_AGENT>",
.......
} - Update the system configuration to define an alias for the fully-qualified domain name to the IP address of the SiteMinder Web Agent. For example, define an alias in the host file.
- Restart the system. Verify that the HPE Marketplace Portal service has restarted.
-
-
On the system on which CSA is installed, do the following:
- Verify that the Organization URL (the URL used to access the Marketplace Portal) displayed in the Cloud Service Management Console uses the fully-qualified domain name of the SiteMinder Web Agent. To view the Organization URL, from the Cloud Service Management Console dashboard, select the Administration tile. In the left navigation frame, select the organization. In the organization's navigation frame, select General Information.
-
If the Organization URL does not use the fully-qualified domain name of the SiteMinder Web Agent, update the
csa.subscriber.portal.urlproperty in theCSA_HOME/jboss-as/standalone/deployments/csa.war/WEB-INF/classes/csa.propertiesfile. -
If you updated the
csa.subscriber.portal.urlproperty, restart the CSA service:Windows:
- Navigate to Control Panel > Administrative Tools > Services.
- Right-click on the CSA service, and select Restart.
Linux:
From a command prompt, type
service csa restart).
Request Flow
The following diagram shows how a request is processed when CSA and SiteMinder are integrated.
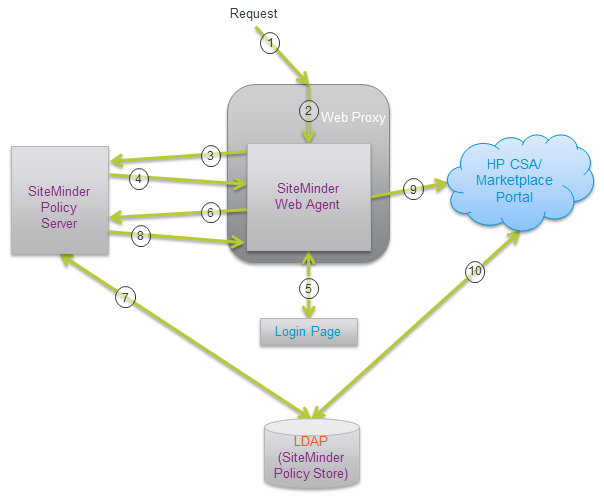
- A user sends a request to launch the Marketplace Portal.
- The request is intercepted by the SiteMinder Web Agent.
- The SiteMinder Web Agent queries the SiteMinder Policy Server to determine if it is a protected URL.
- The SiteMinder Policy Server verifies that the URL is protected.
- The user is redirected by the SiteMinder Web Agent to a login page where the user's credentials are collected.
- The SiteMinder Web Agent sends the user's credentials to the SiteMinder Policy Server for authentication.
- The SiteMinder Policy Server authenticates the user's credentials using the LDAP server (SiteMinder Policy Store).
- The verification of the authenticated user is returned to the SiteMinder Web Agent.
- The SiteMinder Web Agent redirects the user's request to launch the Marketplace Portal, which uses the Identity Management component to generate the necessary token.
- CSA uses the token (included in the X-Auth-Token HTTP header) to perform the authorization. The name of the HTTP header may be different if you customized the
xAuthTokenconfiguration property in thecsa.propertiesconfiguration file.
Additional requests from the user using the same SiteMinder session are automatically directed by the SiteMinder Web Agent to CSA.