


Post-installation tasks
- Configure SAP BusinessObjects Enterprise to ITBA
- Install the Vertica driver in the BusinessObjects Enterprise server
- Deploy the HPE ITOC Reports content pack
- Configure data sources
- ETL management
- Configure secure connection for SAP BusinessObjects server
Configure SAP BusinessObjects Enterprise to ITBA
For information about configuring SAP BusinessObjects Enterprise to ITBA, see the HPE IT Business Analytics Administrator Guide.
Install the Vertica driver in the BusinessObjects Enterprise server
You must install the HPE Vertica driver in the BusinessObjects Enterprise server as follows:
- Get the Vertica JDBC driver from HPBA in the following directory:
%ITBA_HOME%/glassfish/glassfish/domains/BTOA/lib/vertica-jdbc-7.1.1-0.jar
- Copy the driver to the following location in the SAP BusinessObjects Enterprise server:
<BO_INSTALLATION_DIRECTORY>/sap_bobj/enterprise_xi40/dataAccess/connectionServer/jdbc/
- Open the following file:
<BO_INSTALLATION_DIRECTORY>/sap_bobj/enterprise_xi40/dataAccess/connectionServer/jdbc/jdbc.sbo
- Add the JDBCDriver file path to the ClassPath tag in the jdbc.sbo file, as shown below. Add the highlighted content as shown below to the
jdbc.sbofile: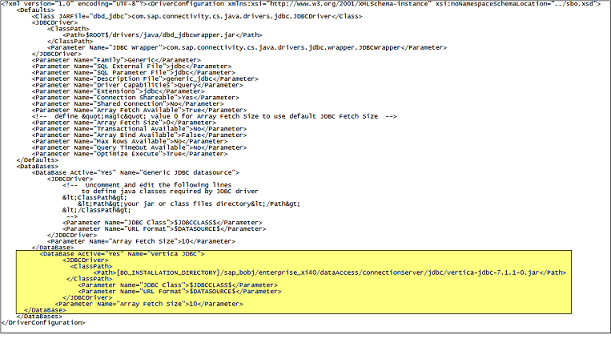
The following example shows the highlighted portion of the above illustration:
<DataBase Active="Yes" Name="Vertica JDBC">
<JDBCDriver>
<ClassPath>
<Path>[BO_INSTALLATION_DIRECTORY]/sap_bobj/enterprise_xi40/dataAccess/connectionServer/jdbc/vertica-jdbc-7.1.1-0.jar</Path>
</ClassPath>
<Parameter Name="JDBC Class">$JDBCCLASS$</Parameter>
<Parameter Name="URL Format">$DATASOURCE$</Parameter>
</JDBCDriver>
<Parameter Name="Array Fetch Size">10</Parameter>
</DataBase> -
Execute the following scripts:
cd <BO_INSTALLATION_DIRECTORY>/sap_bobj
./stopservers
./tomcatshutdown.sh
./startservers
./tomcatstartup.sh
Deploy the HPE ITOC Reports content pack
- Download the HPE ITOC Reports content pack (
HP_ITOC_Reports_1.20_ContentPack.zip)from HPE LN. - Copy the zip file to a temporary folder in your local machine.
- Unzip the
HP_ITOC_Reports_1.20_ContentPack.zipfile after which you can see theCOREandITOCfolders. - Switch user to
ITBA_installer_Username. - With the above sudo user, copy the
COREandITOCfolders to$HPBA_HOME/Content Packs/. - Log in to ITBA as an administrator.
- To deploy the HPE ITOC content pack:
- Navigate to the Data Management panel.
- Click the Install Content Pack tab.
- Select ITOC, and click Install.
- The Install option changes to Upgrade. Click Upgrade.
- You can view the logs at:
$ HPBA_HOME/glassfish/glassfish/domains/BTOA/logs/
Configure data sources
The Data Source page enables you to manage the integration of data into the data warehouse through the activation of data sources. The available data source content packs are registered in the deployment process and can then be activated in the Connect Data Source page.
Add and activate a new data source instance
The process of integrating a data source into the data warehouse is done through activation of the source instance.
- In the ITBA application, select Admin > Data Management > Connect Data Source > Add data source.
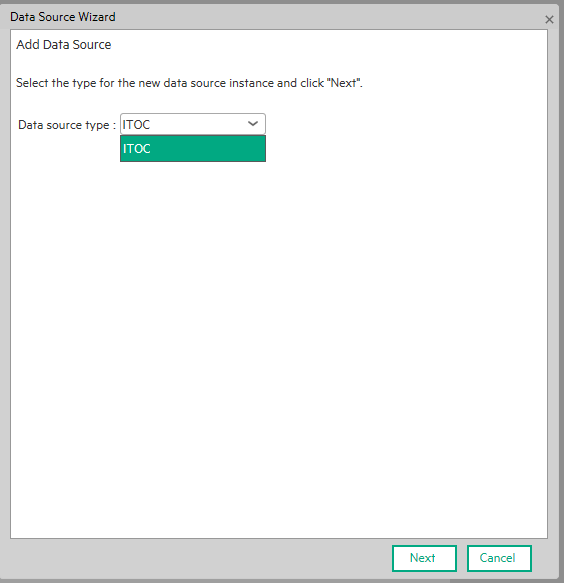
- Click Add data source to open the Data Source wizard. The Add Data Source page opens.
- Select the data source type (ITOC) and click Next. The relevant data source page opens.
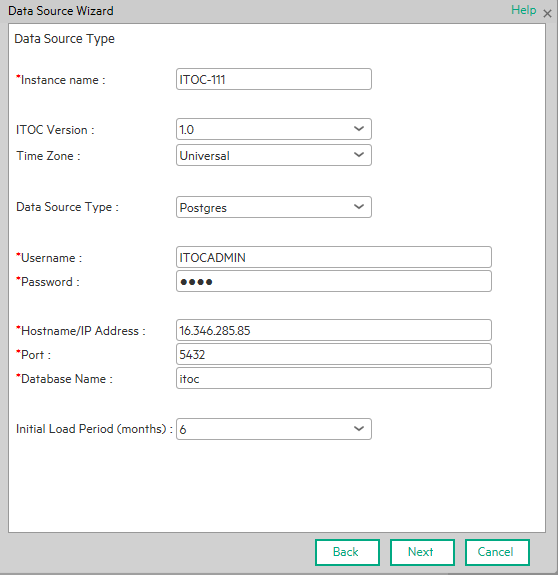
- Enter configuration parameters:
- Enter the instance name. The instance name can be your ITOC name or any name of your choice.
- Select thei ITOC version.
- Select the time zone.
- Select the data source type.
- Enter the database user name.
- Enter the database password.
- Enter the ITOC server host name or IP address.
- Click Next.
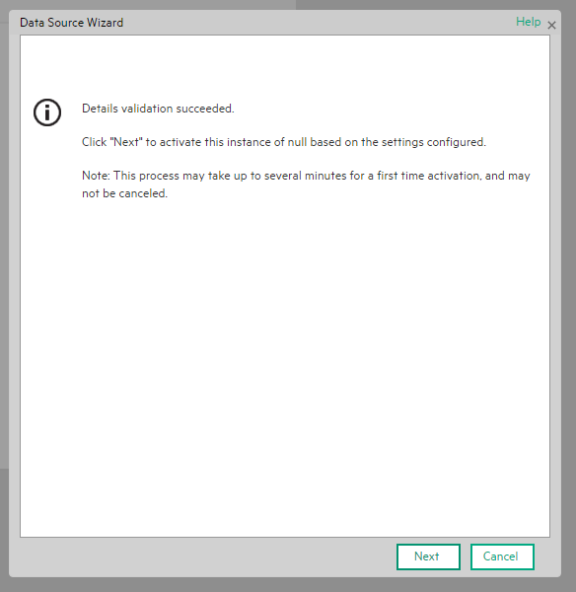
- The data source instance is activated.
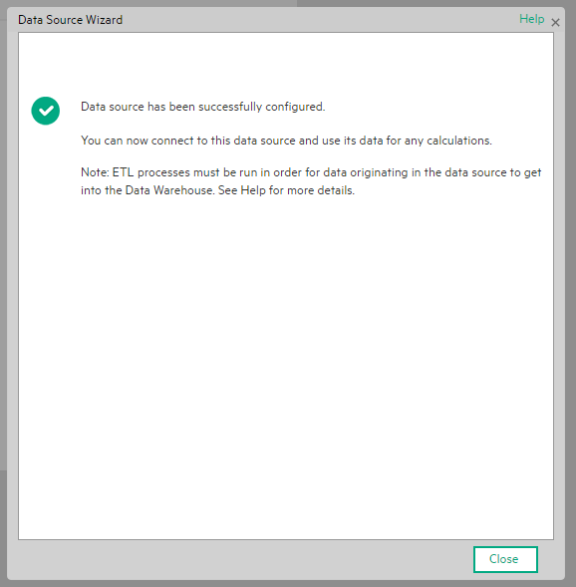
Note: If the first-time activation of a data source instance fails, the instance is displayed in the source list with an Error status. You can then activate the data source by clicking Edit Settings and completing the configuration and activation.
View data source configuration settings
- Select Admin > Data Management > Connect Data Source.
- Click View Settings. The relevant data source page opens.
Edit data source settings and test the connection
- Select Admin > Data Management > Connect Data Source.
- Click Edit Settings, and edit the configuration parameters.
- Click Next to validate your changes and test the connection to the data source.
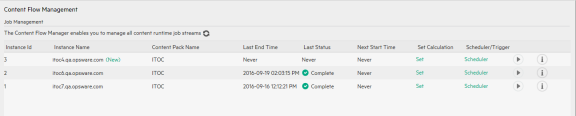
ETL management
After a content pack (CP) is activated, the content pack manager notifies the content flow manager to create a job stream for this CP instance. The job stream includes a series of predefined steps.
Each step is an individual job such as an extractor job or an ETL job. The job executes the back-end process to pull the data from the data source to the data warehouse.
Each content pack instance has an individual job, and each job can run in parallel.
Run a job instance using the Content Flow Manager
- In the ITBA application, select Admin > Data Management > Run ETL.
-
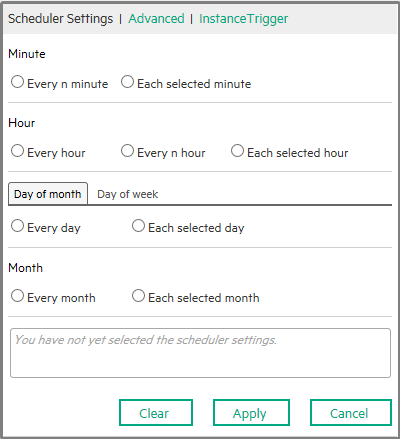
Click Scheduler for the relevant instance:
- Enter the relevant time stamp for scheduling the job instance run. The CronExpression is built in
the box below the options. Click Apply.
View details of the job instance run
- In the ITBA application, select Admin > Data Management > Run ETL.
-
Click the
 icon for the relevant job instance run (you might have to use the scroll bar to see the button). The list of the job instance runs of the instance is displayed. Use the filter to select the runs you want to display.
 - Click the icon for the relevant job instance run. The list of the job instance run steps is displayed.
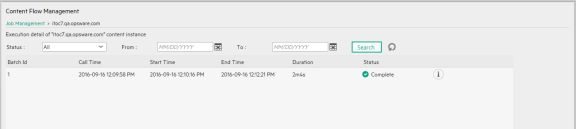
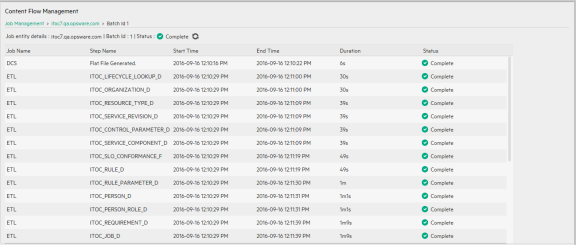
- Click the icon to see the details of jobs run such as job name and status.
Configure secure connection for SAP BusinessObjects server
After the SAP BusinessObjects installation, perform the following steps to configure a secure HTTPS connection.
- Generate the keystore for SAP BusinessObjects Enterprise server. On the SAP BusinessObjects Enterprise server, SSH to theSAP BusinessObjects server and run the following commands in the Tomcat
server.xmlconfig file:keytool -genkey -alias tomcat -keyalg RSA -keystore /home/bocacertsopenssl genrsa -des3 -out /home/server.key 4096openssl req -new -key /home/server.key -out /home/server.csropenssl x509 -req -days 999 -in /home/server.csr -signkey /home/server.key -out /home/server.crtkeytool -import -alias root -keystore /home/bocacerts -trustcacerts -file /home/server.crt
- Edit
<BOE>/sap_bobj/tomcat/conf/server.xml:Remove the comment for the connector with port 8443 and modify it as shown in the following example.
Note: Port 9443 is used in the example; however, you can use any free port in your environment:
…
<Connector port="9443" protocol="HTTP/1.1" SSLEnabled="true"
maxThreads="150" scheme="https" secure="true"
keystoreFile=”/home/bocacerts" keystorePass="<keystore password set in above step>" clientAuth="false" sslProtocol="TLS" />
- Restart Tomcat in the SAP BusinessObjects Enterprise Central Configuration Manager:
- Open the
<BOE>/sap_bobj/folder. - Run the following commands:
./tomcatshutdown.sh./tomcatstartup.sh
- Open the
- Using a database client such as SQuirrel, change the SAP BusinessObjects open doc port in the ITBA management database:
- Postgres DB:
xs_mng - User:
xsadmin - Password:
openview - Table:
fnd.settings_management - SQL script: Update
fnd.settings_management set VALUE = 9443whereCONTEXT = 'bo'andNAME = 'bo.cms.opendoc.port'
- Postgres DB:
- SSH to the ITBA server. Change the SAP BusinessObjects open doc protocol to
httpsin the SAP BusinessObjects settings XML.- Open
<HPBA>/glassfish/glassfish/domains/BTOA/config/settings/bo-settings.xml - Update the protocol from
httptohttps:...
<setting name="bo.cms.protocol"
sectionKey="sections.bo"
nameKey="settings.bo.cms.protocol.name"
descKey="settings.bo.cms.protocol.desc"
refreshRate="Immediate"
displayInUI="false"
settingType="tenant">
<string>https</string>
</setting>
...
- Open
- Restart the HPBA services:
- Open
<HPBA>/supervisor/configure - Run the command:
./install_supervisor_conf.sh - Open
<HPBA>/supervisor/bin. - Run the command:
./hpba-restart.sh
- Open