


How to edit a change record
You can edit multiple records simultaneously by selecting them in the grid and updating them in the Preview pane on the right. For more information, see Mass update.
-
From the , select Build > Change. Service Management displays the available changes.
-
Select the change record that you want to edit.
To filter the record list, click the Add filter
 button. For more information, see Filters.
 -
Click the record identifier in the ID column to display the selected record.
-
If the change is in breach of the scheduling standards, a warning icon is displayed at the top right of the form. You can click the icon to display information about the breach, and a link to the Change Calendar. For more information, see Scheduling changes.
- Click View in calendar to see the change record displayed in the Change Calendar.
-
In the right pane, there are Change Analytics widgets that display information about changes relevant to the change record you are viewing. Relevant means these changes:
-
Used the same change model and affected the same service as the current change record; and
-
Were closed within the preceding six months.
The information displayed in the following widgets can help you improve the chance of the current change being successfully completed. The central idea is that by looking at past changes you can improve future performance.
-
Success analysis widget
This displays, as a pie chart, the successful changes out of all the relevant changes.
If you point to the chart, actual percentages are displayed.
If you click on a portion of the pie chart, Service Management takes you to a filtered list of changes to match the portion you clicked on. For example, if you click on the successful portion, Service Management displays all the successful, closed changes that used the same model and affected the same service as the change record you are viewing.
-
Risk statistics widget
This displays, as a bar chart, the risk profile of all the relevant changes.
If you point to the chart, actual percentages are displayed.
If you click a bar in the chart, Service Management takes you to a filtered list of changes to match the bar you clicked on. For example, if you click on the High risk bar, Service Management displays all the high risk changes that used the same model and affected the same service as the change record you are viewing.
-
Similar past changes widget
This displays, in separate tabs, successful and failed relevant changes.
Note You can use the information displayed in the Similar past changes widget to help you in various aspects of change management.
For example:
-
You may be able to improve scheduling by referring to similar past changes and noting and investigating material differences between scheduled time and actual time.
-
You may be able to improve success rate by referring to similar past changes and analyzing what factors contributed to a change succeeding or failing.
UI Description Successful tab Relevant change records are listed in this tab if they have either of the following completion codes:
-
Successful
-
Successful with problems
The maximum number of changes displayed in this tab is three.
Failed tab Relevant change update records are listed in this tab if they have either of the following completion codes:
-
Failed
-
Rejected
The maximum number of changes displayed in this tab is three.
The summary information displayed for each change includes:
-
Owner's avatar
-
Change record Id
-
Title
-
Actual duration*
If you point to the change summary, further details are displayed, including:
-
Title
-
Description
-
Review results
-
Actual duration*
-
Link to comments and number of comments**
*If there was a difference of more than 30% between the actual duration and the planned duration, an alert icon is displayed beside the actual duration. If you point to the icon, a pop-up message displays the scheduled duration.
** Depending on the available comments, you may see information that can help improve implementation of the current change.
-
-
-
In the , the Related Contracts widget displays all of the contracts related to the record you are viewing.
- Click the down arrow to expand the list of related contracts.
- Click a contract to see its full details.
The icon in the left of the contract indicates the type of contract:

-
-
By default, the change record is displayed with the General tab selected. Click the tab you want to edit or view:
Tab Description General Displays general information about the current record. For more information about the General tab, see General tab. Workflow Displays the workflow metaphase and phase for the current record. For more information about workflow, see Change workflow. Schedule Displays a Change Calendar, scheduled and actual times for the current record. For more information about scheduling, see Schedule tab. Plan and execute Displays task and planning items for the current record. For more information about tasks and planning, see Plan and execute tab. Involved CIs Displays involved devices, system elements and affected services. For more information about Involved CIs, see Involved CIs tab. Related records Displays records which are causes of, or effects of, the current record. For more information about related records, see Related records tab. Approvals Displays approvals for the current record. For more information about approvals, see Approvals tab. Related knowledge Displays relevant articles and news items for the current record. For more information, see Related knowledge tab. Discussions Displays any relevant conversations about the current record. For more information about discussions, see Discussions. History Displays changes to the selected record. For more information about history, see History. Note
-
Click the record title to edit it.
-
To use a template, click Apply template on the toolbar.
-
-
Click
 Save on the toolbar.
You can edit multiple records simultaneously by selecting them in the grid and updating them in the Preview pane on the right. For more information, see Mass update.
Change record tabs
General tab
The Change record's General tab has screen reader support. For more information, see Screen reader support.
This tab includes the following sections:
| Section | Description |
|---|---|
| Review |
This part of the record is only visible after the change enters the review phase in the workflow. It includes the following fields:
|
| General change details | This section contains basic information about the change record. For more information about general change details, see General change details . |
| Classification | This section helps you put the change into the correct workflow with assigned ownership. For more information about classification, see Classification . |
| External Assignment | This section is only relevant when an external group is selected in the Owning group field. The data in the section is populated by the external system. |
| User options |
This section contains any user options. These are cloned from the change model for the record. For more information about user options, see User options. |
| Attachments |
Click Note
|
-
Field Description Title The title is a summary of the change request.
Best practice: choose a meaningful, descriptive, and relatively short title. Titles are often the only identification used in selection lists and in other areas to identify components.
Description A description that captures the details of the change. Service Management may automatically recognize CIs whose details are entered here. See CI Detection - Automatic recognition of CIs.
Reason for change The reason for the change. Select the reason that most closely matches the purpose of the change request.
Latest execution time The date and time by when the change will complete.
Justification The justification for the change. What may happen if the change is not implemented?
Best practice: be as specific as possible.
Reported by The person requesting the change.
-
Field Description Priority The priority for implementing the change. This is a read-only, calculated field that Service Management chooses based on the Impact and Urgency values. The following table describes the default priority matrix.
Enterprise Site or department Multiple users Single user Total loss of service Critical High High Medium Severe disruption High High Medium Medium Slight disruption High Medium Medium Low No disruption Medium Medium Low Low This matrix can be adjusted through business rule configuration.
Owning group The group responsible for dealing with the change.
Urgency The urgency value describes how important the issue is for the customer. Service Management uses the urgency value to calculate the priority for the change implementation.
Owner The person responsible for dealing with the change.
Note: The drop-down list displays only people who are members of the owning group.
Impact The global effect on the user community. Consider whether the change affects the entire enterprise, a business unit, or an individual.
Risk
The risk involved in making the change.
Release The release, if any, the change record is part of. Service The service affected by the change.
Services are usually related to one of the following:
-
Infrastructure. For example, database or network services.
-
Business services. For example, email or a web portal.
The selected service affects the change model you can select. See “Change model”.
Category The category of the change. Service Management uses the category to classify change records.
The selected category affects the change model you can select. See “Change model”.
Service component The service component related to the change. Subtype The subtype of the change. The following options are available:
- Minor
- Significant
- Major
Change model A collection of predefined values. Selecting the model automatically populates the relevant fields and creates the tasks necessary to complete the change.
In the drop-down, change models are grouped as follows:
-
ALL MODELS
-
MODELS BY SERVICE – the change models relevant to the selected service, and those change models that are not connected to a service
-
MODELS BY CATEGORY - the change models relevant to the selected category, and those change models that are not connected to a category
-
MODELS BY SERVICE AND CATEGORY – all of the following change models:
-
Relevant to the selected service and the relevant category
-
Not connected to a service, but relevant to the selected category
-
Not connected to a category, but relevant to the selected service
-
Not connected to a service, and not connected to a category
-
The change models available for selection depend on the selected Service and Category.
Service selected Category selected Change models displayed No No ALL MODELS Yes No MODELS BY SERVICE No Yes ALL MODELS
MODELS BY CATEGORY
Yes Yes MODELS BY SERVICE AND CATEGORY
MODELS BY SERVICE
Change model notes
-
When you select a change model, the drop-down list also displays the model's process type: normal, standard, or emergency change.
-
After you select a change model, you may overwrite any field values which the change model provided. If you do so, saving the record saves the overwritten field values, and not the values which the change model provided.
-
Service Management allows you to select a new model for a change record after you have created the record. Take care because this major operation may change the workflow type and overwrite field values.
-
If you try to save a change record with a new change model, Service Management displays a confirmation message.
To undo the selection, click Cancel and refresh the page. Note that refreshing the page also affects all edits since you last saved your work. Otherwise, continue editing and saving the record.
-
Schedule tab
This tab includes the following sections:
| Section | Description |
|---|---|
| Change Calendar |
Displays the change, when scheduled, and time periods. The calendar can display dates up to one month backwards and six months forward from the current date. If scheduled, the change is shown by a colored graphical representation ("representation") that is displayed from its start to end time. Scheduled downtime is highlighted within the change representation. A key for the change representation and downtime and time period is displayed at the bottom of the calendar. Change scheduling information If a change is:
To schedule a change:
To use the calendar:
If there is a time period that applies to a service, and the current change does not affect the service, that time period does not display in the Change Calendar. |
| Scheduled times |
Details of the scheduled times for the change:
|
| Actual times |
Details of the actual times for the change.
|
 is displayed.
 .
.  .
. If you have the appropriate permissions, you can configure the widget to display either of the following:
-
Days, hours, and minutes
-
Months, days, and hours
The length of a month is hard-coded in the widget at 30 days.
For more information, see "Precision" in Edit a field.
Plan and execute tab
This tab includes the following sections:
| Section | Description |
|---|---|
| Change plan |
Details of the change plan. It includes the following fields:
|
| Task plan |
This is where you design, create, and edit tasks. The tabs that appear under task plan depend on the type of change, with each tab matching a workflow phase which may require completion of a task. The parenthesized number on the tab is the number of tasks in each phase. If the change model used to create the change has a predefined task plan, the plan is cloned to the change. You can edit the task plan where necessary. Service Management sets the task plan to read-only, in each of the following cases:
You can also generate task report in xlsx format.
For more information about the task plan, see How to build a task/approval plan. |
Involved CIs tab
In this tab you may add, change, or delete associations with business devices, infrastructure and peripheral assets, licenses, and system elements that are related to the record. When you link a device, an infrastructure asset, a license, or a system element to a record, you create an internal relationship between them. This tab also displays relevant affected services.
In this tab you can also view a topology impact map for each device and system element you choose, and the affecting CIs and a topology impact map for each affected service.
How to add an involved device, infrastructure and peripheral asset, license, or system element:
-
Click Add or the grid icon
 .
. -
Select the required records. The added items appear in yellow.
-
Click Save.
Affected services connected to the selected involved devices are shown in the Affected Services part of the tab.
How to delete an involved device, infrastructure and peripheral asset, license, or system element:
-
Select the required records.
-
Click Remove. The selected items appear in strikethrough text.
-
Click Save.
How to view an impact map for a device:
-
In the Involved Devices section, select the device.
-
Click Show Impact
 . An impact map of the device is displayed.
How to view an impact map for a system element:
-
In the Involved System elements section, select the system element.
-
Click Show Impact
. An impact map of the system element is displayed.
How to view the CIs affecting a service and an impact map:
-
In the Affected Services section, select the service.
-
Click View CIs affecting. A list of CIs affecting the service is displayed.
-
Select the CI whose impact map you want to view.
-
Click Show Impact
. An impact map of the CI is displayed.The impact map highlights the path (or paths, if there is more than one) from the chosen CI (the device or system element) to the service.
You can zoom in and out of the impact map by using the mouse wheel button. If a text string is too long to be displayed, an ellipsis (…) appears. You can hover over the ellipsis to display the full text string.
You can hover over the following icons in the impact map:
-
Owner avatar
 – a window is displayed with the owner’s details.
 -
Business criticality
 – a tooltip is displayed with the criticality.
 -
Location
 – a tooltip is displayed with the name of the location.
Depending on the size of the impact map and the browser window, Service Management may not display the subtype of a Device, Service or System Element. Hover over the subtype graphic to see a tooltip with this information.
Related records tab
The records displayed are those that are the causes of the current record, and those that are the effects of the current record.
-
In each section, the default sort order is first by record type, then by phase. You can click a column heading to reverse the sort order in any column.
Field Description Id The identifier of the record. Click the ID value to link to the record. Title or Name A short description provided by the end user. Phase Id The current phase of the current record in the workflow. Priority The priority is a value based on urgency and business impact values. Active Indicates if the related record is active. -
In the appropriate section, do one of the following:
-
Click
 Add to create a relationship between the current record and another record.
The Add related record dialog appears. The dialog box displays a list of potential related records. If you select an individual record, Service Management displays the contents of that record in the .
-
If you want to search for more records, you can use the Search box at the top of the dialog box.
-
Find each record that you want to link, and click Add to select it.
-
When you have selected all the records that you want to link, click OK.
-
Click
Save on the toolbar.
-
-
Click
 Remove to delete the relationship between the current record and the selected record.
 -
Click OK to confirm the action.
-
Click
Save on the toolbar.
This action removes the relationship only. It does not delete either record.
-
-
For more information about related records, see How to relate change records.
Approvals tab
The Approvals tab is where you design, create, and edit approvals. It is also where you give or refuse approvals. The tabs that appear depend on the type of change. The parenthesized number on the tab is the number of approvals in each phase.
| Change | Approval tabs |
|---|---|
| Emergency | ECAB |
| Normal |
Approve plan Approve deployment |
| Standard | None |
Approval plans are defined out-of-the-box for Normal and Emergency type changes. These plans are defined in the record definition of each of these types of changes. For more information, see Approval definitions.
You can edit the approval plans of a normal or emergency change workflow in the Approvals tab.
- In the Change record, go to the Approvals tab.
- Select a phase to display its approval plan.
- Move the mouse over the Start node, and click the Edit
 button.
 -
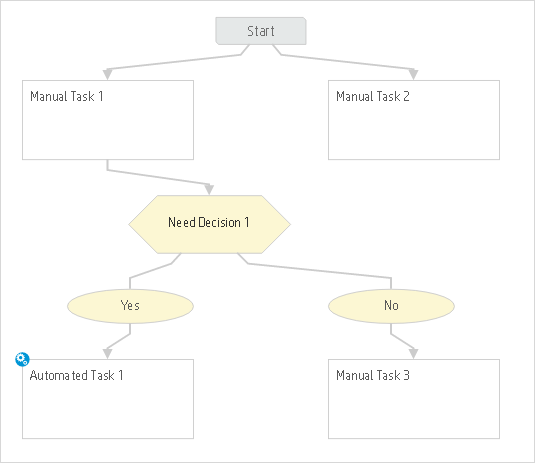
Select an element to add to the plan. The following elements are available:
Step Description Approval Requires one or more users to grant an approval before the workflow can move on to the next phase. Decision A decision point that uses an Expression Language phrase to determine which path in the approval plan to follow. Join Joins two or more nodes in the approval plan. Both must be completed before moving on to the next node in the plan. Path to Creates a path between two nodes in the plan. -
Fill in the relevant information for the selected node.
-
Approval
Requires one or more users to grant an approval before the workflow can move on to the next phase.
Available for the approval phases only.
Title A title for the approval. Strategy The strategy to use to obtain the approval:
- All must approve. Every assigned user must grant an approval.
- All must approve - immediate deny. Every assigned user must grant an approval. If one user denies an approval, the approval is denied.
- Quorum. The majority of responses determines whether the approval is granted or denied.
- One must approve. Requires only one assigned user to grant an approval. The approval is granted regardless of the responses of the other users.
-
One must approve – immediate deny. Requires only one assigned user to grant an approval. If one user denies an approval, the approval is denied. (The decision follows the first user who answers.)
Add approver user Adds a User line to the list of approvers where you can specify a user who must grant the approval. Add approver group Adds a Group line to the list of approvers where you can specify a group that must grant the approval.
When a user in the group assigns the approval to himself, the approval is removed from the Approvals queues of the other members of the group.
Add approver expression Adds an Expression line to the list of approvers where you can specify an Expression Language phrase to determine which users must grant an approval.
You can also define a condition on which to base the resulting list of users. The condition is defined as an Expression Language phrase.
-
Decision
A decision point that uses Expression Language phrases to determine which path in the task plan to follow:
-
Enter the details of the decision to be made.
-
Enter an Expression Language phrase to define when the decision must be made.
-
For decisions that require a yes or no answer, you can use the predefined Yes/No decision options.
Alternatively, click Advanced to define other decision options. In this case, the list of options always includes an otherwise option in case none of the defined options are met.
-
For each decision option, define the next step.
-
-
-
To create a path from one node to another, click the Edit
button on the source node, select Path to, and click the destination node. A path is drawn from the source node to the destination node. -
To ensure that certain tasks are completed before moving on with another task, you can direct them through a join node. Each task node leading into the join node must be completed before the task node leading out of the join node can be instantiated.
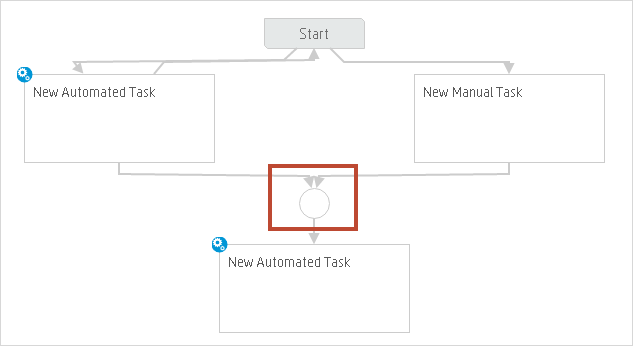
To join nodes:
-
Click the Edit
button on one of the nodes, and select Join. A join node is added. -
Click the node that you want to join to the first node, and select Path to.
-
Click the join node. Both nodes lead into the join node.
-
Repeat to direct more nodes through the join node if desired.
-
- Continue to build the plan in the same way from one node to another.
- Save the plan.
Related knowledge tab
The Related knowledge tab is where related knowledge or news articles are displayed.
| Action | Procedure |
|---|---|
| Add a knowledge or news article |
|
| Remove a knowledge or news article |
|
| View a knowledge or news article |
|


