Searching the Help
To search for information in the Help, type a word or phrase in the Search box. When you enter a group of words, OR is inferred. You can use Boolean operators to refine your search.
Results returned are case insensitive. However, results ranking takes case into account and assigns higher scores to case matches. Therefore, a search for "cats" followed by a search for "Cats" would return the same number of Help topics, but the order in which the topics are listed would be different.
| Search for | Example | Results |
|---|---|---|
| A single word | cat
|
Topics that contain the word "cat". You will also find its grammatical variations, such as "cats". |
|
A phrase. You can specify that the search results contain a specific phrase. |
"cat food" (quotation marks) |
Topics that contain the literal phrase "cat food" and all its grammatical variations. Without the quotation marks, the query is equivalent to specifying an OR operator, which finds topics with one of the individual words instead of the phrase. |
| Search for | Operator | Example |
|---|---|---|
|
Two or more words in the same topic |
|
|
| Either word in a topic |
|
|
| Topics that do not contain a specific word or phrase |
|
|
| Topics that contain one string and do not contain another | ^ (caret) |
cat ^ mouse
|
| A combination of search types | ( ) parentheses |
|
- User and user group setup and security
- SA users and user groups
- Managing users
- Managing user groups
- Setting permissions on user groups
- Setting password, account, and session security policies
- Managing super administrators
- Managing customer administrators and customer groups
- Authenticating with an external LDAP directory service
- SA Common Access Card (CAC) and Personal Identity Verification (PIV) Smart Card integration
- SA/RSA SecurID® integration
- Configuring SA/SecurID integration
- User and Security Reports
Managing users
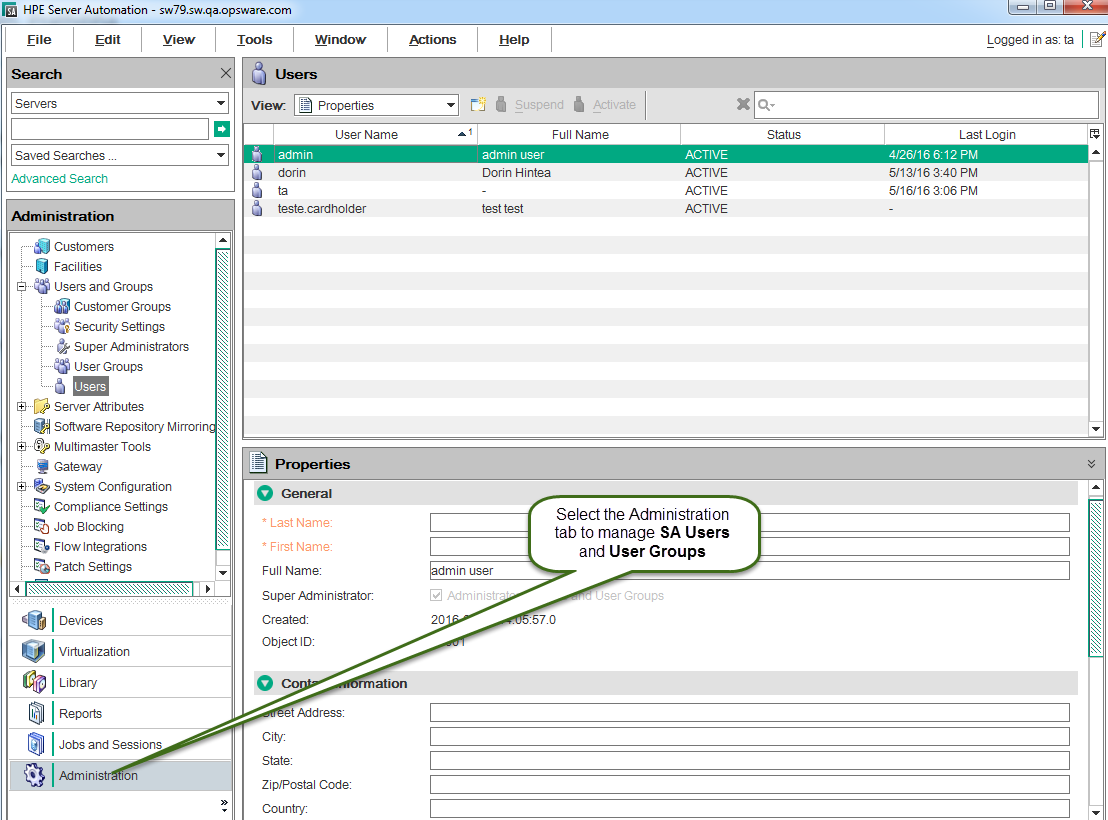
This section describes how to manage users with the SA Client. To manage users, you must log in to the SA Client as a super administrator (admin) and select the Administration tab, as shown in the following figure.
Users listed under the Administration tab

- Creating a new user
- Changing user permissions
- Changing the user password
- Changing your own password and properties
- Changing a user
- Assigning a user to a user group
- Finding the user group a particular action permission comes from
- Suspending a user
- Activating a suspended user
- Importing users from an LDAP Directory
- Deleting a user
Creating a new user
To create a new SA user from the SA Client:
- In the SA Client, select the Administration tab in the navigation pane.
- Open the Users and Groups node in the navigation pane. This displays the Users node.
- Select the Users node. This displays all your SA users.
- Select the Actions > New menu or select the New User icon. This displays the New User window.
- Enter the first name, last name, and full name of the user.
- To allow the new user to administer users and user groups, select the check box labeled Super Administrator. For more information, see Super administrators and Super users.
- Enter the contact information for the new user. An email address is required.
- Enter the log-in information for the new user.
- The user credentials can be stored in HPE SA or on an RSA SecurID server connected to SA. You can change the user password in the SA Client only if the credential store is HPE SA.
- The SA user name must be made up of letters, numbers, periods, hyphens, and underscores. SA user names are not case sensitive.
- The password must be at least six ASCII characters long and may not include the “\” or “^” characters.
- Enter the locale, time zone, and date format preferences.
- Select the User Groups view to assign the user to one or more user groups. Assigning the user to user groups grants the corresponding permissions to the user. Use the “+” button to add the user to a user group. Use the “-” button to remove the user from the selected user group.
- Select File > Revert to discard your changes.
- Select File > Save to save the new user.
Changing user permissions
All permissions are contained in user groups. Each user’s permissions are determined by the user groups to which they belong. To modify user permissions, you must modify the permissions defined in the user groups to which the user belongs or change the user groups to which the user belongs. For more information, see Assigning a user to a user group and Setting permissions on user groups .
Changing the user password
Only a super administrator (admin) can change the passwords of other SA users. If the user name has been imported from an external LDAP directory, then the password cannot be changed with the SA Client. For more information, see Authenticating with an external LDAP directory service.
To change a user’s password, you need to open the user in a user window and select the Properties view. Perform the following steps:
- In the SA Client, select the Administration tab in the navigation pane.
- Open the Users and Groups node in the navigation pane. This displays the Users node.
- Select the Users node. This displays all your SA users.
- Select the user you want to modify.
- Select the Actions menu, or right-click and select Open. This displays the user information in a new window.
- Select the Properties view. This displays the user’s login information, including a Change Password link.
- Select the Change Password link. This displays the Change Password dialog.
- Enter the new password. Note that when you modify the user’s password, the change takes effect immediately.
- Select OK. This modifies the user’s password.
Changing your own password and properties
Any user can change their own password and their profile information.
Users changing their own password

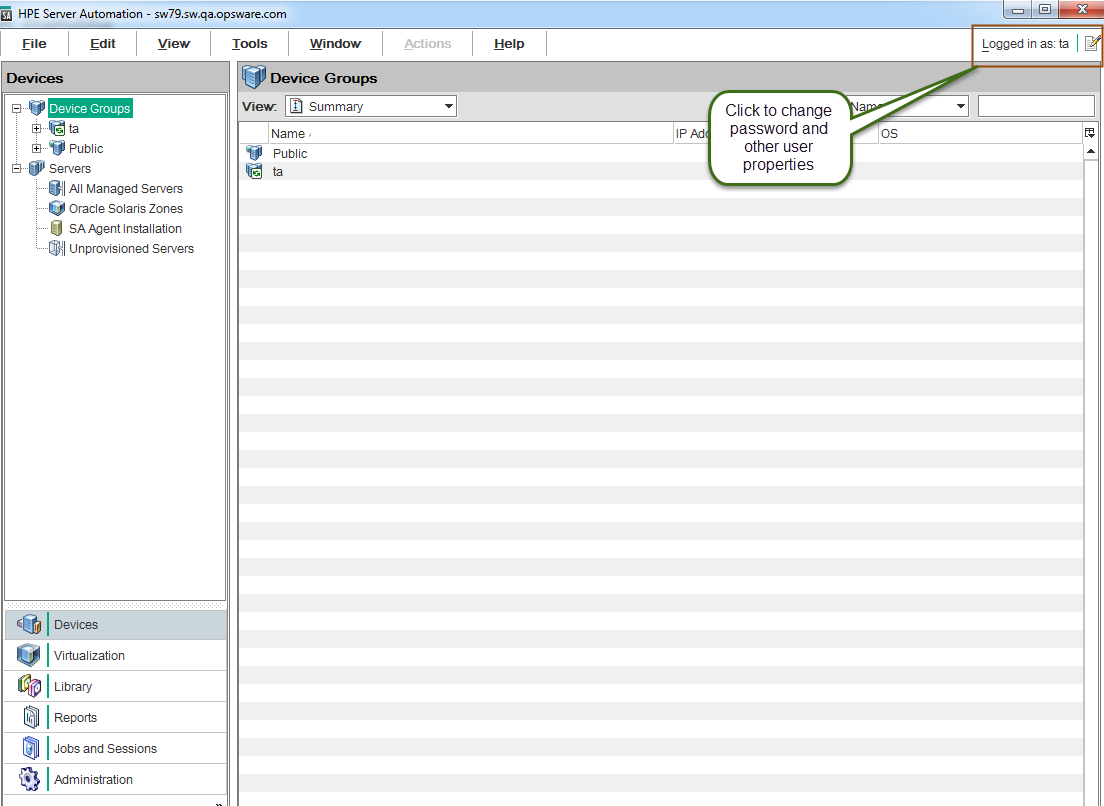
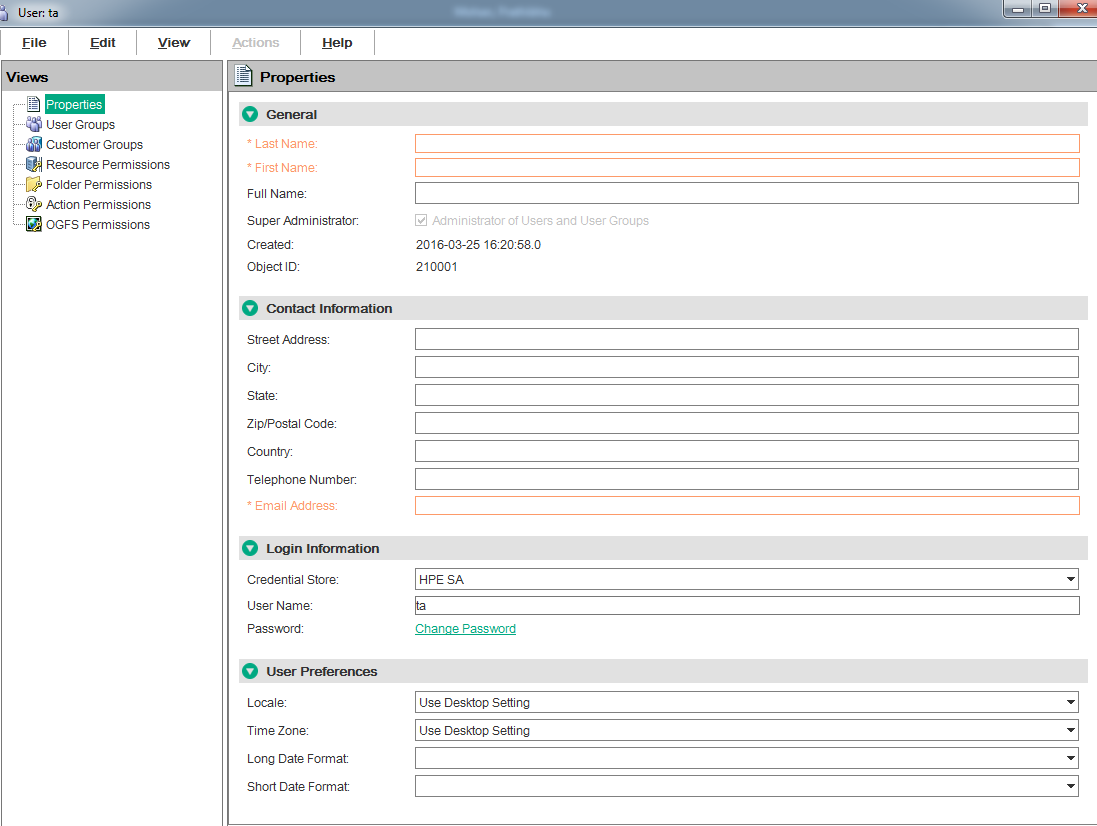
- From the SA Client screen, select the “Logged in as” link in the upper right corner, as shown in the previous figure. This displays the user properties window, as shown in the following figure.
User properties window and change password link

- To change password, select the Change Password link. Note that when modifying a password, the change takes effect immediately.
- Change other properties as needed.
- If any properties were changed, select File > Save.
- Select File> Close.
Changing a user
To modify an SA user from the SA Client:
- In the SA Client, select the Administration tab in the navigation pane.
- Open the Users and Groups node in the navigation pane. This displays the Users node.
- Select the Users node. This displays all your SA users.
- Select the user you want to modify.
- Select the Actions menu, or right-click and select Open. This displays the user information in a new window.
- Optionally modify any of the user’s properties. The Properties view lists the user’s name, contact information, login information, where their credentials are stored, their user name, a link to change their password, and their date and time settings. Note that when you modify the user’s password, the change takes effect immediately.
- Optionally add or remove the user from a user group. The User Groups view lists the user groups to which the user belongs. Each user group grants a set of permissions to all the users who belong to the group.
- The permissions are viewable but not modifiable from the user window. To modify permissions, you need to modify user groups as described in Setting permissions on user groups .
- Select File > Revert to discard your changes.
- Select File > Save to save the changes.
Assigning a user to a user group
Assign each SA user to a group reflecting the user’s role in your organization. To assign an SA user to a user group:
- In the SA Client, select the Administration tab in the navigation pane.
- Open the Users and Groups node in the navigation pane. This displays the Users node.
- Select the Users node. This displays all your SA users.
- Select the user you want to assign.
- Select the Actions menu or right-click and select Open. This displays the user information in a new screen.
- Select the User Groups view. This displays the user groups that the user is a member of.
- Select the “+” button or select the Actions> Add menu. This displays all the user groups.
- Select one or more user groups.
- Select the Select button. This adds the user to the user groups.
- Select File > Revert to discard your changes.
- Select File > Save.
Finding the user group a particular action permission comes from
If a user belongs to more than one user group, you can determine which user group grants a particular action permission as follows.
- In the SA Client, select the Administration tab in the navigation pane.
- Open the Users and Groups node in the navigation pane. This displays the Users node.
- Select the Users node. This displays all your SA users.
- Select the user you want to view.
- Select the Actions menu, or right-click and select Open. This displays the user information in a new window.
- Select the Action Permissions view. This displays all the action permissions organized by the user groups to which the user belongs.
- You can also right-click on any column header and ungroup the User Group column, then use the column selector at the far right of the column headers to display the User Group column. This will show each permission followed by the user group that grants that permission.
Suspending a user
A suspended user cannot log in to SA, but the user name has not been deleted. A suspended user is indicated by a status of Suspended in the SA Client. A user can be suspended in the following ways:
- Login Failure: If you select the check box labeled Login Failure on the Security Settings tab, and someone tries to log in with the wrong password a specified number of times, the user account is suspended. For instructions on accessing the Security Settings tab, see the first two steps of Resetting initial passwords.
- Account Inactivity: If you select the check box labeled Account Inactivity on the Security Settings tab, and the user has not logged on for the specified number of days, the user account is suspended.
- Expired Password: A user can be suspended if the password has expired and the expiration count is full.
- Suspend: You can suspend a user’s account as described below. If the user is logged in, a message will be displayed and they will be logged out.
- In the SA Client, select the Administration tab in the navigation pane.
- Open the Users and Groups node in the navigation pane. This displays the Users node.
- Select the Users node. This displays all your users.
- Select the user you want to suspend.
- Select the
 button or select Actions > Suspend.
Activating a suspended user
To activate a suspended user, perform the following steps:
- In the SA Client, select the Administration tab in the navigation pane.
- Open the Users and Groups node in the navigation pane. This displays the Users node.
- Select the Users node. This displays all your users.
- Select the suspended user you want to activate.
- Select the
 button or select Actions > Activate.
Importing users from an LDAP Directory
You can import user information from an LDAP directory and use the LDAP directory for authentication when logging into SA. For more information, see Authenticating with an external LDAP directory service.
Deleting a user
To delete an SA user from the SA Client, perform the following steps:
- In the SA Client, select the Administration tab in the navigation pane.
- Open the Users and Groups node in the navigation pane. This displays the Users node.
- Select the Users node. This displays all your SA users.
- Select one or more users you want to delete.
- Select the Actions > Delete menu, or select the delete icon.
We welcome your comments!
To open the configured email client on this computer, open an email window.
Otherwise, copy the information below to a web mail client, and send this email to hpe_sa_docs@hpe.com.
Help Topic ID:
Product:
Topic Title:
Feedback:


