Creating a Custom Configuration
You can specify customized configurations to be applied to an Integrity server. You can specify Ignite attributes that are applied on the server during HP-UX installation on top of the standard golden image configurations. You can also select additional software policies to be remediated as part of the HP-UX installation.
You can build customer-specific configurations by specifying the platform, base configuration, Ignite attributes, and related software policies. You can customize the installation to meet your specific needs.
To provision the server in a customized way, you must first create a custom configuration.
HP-UX Custom Configuration Editor APX
To access the HP-UX Custom Configuration Editor APX, perform these tasks:
- In the SA Client: Click the Library tab and select Extensions Web HP-UX Custom Config Editor. The unique name for the APX is displayed when you select the APX.
In this instance, the Custom Configuration Editor APX name is
com.hpe.osprov.hpuxconfig.
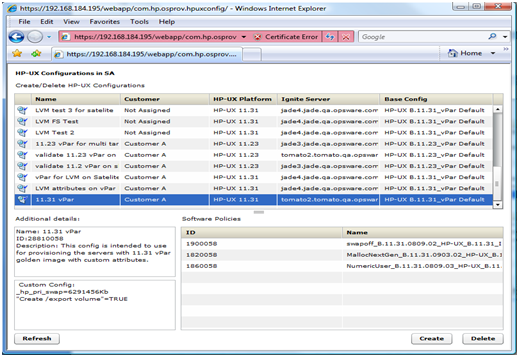
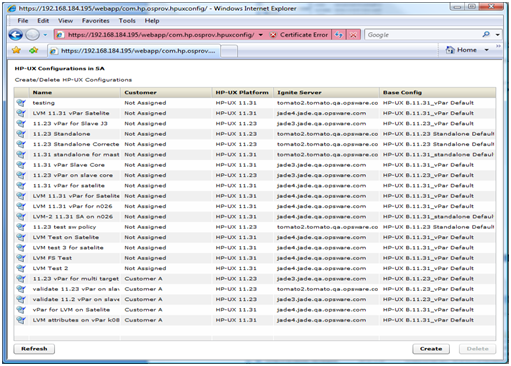
All existing custom configurations are listed with Name, Customer, HP-UX Platform, Ignite Server, and Base Config details. The Refresh, Create, and Delete buttons also appear.
HP-UX Custom Configuration Editor APX – List Existing Configurations
When you select any existing configuration from the list, you will see additional details such as Custom Configurations and Software policies.
The Configuration listings are based on permissions assigned to you. You are able to list configurations belonging to the customers for which you have been granted permission. The configuration can be customer dependent or customer independent.
A customer independent configuration is accessible to all users. A customer dependant configuration is accessible to only those users who have appropriate permissions assigned. You can make the configuration dependant or independent by selecting the customer when you create the configuration.
The HP-UX Custom Configuration Editor APX enables you to:
- Create Custom Configurations
- Delete Custom Configurations
Creating a Custom Configuration
To create a custom configuration, follow these steps:
- Open the HP-UX Custom Configuration Editor APX using Internet Explorer.
- Click the Create button and specify the required details to create a new custom configuration.
HP-UX Custom Configuration Editor – Create Custom Config
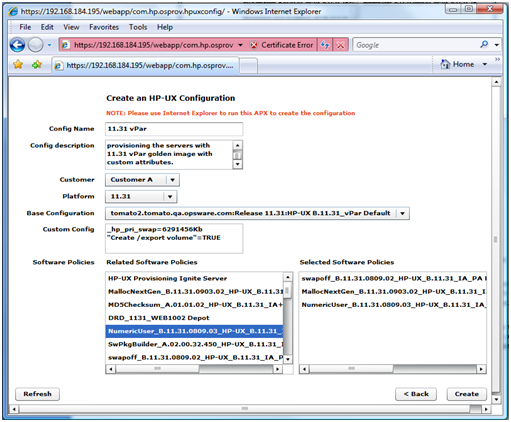
- You must specify the following required details to define the HP-UX custom configuration:
- Config Name: This is a mandatory field. It must be unique for each customer. The APX validates the following specifications:
- Must not exceed 255 characters in length.
- Must not begin or end with an empty space.
- Must not begin with punctuation, including
@#$%^&*()+_-,./:;~{}[]|\'"?=` - Should not use newline, tab, flash or backslash.
- Config Description: This is an optional field that can contain explanatory text describing the purpose and use of the configuration.
- Customer: By default, this is set to Not Assigned, which makes the configuration customer independent. You can only list those customers for which you have permission. You will not be able to list the configurations if appropriate permissions have not been granted to you for that customer.
- Platform: This is a mandatory field. You must select either 11.31 or 11.23 from the drop-down menu. Base configuration or Related Software Policies are dependent on platform selection. If the platform was not selected and you try to select either Base configuration or Related Software Policies, a warning message appears.
- Base Configuration: Content is displayed based on the HP-UX platform selected.
- Custom Config: This is an optional field that can be used to specify Ignite attributes. Any valid Ignite attributes specified in this field overwrite the configuration values specified in the golden image, which allows you to provision the servers in a customized manner.
The following are examples of Ignite attributes:
_hp_pri_swap=6291456Kb"Create /export volume"=TRUE_hp_root_disk="0/1/1/1.2.0"_hp_disk_layout="Logical Volume manager (LVM) with VxFS"For detailed information on Ignite custom attributes, see http://h20565.www2.hpe.com/hpsc/doc/public/display?docId=emr_na-c01942568&lang=en-us&cc=us
If the attributes and values specified are valid, they are applied on the servers on top of the standard image configurations. However, if the attributes specified are invalid or have incorrect syntax, provisioning will not start.
In some cases, attributes and values are incompatible. For example, say that you want to provision the server with the following Ignite attributes:
_hp_pri_swap=6291456Kb"Create /export volume"=TRUEThe Ignite attributes syntax is correct and also has valid values but your target does not have enough disk space to implement it. As a result, a warning message is displayed on the targets before provisioning starts.
- Config Name: This is a mandatory field. It must be unique for each customer. The APX validates the following specifications:
- Related Software Policies: This is an optional field consisting of a drop-down menu whose contents are displayed based on the platform selected. You can select multiple Related Software policies by holding the CTRL key and dragging the policies to the selected software policies list to apply them on the server after provisioning is completed and the agent is installed.
You can change the sequence of a selected software policy by dragging it up or down. Polices specified in Selected Software Policies are applied on top of the standard policies in the golden Ignite image.
After the details for all mandatory fields, Config Name, Platform and Base Config are specified, the Create button is enabled.
- Click the Create button. A confirmation message appears and the newly created configuration is listed.
Newly Created Custom Config Profile