


Scheduling an audit 
Scheduling an audit requires specifying when you want an audit to be run (either once or as a recurring job) and who you want to receive email notification about the status of the job. You can also view, edit, and delete or cancel existing scheduled audits. When you delete a scheduled audit, all schedules that you have created associated with that audit will also be deleted. You can also cancel an audit job that is in progress. See Cancelling an active audit job.
Note You must have permissions to create, view, edit, and delete audit schedules. To obtain these permissions, contact your SA administrator. See the SA 10.51
Scheduling a recurring audit
After you have created, configured, and saved an audit, you can set up a schedule that specifies when you want the audit to run on a recurring basis. When you specify a recurring schedule, the end date must allow for the audit job to run at least once. After the schedule is set, you can edit the schedule according to your needs.
To schedule a recurring audit:
- In the navigation pane, select Library > By Type > Audit and Remediation, and then select Audits.
- Select an OS (Windows or UNIX) and then double-click an audit to open it.
- In the Views pane of the Audit window, select Schedule.
- In the Schedule section, choose to run the audit once, daily, weekly, monthly, or on a custom schedule. Parameters include:
- None: No schedule will be set. To run the audit, select the audit, right-click, and select Run.
- Daily: Choose this option to run the audit on a daily basis.
- Weekly: Choose the day or days of the week to run the audit.
- Monthly: Choose the months to run the audit run, and the days of the month.
Custom: In the Custom Crontab string field, enter a string the indicates a time schedule.
A crontab file has five fields for specifying the day of the week, the month, the day of the month, the hour, and the minute. The following diagram shows each position in the crontab file, what the position corresponds to, and the allowed values:
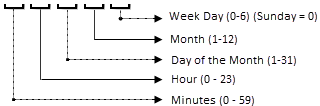
The crontab string can include serial (1,2,3,4) and range (1-5) values. Only some operating systems support the minutes format /2 or /10 for running the audit every 2 minutes or 10 minutes. An asterisk (*) denotes all values for that field, such as all months of the year. Days can be specified in two fields: month day and week day. If both days are specified, both of the values will be executed. All operating systems support comma-separated values within each field.
For example:
5,10 0 10 * 1 means run an audit 12.05 and 12.10 AM every month or on the 10th and on every Monday.For more information about crontab entry formats, consult the Unix man pages.
- In the Time and Duration section, for each type of schedule, specify the hour and minute you want the daily schedule to start. Unless you specify an end time, the audit will keep running indefinitely.
To choose a date to end the audit schedule, select End and then choose a date. The Time Zone is set (Optional) Deselect the End option, if you want the audit schedule to run indefinitely. - To save the audit schedule, from the File menu, select Save. The audit will now run according to the defined schedule.
Editing an audit schedule
You can edit an audit schedule after you have created (or edited) and saved it.
To edit a scheduled audit:
- In the navigation pane, select Jobs and Sessions.
- Select Recurring Schedules.
- In the drop-down list at the top of the content pane, select Audit Servers.
- Select a scheduled audit job, right-click, and select Open.
- In the Audit window, select Schedule in the Views pane to view the audit schedule.
- To edit the audit Schedule, modify the following parameters:
- None: No schedule will be set. To run the audit, select the audit, right-click, and select Run Audit.
- Daily: Choose this option to run the audit on a daily basis.
- Weekly: Choose the day or days of the week to run the audit.
- Monthly: Choose the months to run the audit run, and the days of the month.
- Custom: In the Custom Crontab string field, enter a string the indicates a time schedule.
A crontab file has five fields for specifying the day of the week, the month, the day of the month, the hour, and the minute. The following diagram shows each position in the crontab file, what the position corresponds to, and the allowed values:
The crontab string can include serial (1,2,3,4) and range (1-5) values. Only some operating systems support the minutes format /2 or /10 for running the audit every 2 minutes or 10 minutes. An asterisk (*) denotes all values for that field, such as all months of the year. Days can be specified in two fields: month day and week day. If both days are specified, both of the values will be executed. All operating systems support comma-separated values within each field.
For example:
5,10 0 10 * 1 means run an audit 12.05 and 12.10 AM every month on the 10th and on every Monday.
For more information about crontab entry formats, consult the Unix man pages.
- In the Time and Duration section, for each type of schedule, specify the hour and minute you want the daily schedule to start. Unless you specify an end time, the audit will keep running indefinitely. To choose a date to end the audit schedule, select End and then choose a date. The Time Zone is set according to the time zone set in your user profile.
- (Optional) Deselect the End option, if you want the audit schedule to run indefinitely.
- To save the audit schedule, from the File menu, select Save. The audit will now run according to the defined schedule
Note If you set an audit schedule in previous releases (pre-SA 10.0), and you used System time zones (such as SystemV/PST8 or System V/PST8PDT), you must reset the audit schedule to use supported time zones or you will get an error when you try to run it.
Viewing a completed audit job
To view information about a completed audit job:
- In the navigation pane, select Jobs and Sessions.
- Select Job Logs.
- The content pane displays all jobs run in this SA core. To display only audit jobs, from the drop-down list at the top of the content pane, select Audit Servers. If you want to see only your scheduled audits, enter your user ID in the User ID field at the top of the content pane.
- Open an audit job to view the audit results and then click View Results.