


Overview
Why automated Application Deployment is important
Creating, deploying, and testing custom applications has become a complex process that warrants a software development lifecycle. The lifecycle provides structure for the various activities involved. Here is an example of a simple software development lifecycle:
Typical software development lifecycle
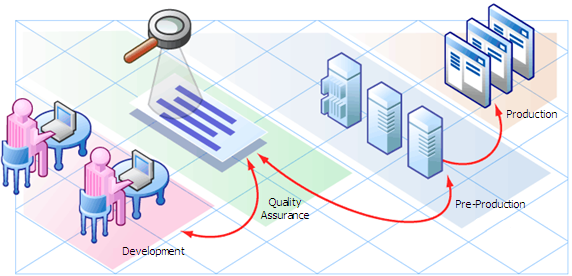
In this software development lifecycle, an application will move from Development to Quality Assurance (QA). QA tests the application, and often there are several cycles of testing and fixes between QA and development. After QA approves the application, it may be deployed—either for the first time or as an upgrade—to verify that the application works in the pre-production environment (which is very similar to the Production environment). This deployment may be used to carry out performance testing. Only when this is successful is the application moved into production.
When performed manually, this process is time-consuming and prone to error. Challenges arise from fragmentation of both people and processes. For example, applications may require components from geographically dispersed development teams; QA may control the QA environment, while system administrators are responsible for the pre-production and production environments. This requires a great deal of communication and coordination.
Some additional challenges are:
- Complex environments complicate the process.
- There is typically not a consistent way for Development to describe the steps necessary to deploy a release.
- QA must have the machines necessary to create environments. Then, they must create and clean up these environments repeatedly.
- They may even have to perform multiple deployments to bring the application up to the latest production level.
- A product may work in QA but fail in pre-production due to inconsistent processes used in the two environments.
- The Pre-Production environment must precisely mimic the Production environment.
- Each time the code changes, software engineers must re-package the code.
- Someone must be responsible for the Production machines and knowing what needs to be updated.
- There is no single place for release managers and the teams that they work with to communicate the current state of a release.
- Lack of auditing, reporting, and metrics lead to a lack of process improvement, because organizations do not know what needs to be fixed.
- Security issues arise from conflicting needs between Development and Operations.
Application Deployment in HPE Server Automation reduces the complex communications necessary to deploy applications by providing a single point of access where everyone involved can view or enter data that is relevant to them and to their role.
Application Deployment also integrates with other HPE Software technologies to ensure that applications are successfully moved into Production.
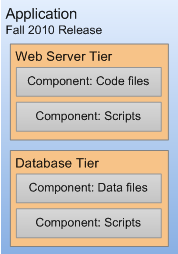
Application architecture
Applications are made up of a variety of components, including the following:
- Code components (for example: HTML files, JAR files, WAR files, .NET assemblies, or databases)
- Scripts
- Configuration files
- SA Application Configurations
- SA Software Policies
- Packages from the SA library
- HPE Operations Orchestration (OO) flows
- Windows Registry settings
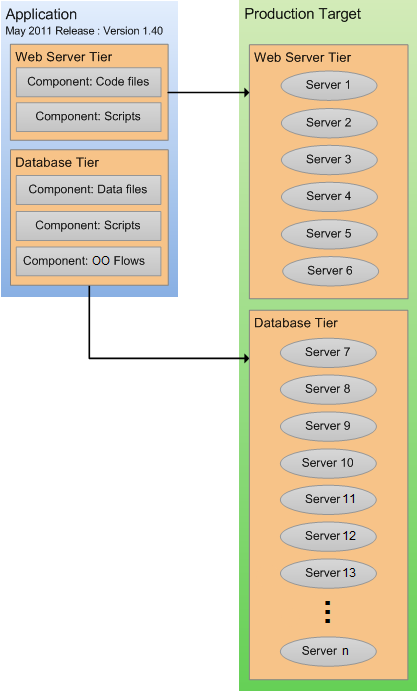
These components are deployed to the appropriate tiers, such as web servers, application servers, and databases.
Simple application with two tiers
A single application can have multiple releases. A release, in turn, typically has multiple versions. A version is an immutable “snapshot” of a release at a specific point in time. When you deploy an application to an environment, you deploy a specific version.
When you specify the components included in a release, you can specify both rollback and undeploy instructions for each component.
When rollback is enabled, Application Deployment performs a backup before deploying. In the event that a failure occurs during deployment, the rollback instructions are used to return the target to its previous state. In this situation, Application Deployment will retrace its steps and undo each step of the deployment according to the rollback instructions.
If undeploy is enabled, the undeploy instructions are used to uninstall the application.
You can create application groups to help you organize your applications in the most convenient manner. This is an organizational tool that is provided strictly for your benefit; it does not affect the deployment of applications.
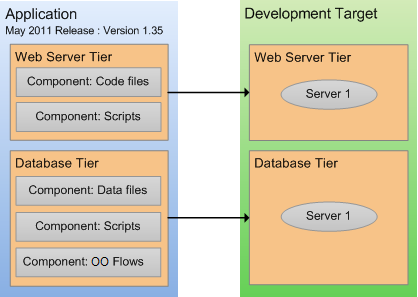
Operations architecture
On the operations side, you have targets where you deploy applications. Each target is generally suited to support one or more applications, depending on its structure. A target is structured by use of tiers—for example, an application server tier or a database tier. Each target is associated with an environment, such as QA or Production. After you have created your environments, you can see how they map to your software development lifecycle.
Target with two tiers

How the application and operations architectures align
Tiers are the mechanism used to connect applications to targets. An application is deployed by mapping the components that are part of each tier to the target servers that belong to the same tier. Regardless of the size or composition of the targets, the application tiers do not change.
Consider the following example of how a simple application—perhaps a patch—progresses from the Development environment, through the QA environment, and ultimately to the Production environment.
During the development phase, the application changes frequently, so many versions are deployed to a small testing environment—in this case, the same server runs both the web server and the database.
Deploying to a small development target
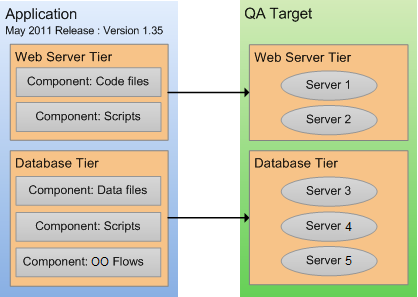
When the application is promoted into the QA environment, there are fewer iterations. The environment is slightly larger. During the QA phase, the application is likely deployed in both the Development and the QA environment as problems are detected and fixed.
Deploying to a slightly larger QA target
Eventually, when the application is stable and thoroughly tested, it is promoted to the Production environment. This is usually a much larger environment, as shown in figure above.
Deploying to a production environment
Note that in this example, the production database is hosted on a server cluster, such as an Oracle Real Application Cluster (RAC).
How an application moves through the software lifecycle
Application Deployment enables you to create customized lifecycles so that you can exercise finely grained control over an application as it progresses from the Development phase through full deployment in a Production environment.
A lifecycle consists of a series of environments. An environment consists of a group of servers. You can use different lifecycles for different purposes. For a very small application or minor patch, for example, you might use a simple lifecycle like this:
Patch lifecycle

For a more complex application—such as a new product or major upgrade—you would use a more sophisticated lifecycle like this one:
Complete lifecycle
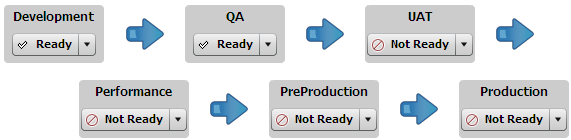
Through the use of lifecycles, the Application Deployment helps ensure a seamless transition between application development and operations.
In the very beginning of the lifecycle, an application typically undergoes frequent changes. You might, for example, create a new version for each nightly build and deploy it to the servers in the Development environment.
As the application becomes more stable, it becomes ready for formal QA testing. At this point, you might install the latest build on each server in the QA environment twice per week.
As the application moves forward in the lifecycle, changes become less frequent, and fewer deployments are required. Eventually, there will be a small number of release candidates that are deployed for user acceptance testing (UAT) and performance testing.
Upon successfully passing UAT and demonstrating acceptable performance, the release candidate could be deployed to Pre-Production and, ultimately, to Production.
SA determines which environments are included in the various lifecycles, according to the standards at your company.
Environment status settings
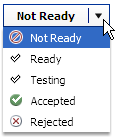
Each environment has a certain status. Application Deployment will not allow you to deploy to environments whose status is Not Ready—in this case, no targets in the environment can be selected.
You can use the status field to control where an application can be deployed. The initial setting for each environment is set by the Application Deployment administrator. If a user has permission to deploy to a particular environment, that user can change the environment’s status at deployment time.
Your Application Deployment administrator determines which users have permission to deploy applications into which environments. See Set permissions for details.
Environments and device groups
Environments in the Application Deployment context are mirrored as device groups in SA:
Application Deployment and SA views
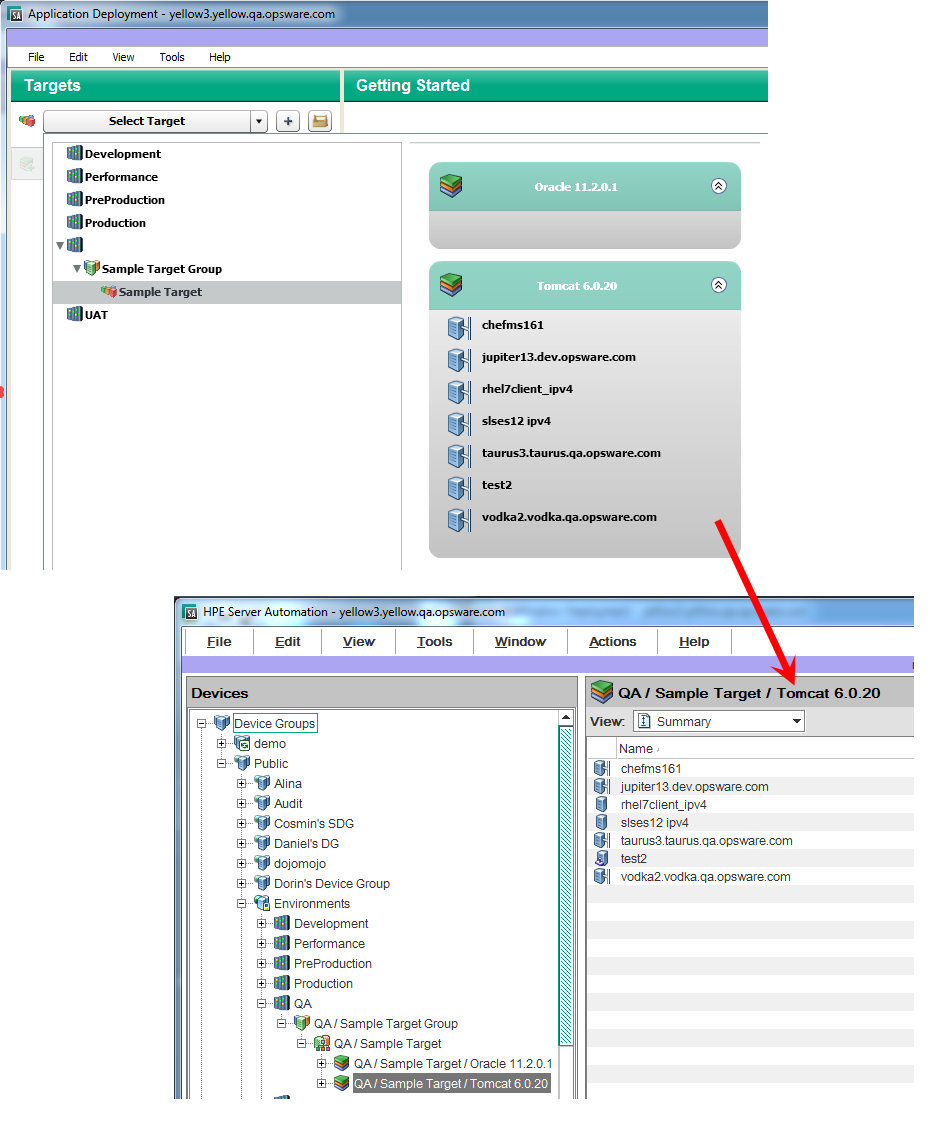
The Application Deployment environments are located under the Environments device group on the Devices screen. These device groups are read-only (cannot be modified by users), and they are managed by Application Deployment.
Each device group under Environments has a special icon that signifies what type of Application Deployment object it is:
-
 Environment
 -
 Target
 -
 Tier
Tier
Target and tier device group names are paths indicating their parent environment and target, respectively.
When you make a change to an environment or target in the Application Deployment user interface—for example, renaming a target—that change is also made in the corresponding Device Group. This can take time, during which you may see a “synchronizing” message. You may need to perform a refresh in the main SA user interface to see the change.
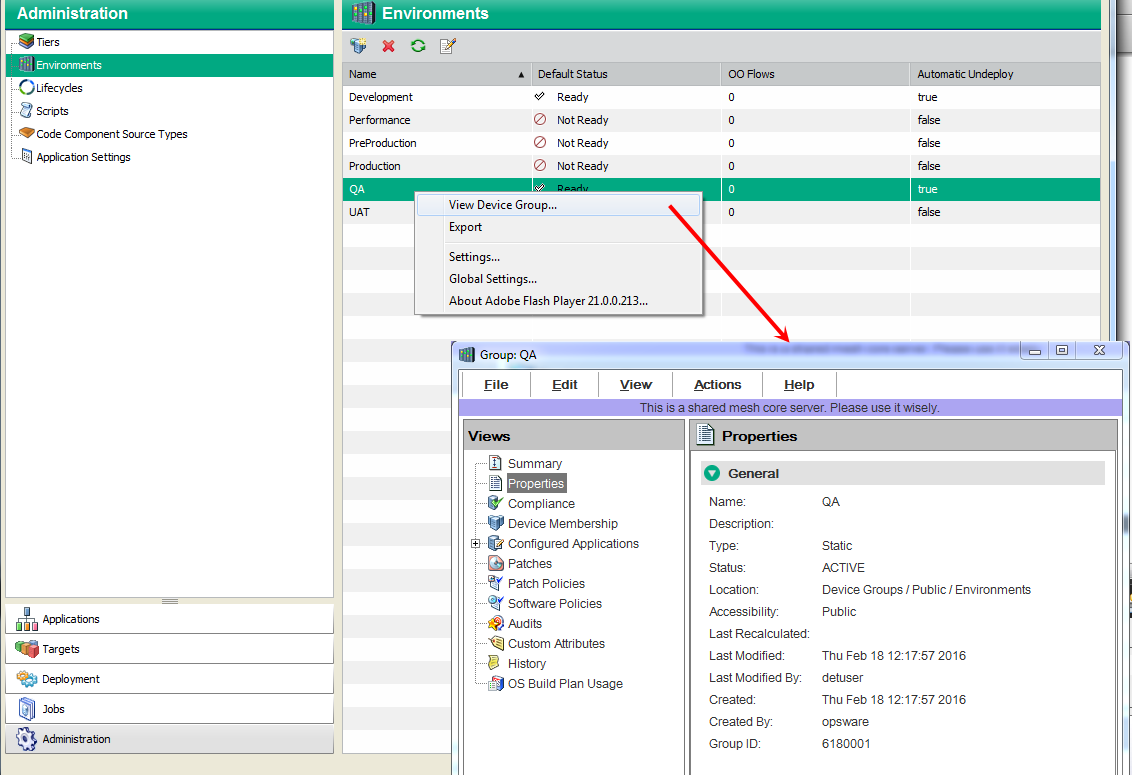
The environment owner or Application Deployment administrator can use the right-click shortcut menu to open a Device Group window or force an immediate synchronization, as shown here (see Administer environments).
Device group Window for an environment
Example: Preparing an environment and deploying an application
Imagine that you are opening an online store. You want to make the site available to the public as soon as possible. The application that handles orders is still in Development, but it is almost ready to move to QA.
Your application has two tiers: an Apache 2.2.9 web server and an Oracle 11g database. It consists of several components that are stored in your source code control system.
Here are the steps that your team would follow to use Application Deployment to move the new application into the QA environment for testing:
- Your Application Deployment administrator sets the permissions required. For example:
- The Application Expert needs permission to Edit the application and Deploy it into the Development environment.
- The Deployment Specialist needs permission to View (but not Edit) the application and Deploy it into the QA environment.
- Your Application Expert defines the application architecture by creating the pertinent components and assigning them to a Web Server tier and a Database tier.
- Your QA Environment Owner then reviews the application architecture and prepares the QA environment needed for this application.
- First, he creates a target, called Store Orders. The target must contain the same tiers that were specified in the application architecture.
- Next, he specifies the servers that belong to each tier—the servers must already be managed by SA. The QA environment for the online store is now ready.
- When your Software Engineering team decides that the first version of the application is ready for testing, they create a version in preparation for deployment. Next, they inform QA that the application is ready for testing.
- A Deployment Specialist then deploys the application to the QA environment, and the QA engineers begin testing.
Your goal is for the team to move through the testing process with the minimum number of iterations between Development and QA. Automating the deployment reduces the number of iterations.
Once the application completes the QA cycle, moves to and passes the pre-production phase, and finally moves to the production phase, you can open your store.
About the Application Deployment user interface
When you open the Application Deployment tool for the first time—and whenever you create a new application—the user interface looks like this:
Application Deployment interface – Initial view
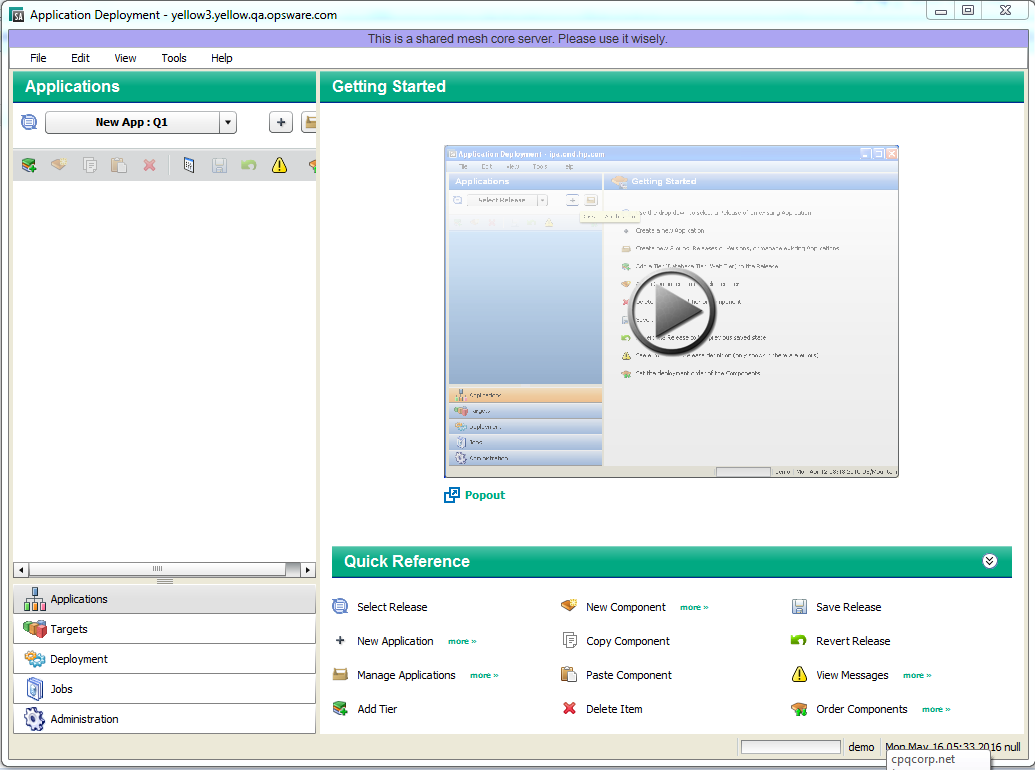
In this initial view, there are two tools that you can use to learn more about the Application Deployment user interface:
- The Getting Started area contains a short video demo that demonstrates the function of this screen.
Click the button to start the video. To play it in a separate window, click
  .
. - The Quick Reference area lists the functions of the tool bar buttons available on this screen.
Hover over each function to view a tooltip. Click the more>> links to open related online help topics in a separate browser window.
The buttons in the lower left corner open the different functional areas of the Application Deployment user interface. The button that is highlighted shows you the area in which you are working. Before you move to a different area, you must either save or revert any changes that you have made.
Note Application Deployment comes with a sample application and sample target to help you get started.
After you add tiers to your application and create components within the tiers, the interface looks like this:
Application Deployment interface – Application with two tiers
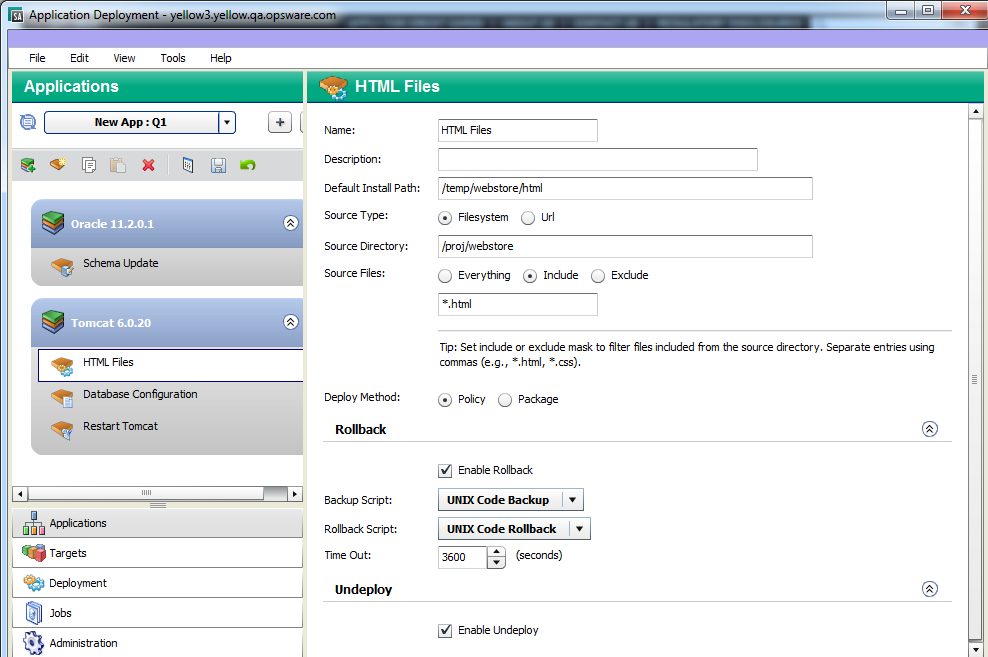
The left pane shows you the structural view and provides navigation controls.
The right pane shows you the content of the item selected on the left. In this example, the HTML Files component in the Tomcat 6.0.20 tier is selected.
Naming rules
The following rules apply to the Name property for all items:
- Names cannot begin or end with a space.
- Names cannot begin with a punctuation mark—in other words, they must begin with a letter or a number.
- Names cannot contain any of the following characters; newline, tab, slash (/), or backslash (\).
The Application Deployment user interface will not allow you to violate the naming rules. If a Name does not comply with these rules, a red box appears around the Name box.
Modifying information in a text box
When you modify information in a text box (either in the right pane or in a dialog), note the following:
- When you select a text box, a blue border appears around that box.
- If you violate any of the Naming rules, a red box appears around the text box.
You can use Ctrl+C, Ctrl+X, and Ctrl+V to copy, cut, and paste information in any editable text box. You can also use the corresponding items on the Edit menu if you prefer.
Saving and reverting changes
Whenever you modify an item in the Application Deployment user interface, the Save and Revert buttons become active:
- Click the Save button
 to save your changes to the Application Deployment database.
 - Click the Revert button
 to discard your changes and reload the most recently saved values from the database.
Before you can move to another screen—for example, from the Applications screen to the Targets screen—you must either save or revert your changes.
Managing applications and targets
Both the Applications screen and the Target screen have “managers” that you can use to quickly assess the current state of your applications and targets and perform various tasks. In the Application Manager, for example, you can create a new release or rename an application.
In the managers, you can select multiple items and then perform the same operation on all of them. For example, you can select several applications and then delete them.
To open a manager, click the ![]() button to the right of the drop-down list in the upper left corner.
button to the right of the drop-down list in the upper left corner.
See Managing applications and Managing targets for details.
Validation messages
The “Warning” sign ![]() appears on the tool bar whenever a validation error has occurred. It also appears when an item is not yet fully configured.
appears on the tool bar whenever a validation error has occurred. It also appears when an item is not yet fully configured.
Click the “Warning” sign ![]() to learn more about the particular error that has been detected.
to learn more about the particular error that has been detected.
For example, after you create a new application, but before you have added any components, the following validation error is reported:
“No components in release”
Validation error messages also appear if you attempt to perform an operation that fails. For example, if you try to create a version for an application whose component are incomplete, messages similar to the following would be displayed.
“Cannot create version from this release. Please correct errors below: Script Component ‘Sample Script Component’: No content.
Code Component ‘Sample Code component’: Source Directory must be set.
Code Component ‘Sample Code component’: Default Install Path must be set.”