


Applications overview
Applications are one of the basic building blocks in Application Deployment. They have two primary qualities: their content and their structure. The content of an application determines its function. The structure of an application reflects its organization. In the context of Application Deployment, the structure helps associate the application with suitable, similarly structured application deployment targets.
The structure also specifies the order in which the components are deployed. In Application Deployment, components implement the content of an application. The following types of components are available:
Code components (for example: HTML files, JAR files, WAR files, .NET assemblies, or databases)
- Ad hoc scripts
- Configuration files
- Application Configurations
- Software Policies
- Packages
- HPE Operations Orchestration (OO) flows
- Registry components (for Windows targets only)
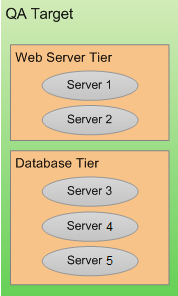
Tiers are containers that represent the structure of an application. A tier includes the components that a particular part of the application requires. Examples of tiers are web servers, application servers, and databases. Targets are also organized in tiers. When you deploy an application, the components of each application tier are deployed to the target servers in the corresponding tier.
Application with two tiers
A single application can have multiple releases. A release, in turn, typically has multiple versions. A version is an immutable “snapshot” of a release at a specific point in time. When you deploy an application to an environment, you deploy a specific version.
There are two types of releases, full releases and delta releases, which differ in their treatment of Code components. For a full release, all files belonging to all Code components are included. For a delta release, only those files that have been added or modified since a specific version of the release was created are included. Files that have been deleted will be deleted on the target servers during deployment.
When you specify the components included in a release, you can specify both rollback and undeploy instructions for each component. The rollback instructions are used in the event that a failure occurs during deployment. In this situation, Application Deployment will retrace its steps and undo each step of the deployment according to the rollback instructions that you provide. The undeploy instructions are used to uninstall an application.
The degree to which rollback and undeploy are automated depends on the type of component. Code components, for example, use standard scripts that are maintained by the Application Deployment administrator. Script, and OO Flow components, in contrast, require you to provide explicit rollback and undeploy instructions.
You can create application groups to help you organize your applications in the most convenient manner. This is an organizational tool that is provided strictly for your benefit; it does not affect the deployment of applications.
The process of defining a new application has three primary steps:
- Create the application and the release
- Specify the tiers that are included in the release
- Specify the components for each tier
Prerequisites
Before you can define an application, the following conditions must be met:
The tiers that this application requires are available in the Application Deployment user interface.
You have permission to create applications.
See the SA
About the Applications screen
After an application has been defined, the Applications screen looks like this:
Applications tab with existing applications
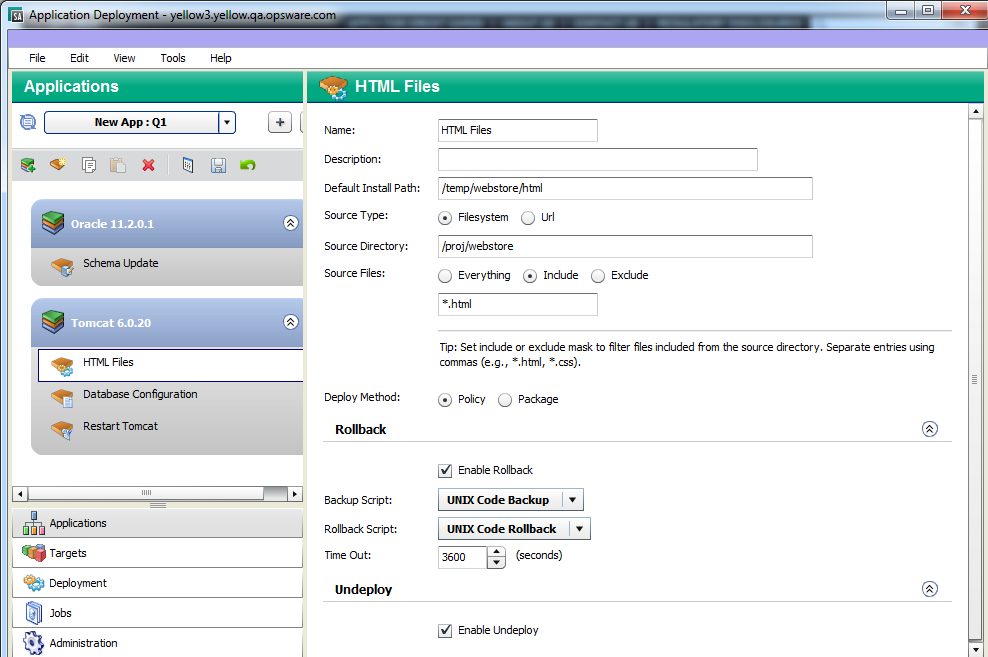
Things to note:
- Application names must be unique.
- All defined applications and releases that you have permission to view are listed in the drop-down list in the upper left corner. Here, the New App: Q1 was selected.
- The left pane shows you the structure of the application.
- The right pane displays information about the item selected in the left pane. You can select a single component or a whole tier. When you select an item, the background color changes for that item. Here, the HTML Files component is selected.
- You can drag and drop components between tiers (assuming the platform is the same).
- You can change the deployment order of the components (see Changing the deployment order of components).
About tiers
Tiers are containers that are used to represent the structure of an application. Tiers contain components, which implement the functions of the application. The Application Deployment administrator defines the tiers that are available for you to use (see the SA
To view a simple example, see .
Working with applications
Creating a new application
This topic provides basic instructions for creating a new application. It assumes that you have the HPE Server Automationpermissions required to create applications. See Set permissions for details.
To create and configure a new application:
- Go to the Applications screen (click Applications in the lower left corner).
- Click the Create a New Application. The Create New Application dialog opens. Note that the ability to create applications is a specific action privilege in SA that needs to be assigned to a group to which you belong (see Set permissions).
- Enter the name of your new application (seeNaming rules).
- Optional: Assign your new application to an existing application group.
- Optional: Enter a description of your new application.
- In the Release Name field, enter the name of the current release that you are working on for this application.
For example, if you release quarterly, you could use Q3-2010, Q4-2010, Q1-2011, Q2-2011, and so forth as your release names. - Select a lifecycle for this release. The lifecycle specifies which phases your application goes through on its way from development to production.
For example, a common lifecycle is Development QA Pre-Production Production. This is the default Standard lifecycle. - Click OK to save the application information.
- Click the Add Tier to add one or more tiers to your application.
- Select the type of tier to add.
A group of standard tiers are provided with your software. If a tier that you need is not available, your Application Deployment administrator may need to add it. See the SA - Click Add.
- Repeat steps (a) and (b) for each additional tier that you need.
- Select the type of tier to add.
- To add components to a tier, follow these steps:
- Select the tier.
- Click New Component to add components to this tier.
- Enter a name for the new component.
- Select the component type. See Types of components for more information.
- Click OK.
- Enter the information required to fully specify the location and behavior of the new component.
The information that you must provide varies depending on the type of component that you are adding. Some component types require instructions for rollback and undeploy scenarios. - Repeat steps (b) through (f) above to add more components to this tier.
- Click Save Release to save your changes.
- Repeat steps 3–4 above to add more tiers and add more components to each tier.
- Click Edit component deployment order.
- Use the green arrow keys to arrange your components in the proper deployment order (see Changing the deployment order of components).
After you have added all tiers and components, your application is fully defined. Your application should look similar to the example shown in Step 1: Define your application - Tiers and components.
If the “Warning” sign ![]() appears on the tool bar, this indicates that a component is not fully defined or is incorrectly defined. For example, a Code component’s source location might reference a directory that does not exist.
appears on the tool bar, this indicates that a component is not fully defined or is incorrectly defined. For example, a Code component’s source location might reference a directory that does not exist.
Click the ![]() icon to determine what information is needed.
icon to determine what information is needed.
Managing applications
If you have permission to do so (see Overview), you can use the Manage Applications tool to perform certain tasks. This tool enables you to create versions that can be deployed to targets. It also enables you to specify very finely grained information about applications and releases.
To open the Manage Applications tool, click the  button on the Applications screen. If you do not have permission to manage applications (see Set permissions), this button is not available.
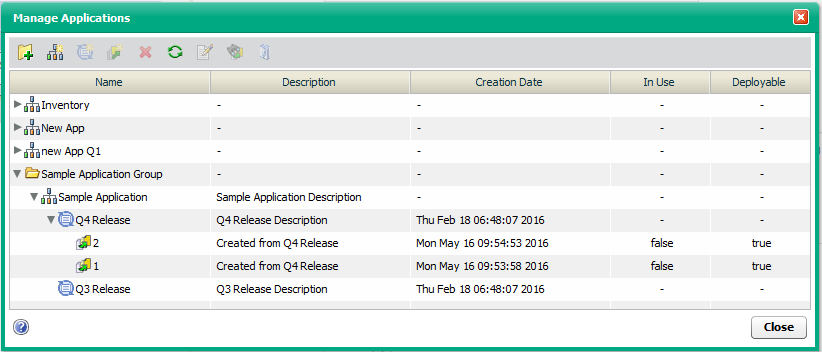
The Manage Applications tool contains a table that lists the items shown here:
![]() Application groups (can be nested)
Application groups (can be nested)
![]() Applications
Applications
![]() Releases
Releases
![]() Versions
Versions
Only those applications that you have permission to View are visible.
The Name and Description columns show the information that was specified when the item was created (or most recently edited). The Creation Date is only shown for releases and versions. The In Use column indicates whether a version has been deployed (and not undeployed or rolled back). The Deployable column indicates whether or not this version was successfully created.
Manage Applications tool
To edit a specific item, select the row containing that item, and click the ![]() button on the tool bar—or simply double-click the item.
button on the tool bar—or simply double-click the item.
Because a version is an immutable “snapshot” of a release at a particular point in time, versions cannot be edited.
Creating a version of an existing release
Before you can deploy a release, you must create a version of that release. A version is a “snapshot” of the release and the lifecycle that is associated with that release at the time that the version is created. The release may continue to evolve, but the version will not change. This ensures that a specific version of a release can be repeatedly deployed.
If you have the proper permissions (see Overview), you can create a version of a release.
Note that versions can also be created on the Deployment screen. See Deploy an application for more information.
To create a version of an existing release:
- Open the Manage Applications tool (see Managing applications).
- In the table, select the row containing the release that you want to work with.
- Click the “Create Version”
 button. The Create New Version dialog opens.
 - Specify the following information:
- The Version shown is based on the name (which is frequently a number) of the previous version. You can change this if you like.
- Optional: The Description initially indicates which release the version is based on. You can also change this if you like.
- Optional: Select the Show Code Component Changes box if you want to see a list of the Code component files. For a full release, all files are listed. For a delta release, only those files that have changed since the “baseline” version are listed. For example:
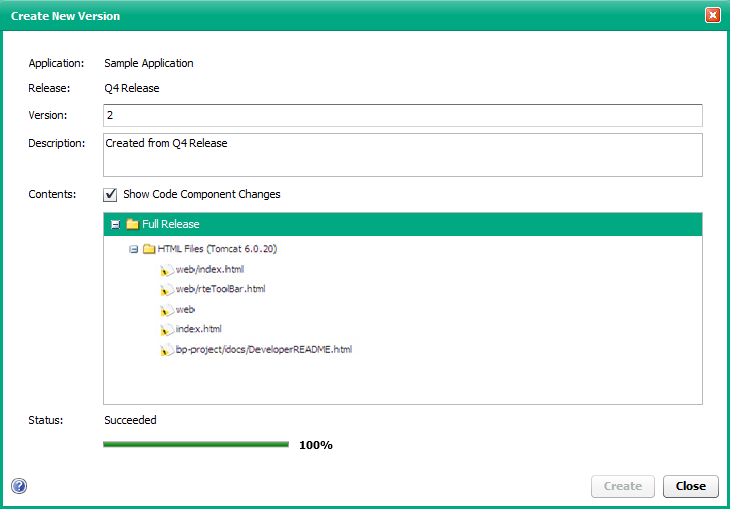
- Click Create. Application Deployment creates the version.
- When the status displays “Succeeded,” click Close.
- If the job fails, click Close, and go to the Jobs screen to determine why.
Creating a new application group
An applications group is a container that you can use to organize your applications in a hierarchy. If you have the proper permissions (see Overview), you can create applications groups.
To create an applications group:
- Open the Manage Applications tool (see Managing applications).
- To create an application group at the top level, do not select anything. To create a nested application group, select the group under which you want to create the new group.
- Click Create Application Group.
- Specify a name for your new group (see Naming rules). This name must be unique within this level of the application hierarchy.
- Click OK. Your new group should now be visible in the table. The groups and applications are listed in alphabetical order at each level of the hierarchy.
You can drag and drop applications between groups in the Manage Applications tool.
Creating a new application
If you have the proper permissions (see Overview), you can create a new application by using the Manage Applications tool. This is an alternative to creating an application on the main Applications screen. This is useful, for example, if you want to set the permissions for the application before you add tiers and components.
To create a new applications in the Manage Applications tool:
- Open the Manage Applications tool (see Managing applications).
- To create an application at the top level, do not select anything. To create the application within an existing application group, select the group that will contain the new application.
- Click Create Application.
- Specify the following information:
- Provide a unique name for your new application (see Naming rules).
- Optional: Enter a description of your new application.
- In the Release Name field, enter the name of the current release that you are working on for this application. By default, this will be “Initial Release.”
- Select a lifecycle for this release. The lifecycle specifies which phases your application goes through on its way from development to production.
For example, a common lifecycle is Development ® QA ® Pre-Production ® Production. This is the default Standard lifecycle.
- Click OK. Your new application should now be visible in the table. The applications and groups are listed in alphabetical order at each level of the hierarchy.
Next steps:
If you want to specify permissions for this application, keep the Manage Applications tool open, and see Set permissions.
If you want to specify tiers and components for the application, close the Manage Applications tool, and select the release that you just created on the main Applications screen.
Creating a new release of an existing application
If you have the proper permissions (see Overview), you can use the Manage Applications tool to create a new release for an existing application. The new release is cloned from an existing release. It can be either a full release or a delta release. A full release contains all of the files included in all of the Code components; a delta release contains only those Code component files that have been added or modified since the specified “baseline” version was created.
For more information, see Managing applications.
To create a new release for an existing application:
- Open the Manage Applications tool (see Managing applications).
- In the table, select the row containing the application that you want to work with.
- Click the “Create Release” button:
 . The Create New Release dialog opens.
 - Specify the following information:
- From the Clone Release drop-down list, select the release that you want to clone. The new application will contain the same tiers and components as the release that you select.
- Enter a Name for this release (see Naming rules). The Name must be unique within this application.
- Optional: Provide a Description for the release. This information appears on reports and is also displayed in the Manage Applications tool.
- Optional: Specify a Change Request number for this release. This information also appears in reports.
- Optional: In the ROI box, estimate the “return on investment” that you expect to realize for each target machine. This is your own assessment of how much value you will derive by deploying this release. You define the scale and meaning of this field. It is used in the HPE Server AutomationROI reports. You can specify any positive whole number.
- Optional: Specify the Planned Release Date. This information also appears in reports.
- If this is a delta release, select the Delta check-box, and select the “baseline” version from the drop-down list. Only those files located in the Source Directory specified for each Code component that have been added or modified since the baseline version was created will be deployed.
If this is a full release, be sure that the Delta check-box is not selected. - Select the pertinent Lifecycle from the drop-down list.
- Click OK.
Modifying properties of an existing release
If you have the proper permissions (see Overview), you can modify the properties of any of its releases.
To modify the properties of an existing release:
- Open the Manage Applications tool (see Managing applications).
- In the table, select the row containing the release that you want to modify.
- Click the “Edit Properties” button:
 .
. - Modify the properties of the release.
- Click OK.
Deleting application groups, applications, releases, or versions
If you have the proper permissions (see Overview), you can use the Manage Applications tool to delete applications, groups, releases, or versions.
To delete an existing application, group, release, or version:
- Open the Manage Applications tool (see Managing applications).
- In the table, select the row containing the items that you want to delete. Note the following:
- You can select multiple items by using the Ctrl or Shift key. You can only delete multiple items of the same type, however—for example, multiple applications or multiple releases.
- If you delete an application, all releases and versions of that application will also be deleted, as will any jobs that are scheduled but not running
- You cannot delete a version that is In Use.
You must first “undeploy” this version from the Jobs screen (see Manage Application Deployment jobs). Then you can delete it.
Click Show Deployment Jobs to see the list of jobs that must be undeployed or rolled back before you can delete this version.
Note that, unless you are the Application Deployment administrator, you can only undeploy or roll back deployments that you initiated. - Some application groups cannot be deleted.
- Click Delete.
There is no UNDO. You will be asked if you really want to delete the item (or items). Click Yes to delete them.
Renaming an application or application group
If you have the proper permissions (see Overview), you can change the name of an application or application group by using the Manage Applications tool.
To rename an application or group:
- Open the Manage Applications tool (see Managing applications).
- In the table, select the row containing the application or group that you want to rename.
- Click Edit Properties.
- Enter a new unique name for the application or group (see Naming rules).
- Click OK.
Granting or revoking permissions for an application
When you create an application, you can specify which SA users and user groups are allowed to view, edit, and deploy your application. If you do not explicitly specify these permissions, you and your Application Deployment administrator will be the only users who can access your application. See Overview for more information.
To set the permissions for an application:
- Open the Manage Applications tool (see Managing applications).
- In the table, select the row containing the application that you want to work with.
- Click the Edit Properties.
- From the Choose User menu, select a user or user group.
- Click Add User.
- Select the permissions that you want to grant:
- View permission allows the user to see your application in the Select Release drop-down list on the Applications screen.
- Edit permission allows the user to change the content (components), structure (tiers), or properties (name, description, release name, etc.) of your application.
- Deploy permission allows the user to deploy your application to one or more targets.
You can select or deny any combination of these permissions. View is automatically selected when you select Edit or Deploy.
- To remove a user (or group) from the permissions list, select the row containing that user (or group), and click Delete .
- Click OK to close the Edit Applications dialog and save your changes. The Cancel button discards your changes.
Viewing the properties of a specific version
If you have the proper permissions (see Overview), you can open the Version Viewer from the Manage Applications tool (see View the properties of a version).
To open the version viewer from the Manage Applications tool:
- Open the Manage Applications tool (see Managing applications).
- In the table, select version that you want to view.
- Click View version on the tool bar. The Version Viewer opens.
Viewing the deployment jobs that use a specific version
If you have the proper permissions (see Overview), you view a list of the deployment jobs that use the most recent version of a release.
To view the list of deployment jobs that use a specific version:
- Open the Manage Applications tool (see Managing applications).
- In the table, select version that you want to view.
- Click the Show Deployment Jobs on the tool bar. The Jobs screen opens and displays a list of all deployment jobs that use this version.