Update an HPE ProLiant server's firmware
An HPE Service Pack for ProLiant (SPP) is an ISO image that contains firmware, drivers, and software packages for Linux and Windows.
The components of each SPP are pretested together for stability.
To upgrade the firmware on target servers to the latest HPE Service Pack, SA offers the baseline Build Plan ProLiant SW - Offline Firmware Update.
Downloading an SPP
- Go to https://www.hp.com/go/spp.
- Select Download.
- Select Current Version.
- Select Download Next to the Full ISO Image selection.
- Enter your HPE Passport user ID and password.
- Follow the instructions to download the SPP ISO file.
Deploying an SPP image to your media server
The HPE-provided Build Plans that deploy SPPs require the SPP contents to be in the directory <File share name>/Media/spp on your Media Server.
Each SPP version has its own folder named after the SPP version.
For example, if the SPP is version 2014.06.0, the contents of the SPP ISO image should be extracted to <File share name>/Media/spp/2014.06.0 on your Media Server.
Preparing and running the “ProLiant SW - Offline Firmware Update” Build Plan
Note The offline firmware update must be performed in the Linux service OS. The server will be automatically rebooted into the Linux service OS if needed.
The following steps must be completed before running the Build Plan:
-
Deploy the HPE Service Pack for ProLiant (SPP) on your Media Server (see Downloading an SPP and Deploying an SPP image to your media server).
-
Copy the ProLiant SW - Offline Firmware Update Build Plan and save it under a new name.
-
Edit the Build Plan copy.
If you are updating firmware on a server already provisioned with an OS and you want your server booted back to this OS after the firmware update is complete, perform the following steps to adjust the Build Plan so it boots your server back into its provisioned OS:
-
Delete the last two steps of the Build Plan: Boot and Wait for HPE SA Agent.
- Add a Reboot step at the end of the Build Plan.
-
Add a Wait for HPE SA Agent step to the end of the Build Plan and specify these parameters:
--production --atLeast 3 --atMost 10
-
- Edit the parameters of the
Set Media Sourcestep, specifying the media URI containing the SPP files (as specified in Deploying an SPP image to your media server without includingMedia/spp/<version>in the path).Example, using NFS:
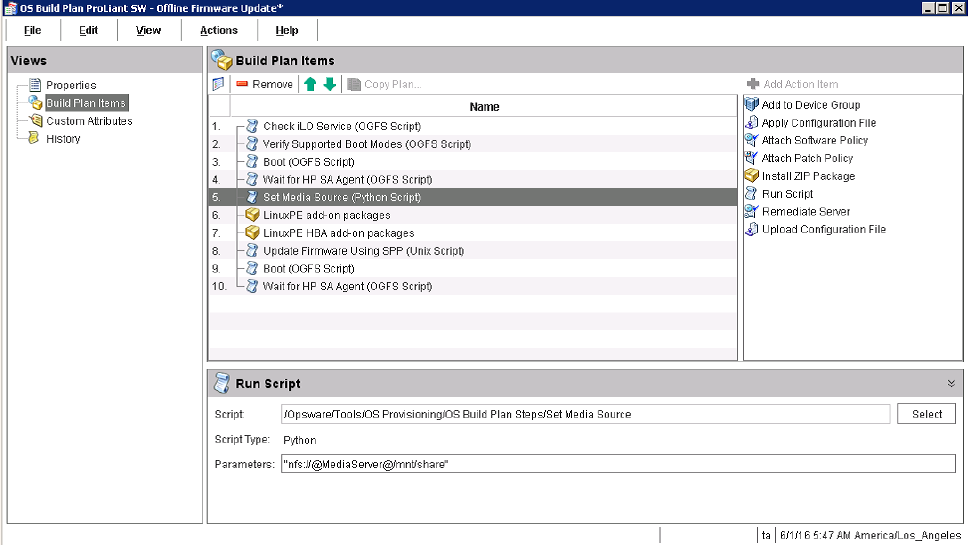
-
Save the Build Plan.
After completing the above steps you can run the Build Plan.
Note When performing an offline firmware update, only the firmware components are installed from the SPP; software and driver components are not installed.
Additional parameters for the “Update Firmware Using SPP” Build Plan
--spp_version- specify the SPP version to use. By default, the latest SPP version is used.--hpsum_options- specify any additional arguments to the HPE SUM utility used to perform the firmware update.For a detailed description of the available HPE SUM options, refer to the
hp/swpackages/assets/doc/CLIHelp.txtfile in the SPP.The syntax of this option is:
--hpsum_options="<option1 option2 ... optionN>"--hpsum_logs_dump_dir- specify a directory on a file share where a zip file containing the HPE SUM logs will be written.--no_show_log- disables showing thehpsum_log.txtcontents in the job log.
Example of a working parameter set:

Provisioning of a UEFI-enabled Server
Provisioning a UEFI-enabled HPE ProLiant Server
For HPE ProLiant, SA provides several Build Plans for transparent installation to BIOS- or UEFI-based target servers. The Build Plans are prefixed "ProLiant OS -". Build Plans for the following operating systems are provided:
- Red Hat Enterprise Linux 6.4 and later
- SUSE Linux Enterprise Server 11 SP3 and later
- Windows Server 2008 SP2 and Windows Server 2012 R2
- VMware ESXi 5.1.U2 and VMware ESXi 5.5
The Build Plans deploy the operating systems independent of the system ROM firmware (that is, a UEFI-based server running in either UEFI or Legacy boot mode and a BIOS-based server install just as well).
Windows WIM capture and deploy (Legacy Bios)
Beside scripted Windows OS installation, SA supports the provisioning of Windows OS using WIM files. Windows Imaging File Format (WIM) is used for the creation and distribution of disk image files.
Assuming you already have a Windows OS installed, configured the way you want, with all the needed applications in place, you can capture a WIM Image of that installation that can be used later to deploy it on other servers; so the provisioning consists of 2 major phases: Capture and Deploy, for which SA has Sample Build Plans.
The advantage of this type of provisioning comes from the fact that a WIM Image once captured, can be used for quick deployments of many servers.
WIM capture
SA Core provides a sample Build Plan to capture a WIM Image, which can be used for any supported Windows OS. It is called SAMPLE: Windows WIM Image Capture for x64 Windows OS or SAMPLE: Windows WIM Image Capture for x86 for x86 Windows OS and can be used as is or as an example to create your own custom implementations if needed. For example you could combine a Windows OS scripted installation Build Plan with this one and have a Build Plan that installs and configures Windows OS and then saves the WIM Image to speed up deployment to a large number of servers.

In order to capture the WIM Image with SA, the installed Windows OS has to have the SA Agent running and registered to your SA Core. A typical Build Plan that will capture the WIM Image of an existing Windows OS will get the existing Windows OS in pre-installation state and then capture and save its WIM Image on a media share server.
Before running the Build Plan please review all its Custom Attributes and make sure you specify a correct share location on the media share server for the Set Media Source step (check step parameters). The Capture Windows Image will have to save the WIM Image on the drive where the media share server was mounted (Z: by default).
Note The server from which the WIM Image was captured needs to be re-provisioned using a WIM Deploy Build Plan, as the Prepare Windows for Image step gets the Installed OS in pre-install state.
WIM deploy
Deploying Windows using a WIM Image (as the scripted installation) also requires an Answer (Unattend.xml) file, so we will have multiple deploy Build Plans for each Windows OS version. The sample Build Plans have names of this form: Windows <version> WIM Install.

To run one of these Build Plans you will first need to get your new server in Maintenance in WINPE using PXE boot as described inNetwork booting
What all of these WIM Deployment Build Plans basically do:
- The media share server is mounted
- The disk is prepared and the WIM Image is applied
- Reconfigures the deployed Windows OS
Before running such a Build Plan please review its Custom Attributes list and provide the proper values for each of them you need (these are mandatory: MediaServer, ProductKey); also make sure the Apply WIM Image step is using the right WIM Image Name from the media share server.
Note For ProLiant servers there are other sample Build Plans that are more complex but in the end they do something similar; you will be able to use them having understood the above example.
Capture and deploy Smart Array (RAID) configuration for HPE ProLiant servers
For HPE ProLiant servers, SA provides Build Plans to configure the Smart Array configuration:
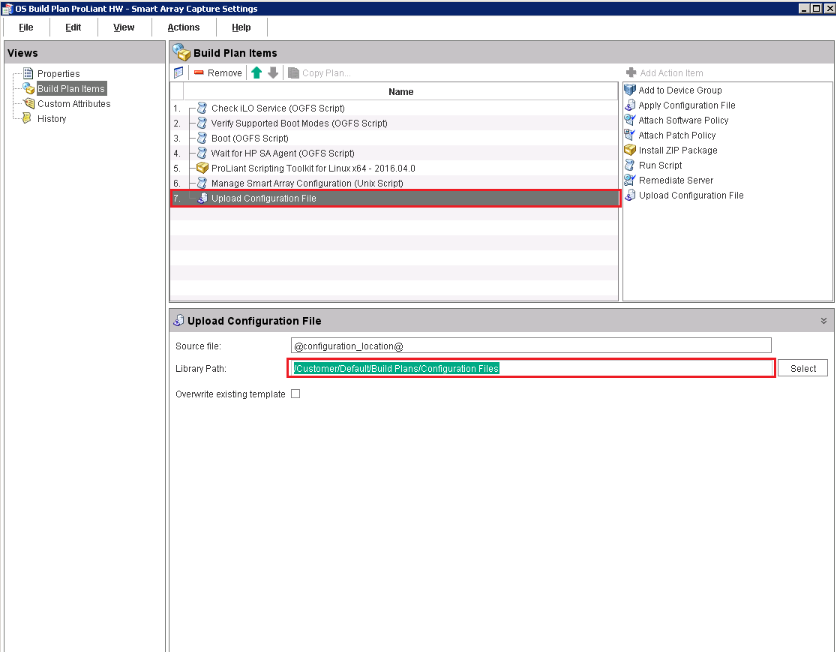
- ProLiant HW - Smart Array Capture Settings - Build Plan for capturing the HPE Smart Array RAID controller settings to the SA Core which later can be restored by a Smart Array Set Build Plan.
- ProLiant HW - Smart Array Erase - Build Plan for clearing the HPE Smart Array configuration. WILL CAUSE DATA LOSS
-
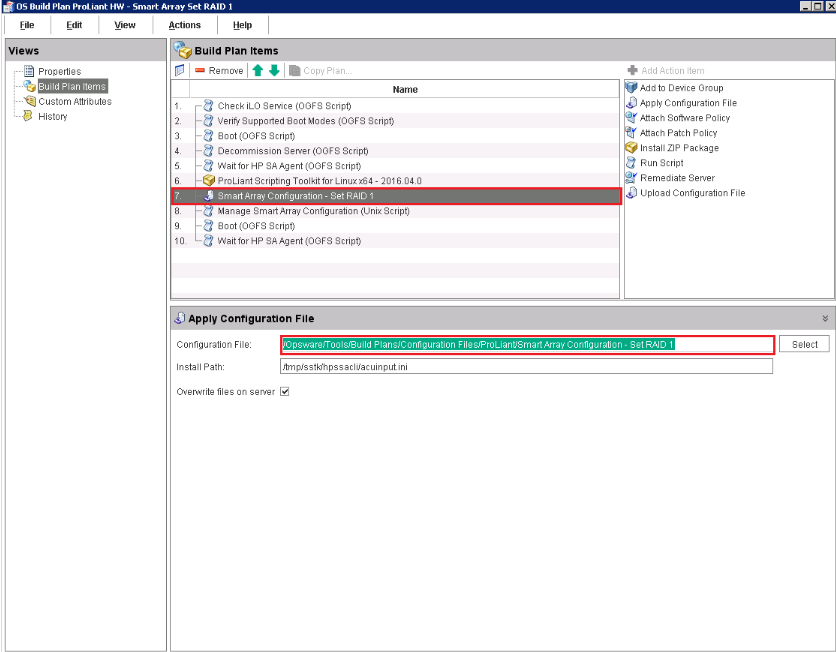
ProLiant HW - Smart Array Set RAID 1- Build Plan for initializing the disks of HPE Smart Array to RAID 1. WILL CAUSE DATA LOSS.
Smart Array on HPE ProLiant servers can be configured in two ways, by: - capturing the configuration file from the same or another ProLiant server - creating a configuration file from scratch.
The configuration file can be captured from a server by using the "ProLiant HW - Smart Array Capture Settings" Build Plan. The Smart Array configuration file will be saved to the Library Path specified in Upload Configuration File step.
For creating a configuration file from scratch, do as follows:
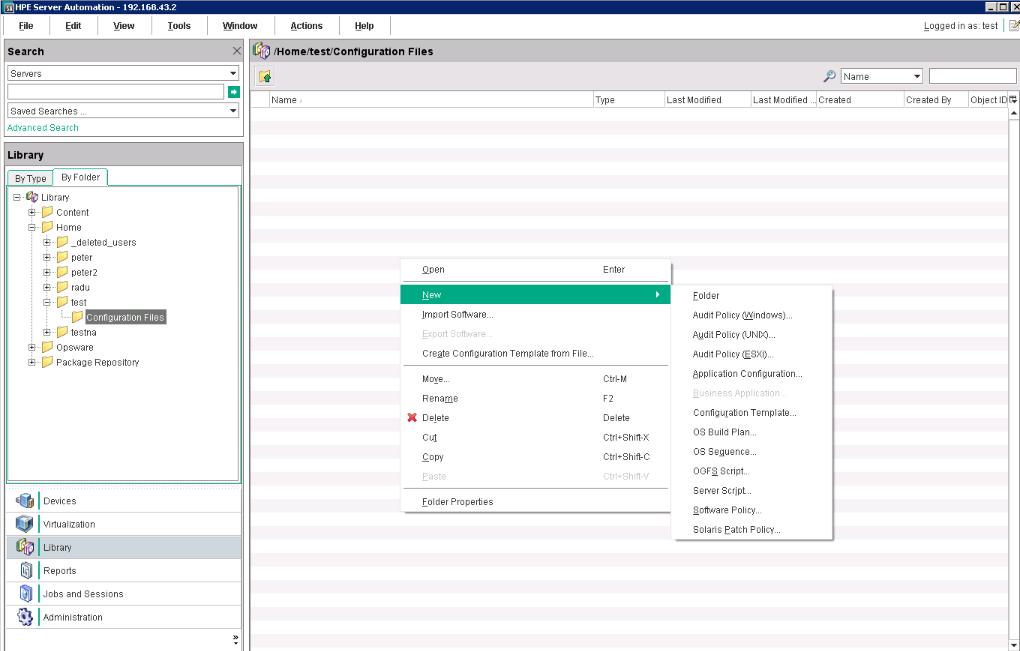
- In the SA Client Navigation pane, select Library, set the view to By Folder.
- Select the folder where the Configuration file will be created. For example: Library > Customer > Default > Build Plans > Configuration Files.
-
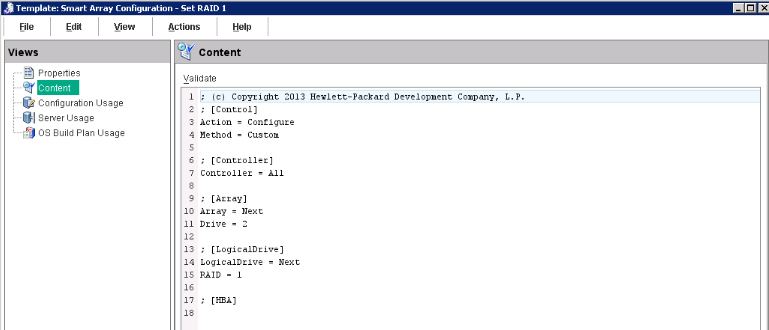
Right click the configuration files list and from the drop-down menu select New > Configuration Template....
-
In the Template window's Properties page provide a name for the template, set Parser Syntax to Custom Attribute Syntax and in the OS list check all checkboxes.

-
In the Views pane, select Content, and in the Content pane, provide the configuration file content.
-
Close the Template window and save the configuration.
For more information on the HPE Smart Array configuration file please refer to the "HPE Array Configuration Utility User Guide."
Smart Array configuration can be deployed by the "ProLiant HW - Smart Array Set RAID 1" Build Plan. To deploy a user-created or a captured configuration file the Build Plan has to be customized by editing the "Smart Array Configuration - Set RAID 1" step and changing the Configuration File path to the intended configuration file.