SA Common Access Card (CAC) and Personal Identity Verification (PIV) Smart Card integration
The Common Access Card (or CAC card) is a smart card about the size of a credit card. It is the standard identification for active-duty military personnel, Selected Reserve, United States Department of Defense (DoD) civilian employees, and eligible contractor personnel. It is also the principal card used to enable physical access to buildings and controlled spaces, and it provides access to defense computer networks and systems. It serves as an identification card under the Geneva Conventions (esp. the Third Geneva Convention). The CAC card meets two-factor authentication standards (something that belongs to the user, and something only known to the user) and standards for digital signature and data encryption technology (authentication, integrity and non-repudiation).
SA/Smart card integration is available only when logging into the SA Client.
- Smart Card/SA integration authentication
- SA Smart Card integration architecture
- Setting up SA/Smart Card integration
- Setting up Smart Card certificates
- Setting up Smart Card certificates on all slice hosts
- Creating a new smart card user
- Logging in to the SA Client as a Smart Card user
Smart Card/SA integration authentication
The SA Client can discover the presence of a Smart Card and provide the user the option to login using regular SA authentication screen or using the new Smart Card based authentication. The SA Client works with the Card Reader API to access Smart Card certificates after the user provides the necessary PIN. The smart card’s certificate is validated for revocation and unique certificate fields are mapped to an internal SA user account. An SA administrator creates the original mapping of these unique fields.
The information that identifies a user is stored on the Smart Card in a document called a certificate. This certificate contains an encryption key called a public key. It also contains text fields that identify the user, such as the person’s name, usually the first, the last names and the middle initial or perhaps the user’s email address within the organization. In order to be able to match a user’s Smart Card authentication information with an existing SA username, the system constructs a username from the text data in the Smart Card certificate.
A certificate stored on a Smart Card looks similar to the following:
Certificate:
Data:
Version: 3 (0x2)
Serial Number: 1501 (0x5dd)
Signature Algorithm: ecdsa-with-SHA256
Issuer: C=US, O=Test Certificates 2010, OU=Test CA, CN=Test ECC P-256 CA
Validity
Not Before: Oct 1 08:30:00 2010 GMT
Not After : Oct 1 08:30:00 2030 GMT
Subject: CN=Test E. Cardholder XV, C=US, O=Test Government, OU=Test Agency
Subject Public Key Info:
Public Key Algorithm: id-ecPublicKey
EC Public Key:
pub:
04:03:a0:ad:22:46:01:b8:9b:1b:65:b0:94:3f:5e:
…
To derive a username from the certificate, SA uses a pattern specification string set up in the /etc/opt/opsware/twist/twist.conf file and a matching and assembly algorithm that constructs the username. The pattern specification might look like this:
sc.usernameMakeRule.1=%Subject#CN$1%Subject#CN$2%Subject#CN$3
The username creation logic would use the above specification string to create the username:
TestE.Cardholder
Field names from the certificate are specified by using the percent sign (%), the attributes (sub-fields) are specified with a number sign (#) and positional fields within an attribute are specified using a dollar sign ($) followed by a number (the position of the field in the text line).
This will be the default pattern supplied with the SA installation. SA administrators must be aware that this pattern may create user names which may NOT be unique and they should plan accordingly.
Note Do not use Smart Card attributes in the algorithm for username construction.
You must decide on the pattern of creating user names from Smart Card certificates prior to installation. It is very important to understand the mechanism, decide on a username creation pattern (you can accept the default pattern or specify a different pattern) and insure that administrators are trained to create Smart Card user accounts in SA using the correct pattern-based username.
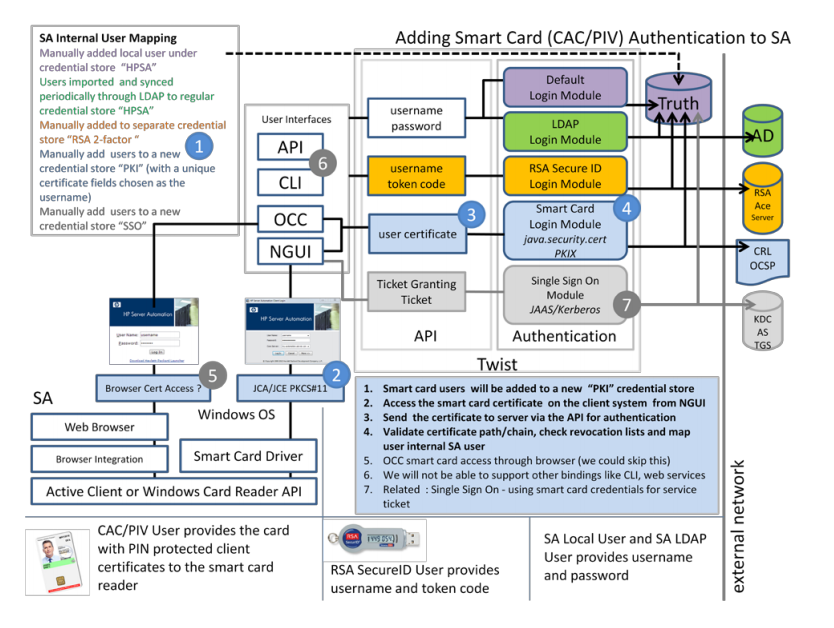
SA Smart Card integration architecture
The following figure illustrates how CAC/PIV smart card functionality is integrated with SA.
SA/CAC Smart Card integration architecture
Setting up SA/Smart Card integration
Setting up new users to log in using a CAC smart card is simple:
- Create a new user and specify the credential store as SmartCard.
- When that user logs in to the SA Client, they will swipe their smart card and enter their unique PIN
Setting up Smart Card certificates
The /etc/opt/opsware/twist/twist.conf file must be modified as follows:
- For each signature algorithm, there must be an entry named
sc.sigAlrgName.NwhereNis the number in the series. - For each algorithm, there must be a path to the certificate file (in
.pemformat) with the namesc.trustedCertPath.N.For example:
sc.sigAlgName.0=SHA256withECDSA
sc.trustedCertPath.0=/var/opt/opsware/crypto/twist/smartcard/ECCP256IssuingCACertificate.pem
sc.sigAlgName.1=SHA384withECDSA
sc.trustedCertPath.1=/var/opt/opsware/crypto/twist/smartcard/ECCP384IssuingCACertificate.pem
sc.sigAlgName.2=SHA256withRSA
sc.trustedCertPath.2=/var/opt/opsware/crypto/twist/smartcard/RSA2048IssuingCACertificate.pem
The location of the certificate files is optional but it is recommended that the certificate files be stored in the directory:
/var/opt/opsware/crypto/twist/smartcard/
Setting up Smart Card certificates on all slice hosts
You must perform the following steps on each server in the SA Core that hosts a Slice Component bundle.
- Create the following folder:
mkdir /var/opt/opsware/crypto/twist/smartcard - For each Slice host, import the users’ smart card certificates into the folder you created in Step1:
/var/opt/opsware/crypto/twist/smartcard - Ensure that the ownership of these certificates is changed to
twist: - Restart the Web Services Data Access Engine (
twist) on each Slice host. - Set up a user and verify that the user can be authenticated using the smart card.
chown -R twist:user /var/opt/opsware/crypto/twist/smartcard
Creating a new smart card user
To create a new SA user from the SA Client:
- In the SA Client, select the Administration tab in the navigation pane.
- Open the Users and Groups node in the navigation pane. This displays the Users node.
- Select the Users node. This displays all your SA users.
- Select the Actions > New menu or select the New User icon. This displays the New User window.
Complete the user information fields as described in Create a new user, specifying SmartCard as the Credential Store.
When you select “SmartCard” as the credential store, the password field is removed from the screen because smart card access is done using smart card encryption techniques and not a preset password.
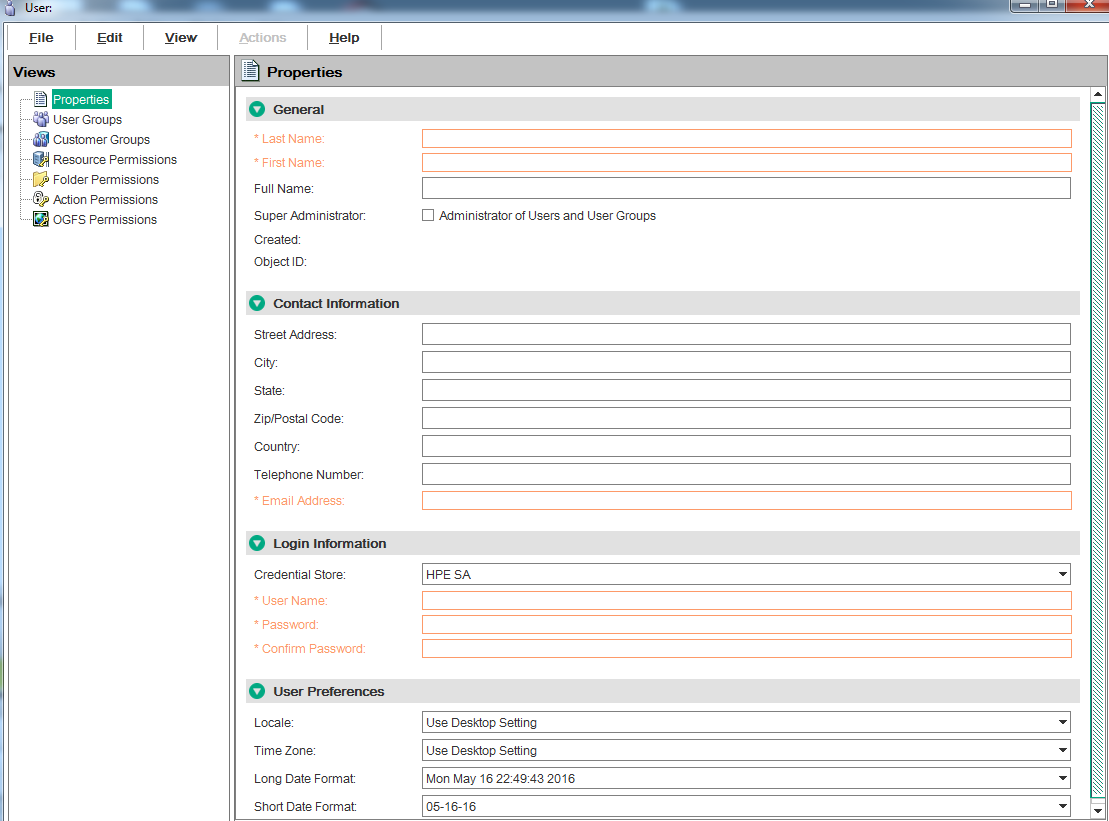
As described above, the “User Name” field must contain a name which matches the name derived from the user smart card certificate according to the rules described in Smart Card/SA integration authentication . The administrator who creates the new smart card user must understand how the username construction pattern rules work so they can enter the text string that matches those rules.
Logging in to the SA Client as a Smart Card user
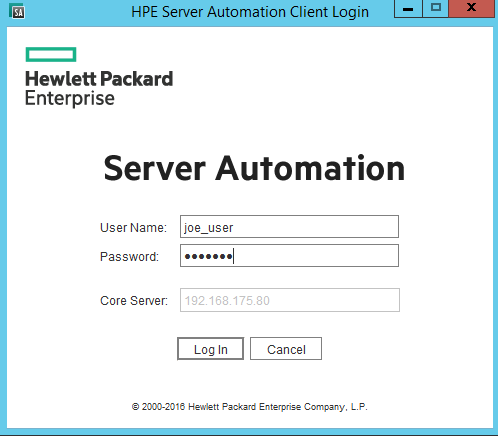
When you start the SA Client, you see screens similar to the following:
Standard SA Client Login Dialog
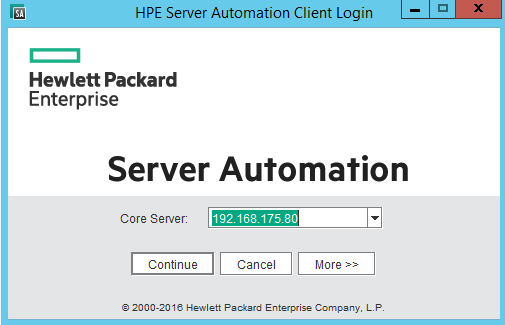
SA Client Username/Password Window
To enable Smart Card login, click on the More>> button to access the advanced log in settings. You see a screen similar to the following:
Setting the SA Client to Use Smart Card Login
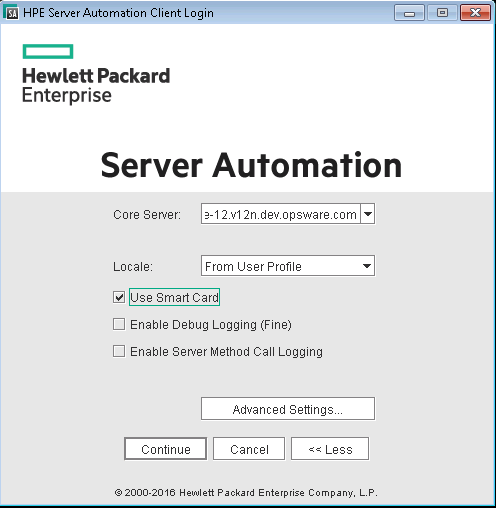
To enable Smart Card log in, select Use Smart Card by checking the box to the left of the option. The log in screen is displayed as shown the following figure:
Smart Card-Enabled Login Screen
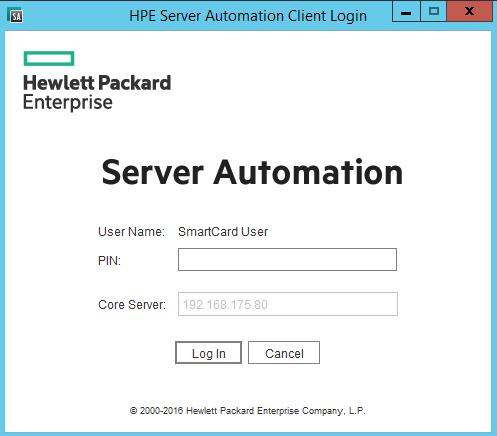
All subsequent logins will display this screen. To revert back to the standard username/password log in, select Advanced Settings and uncheck the Use Smart Card option.
On the Smart Card login screen, the user must be using a PC with an operating smart card reader device. In order for the reader to be usable by SA, ensure that the Windows device is visible in the “Media” icon application. If the PC used to access SA with the smart card does not have a valid card reader, please contact the IT administrator. To proceed with access to SA, the user must enter the PIN for the smart card and press the “Log In” button.