


Set permissions on user groups
This section describes how to set action permissions, resource permissions, folder permissions and OGFS permissions for a user group. All these permissions are granted to the users who are members of the user group.
- Set Resource permissions - facilities, customers, and device groups
- Set Action permissions
- Set Folder permissions
- Set OGFS permissions
- Set private user group permissions
Set Resource permissions - facilities, customers, and device groups
All managed servers are grouped by customers, facilities, and device groups. The Resource Permissions view lists the customers, facilities, and device groups the user group has access to. For more information, see Resource permissions.
To modify resource permissions for a user group:
- In the SA Client, select the Administration tab in the navigation pane.
- Open the Users and Groups node in the navigation pane. This displays the User Groups node.
- Select the User Groups node. This displays all your user groups.
- Select a user group. This displays information about that user group in the lower part of the screen.
- Select the Actions menu, or right-click and select the Open menu. This displays the user group in a new screen.
- In the navigation pane, select the Resource Permissions view. This displays all the facilities, customers, and device groups to which the user group has access.
- To add access to a customer, perform the following steps:
- Select the “+” icon under the Customers heading. This displays a list of all customers in a separate window.
- Select one or more customers.
- Select the access, either Read or Read & Write.
- Select the Add button.
- To remove access to a customer, select the customer and select the “-” button.
- To add access to a facility, perform the following steps:
- Select the “+” icon under the Facilities heading. This displays a list of all facilities in a separate window.
- Select one or more facilities.
- Select the access, either Read or Read & Write.
- Select the Add button.
- To remove access to a facility, select the facility and select the “-” button.
- To add access to all device groups, select the check box labeled Allow access to all device groups.
- To add access to a subset of device groups, perform the following steps:
- Clear the check box labeled Allow access to all device groups. This displays the “+” icon.
- Select the “+” icon under the Device Groups heading. This displays a list of all public device groups in a separate window.
- Select one or more device groups.
- Select the access, either Read or Read & Write.
- Select the Add button.
- To remove access to a device group, select the device group and select the “-” button.
- Select File > Revert to discard your changes.
- Select File > Save.
Set Action permissions
This section describes how to set action permissions for a user group. For more information, see Action permissions.
To modify action permissions for a user group:
- In the SA Client, select the Administration tab in the navigation pane.
- Open the Users and Groups node in the navigation pane. This displays the User Groups node.
- Select the User Groups node. This displays all your user groups.
- Select a user group. This displays information about that user group in the lower part of the screen.
- Select the Actions menu or right-click and select the Open menu. This displays the user group in a new screen.
- In the navigation pane, select the Action Permissions view.
- Locate the permission you want to modify using the Name and Description columns. You can right-click on any column to group or ungroup by that column for easier browsing.
- Select the current value for the permission in the Permission column. This displays a drop-down list of the available values. Select the desired value.
You can select and set multiple permissions simultaneously. Select multiple permissions by dragging the mouse, or by using the Shift and Control keys on your keyboard and the mouse. Right-click to display the available permission values, then select the desired values. If a permission value is grayed out, that permission is controlled by another, related permission that needs to be changed first. For example, the permissions “Create Applications” and “Manage Application Deployment” both require that the permission “Access Application Deployment” be set to Yes before they can be set.
- Select File > Revert to discard your changes.
- Select File > Save.
Set Folder permissions
This section describes how to set folder permissions for a user group. For more information, see Folder Permissions.
To modify folder permissions for a user group:
- In the SA Client, select the Administration tab in the navigation pane.
- Open the Users and Groups node in the navigation pane. This displays the User Groups node.
- Select the User Groups node. This displays all your user groups.
- Select a user group. This displays information about that user group in the lower part of the screen.
- Select the Actions menu or right-click and select the Open menu. This displays the user group in a new screen.
- In the navigation pane, select the Folder Permissions view. This displays all the folders in the SA Library and their current permissions.
- Locate and select the folder you want to modify.
- Select the Actions menu or right-click and select the Folder Properties menu. This displays the folder properties in a new window.
- Select the Permissions tab. This displays all the users and user groups that have access to the folder.
- Select a user or a user group. This displays the current access permissions at the bottom of the window.
- Set the access permissions at the bottom of the screen.
- To optionally give access to other users or user groups, select the Add button, select one or more users or user groups and select the Add button.
- To optionally remove access for a user or user group, select the user or user group and select the Remove button.
- Select the OK button.
- Select File > Revert to discard your changes.
- Select File > Save.
Set OGFS permissions
This section describes how to set OGFS permissions for a user group. For more information, see Global File System permissions.
- In the SA Client, select the Administration tab in the navigation pane.
- Open the Users and Groups node in the navigation pane. This displays the User Groups node.
- Select the User Groups node. This displays all your user groups.
- Select a user group. This displays information about that user group in the lower part of the screen.
- Select the Actions menu or right-click and select the Open menu. This displays the user group in a new window.
- In the navigation pane, select OGFS permissions. This displays the current OGFS permissions.
- To add permissions, select the “+” icon. This displays the Add OGFS Permissions window, as shown in the following figure. This screen has three main parts:
- Features lists the action permissions for performing tasks with the OGFS and OGSH.
- Groups lists the servers that the actions can be performed on. Servers are grouped by facilities, customers or device groups.
- Logins specifies the login name to be used when connecting to servers using the OGFS and OGSH.
Add OGFS Permissions Window
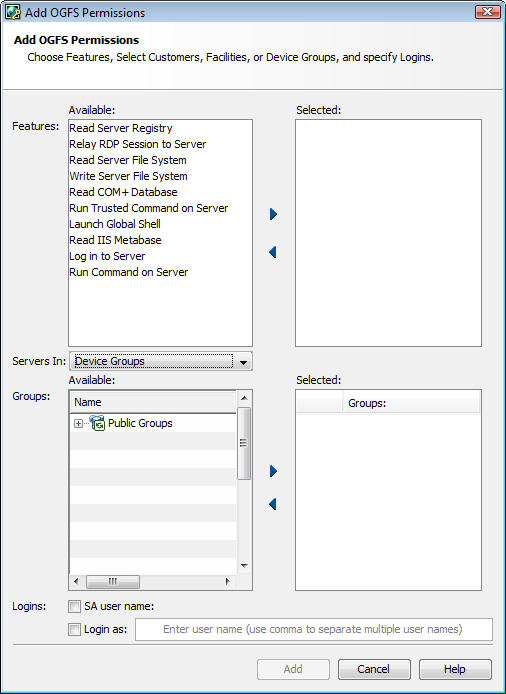
- In the Features section, select the OGFS actions you want to grant under the Available list. Select the arrow to move those actions to the Selected list.
- In the Groups section, first select the type of server group you want to select from in the Servers In drop-down list. Select either Customers, Facilities or Device Groups.
- Select one or more customers, facilities or device groups. Select the arrow to move them to the Selected list.
- In the Logins section, select the check box labeled SA user name if you want OGFS users to log in with their SA user name. Otherwise select the check box labeled Login as and enter one or more user names for logging into servers with the OGFS.
- Select the Add button.
- To remove permissions, select one or more permissions and select the “-” button.
- Select File > Revert to discard your changes.
- Select File > Save to save your changes.
For more information on OGFS permissions, see Global File System permissions.
Set private user group permissions
Private user groups are intended for migrating scripts into folders in the SA Library. You should not assign permissions to users using private user groups. You should use regular user groups. For more information, see SA users and user groups.
For information about private user groups, see Private user groups. To modify a private user group, perform the following steps:
- In the SA Client, select the Administration tab in the navigation pane.
- Open the Users and Groups node in the navigation pane. This displays the Users node.
- Select the Users node. This displays all your SA users.
- Select the user you want to set private user group permissions for.
- Select the Actions menu or right-click and select Open. This displays the user information in a new window.
- Select the User Groups view. This displays all the user groups the user is a member of, including the private user group. The private user group has the same name as the user.
- Select the private user group.
- Select the Actions menu or right-click and select Open. This displays the private user group in a new window.
- To modify resource permissions, select the Resource Permissions view. For more information, see Set Resource permissions - facilities, customers, and device groups.
- To modify action permissions, select the Action Permissions view. For more information, see Set Action permissions.
- Select File > Revert to discard your changes.
- Select File > Save to save the changes.