Setting password, account, and session security policies
You can set several policies to keep your SA user passwords secure, automatically disable inactive user accounts, and automatically lock inactive user sessions. Perform the following steps:
- In the SA Client, select the Administration tab.
- In the navigation panel, open the Users and Groups node. This displays the Security Settings node.
- Select the Security Settings node. This displays the password policy settings.
- Set any of the following policies:
- Reset forces each user to reset their password the first time they log in to SA.
- Expiration forces each user to change their password after the specified number of days. You can also specify how many times the user can postpone the change before it is required by specifying a number for “Allow graceful logins.”
- Retention specifies how many previous passwords to save. This setting prohibits users from reusing passwords. For example, if you specify 10, users cannot reuse their previous ten passwords.
- Login Failure specifies how many times someone can attempt to log in with the wrong password before the user account is suspended. When a user account is suspended you can reactivate it by selecting Administration > Users and Groups, selecting the user and selecting the Activate button. For more information, see Suspende a user.
- Account Inactivity specifies how long a user account can be unused before it is suspended. When a user account is not used for the specified number of days, the user account is suspended. When a user account is suspended you can reactivate it by selecting Administration > Users and Groups, selecting the user and selecting the Activate button. For more information, see Suspende a user.
- SA Client Session Inactivity specifies how long a user session can be idle before the SA Client is locked. Specify a value in minutes.
- To revert to the previously saved settings, select the View > Refresh menu or press the F5 key on your keyboard.
- After setting the values you want, select the Save button.
This section provides information on the following topics:
- Resetting initial passwords
- Setting password expiration
- Prohibiting reuse of old passwords
- Suspending user accounts after login failures
- Suspending inactive user accounts
- Locking inactive sessions
- Displaying a user login agreement
- Displaying a banner on the SA Client screen
Resetting initial passwords
To require users to reset their passwords the first time they log in to SA:
- In the SA Client, select the Administration tab.
- In the navigation panel, open the Users and Groups node. This displays the Security Settings node.
- Select the Security Settings node. This displays the password policy settings.
- Set the check box labeled “Reset password on first login.”
- Select Save.
Setting password expiration
To require SA users to change passwords after a certain number of days:
- In the SA Client, select the Administration tab.
- In the navigation panel, open the Users and Groups node. This displays the Security Settings node.
- Select the Security Settings node. This displays the password policy settings.
- Select the check box labeled Expiration.
- Enter the number of days before password expiration.
- Enter the number of graceful logins with the old password that will be allowed before the user is suspended.
- Select the Save button.
To activate a suspended user, see Activate a suspended user.
Prohibiting reuse of old passwords
To save a copy of users’ old passwords and prevent them from reusing their old passwords:
- In the SA Client, select the Administration tab.
- In the navigation panel, open the Users and Groups node. This displays the Security Settings node.
- Select the Security Settings node. This displays the password policy settings.
- Set the check box labeled Retention.
- Enter the number of old password to save and prohibit.
- Select the Save button.
Suspending user accounts after login failures
You can suspend a user account if someone attempts to log in with the wrong password after a certain number of tries as follows.
- In the SA Client, select the Administration tab.
- In the navigation panel, open the Users and Groups node. This displays the Security Settings node.
- Select the Security Settings node. This displays the password policy settings.
- Set the check box labeled Login Failure.
- Enter the number of failed login attempts. If someone tries to log in to any account and fails after the specified number of tries, the user account will be suspended.
- Select Save.
To activate a suspended user, see Activate a suspended user.
Suspending inactive user accounts
You can automatically suspend user account if they do not log in for a certain period of time.
- In the SA Client, select the Administration tab.
- In the navigation panel, open the Users and Groups node. This displays the Security Settings node.
- Select the Security Settings node. This displays the password policy settings.
- Set the check box labeled Account Inactivity.
- Enter the number of days. If any user does not log in for the specified number of days, the user account will be suspended.
- Select Save.
To activate a suspended user, see Activate a suspended user.
Locking inactive sessions
You can automatically lock any SA Client session if the user has been inactive for a certain period of time. The user must enter their password to unlock the session.
- In the SA Client, select the Administration tab.
- In the navigation panel, open the Users and Groups node. This displays the Security Settings node.
- Select the Security Settings node. This displays the password policy settings.
- Set the check box labeled SA Client Session Inactivity.
- Enter the number of minutes. If any logged in user does use the SA Client for the specified number of minutes, the SA Client will be locked and the user will have to enter their password.
- Select Save.
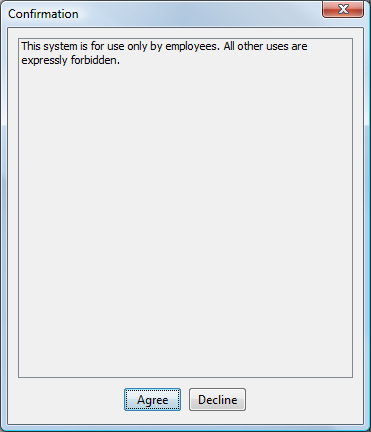
Displaying a user login agreement
You can display a message whenever a user logs in and require that they acknowledge the message. Perform the following steps:
- In the SA Client, select the Administration tab.
- In the navigation panel, open the Users and Groups node. This displays the Security Settings node.
- Select the Security Settings node. This displays the user agreement settings and the banner settings.
- Under User Agreement Settings, select Enable display.
- Enter the text you want displayed in the user agreement.
- Select Save.
Whenever any user logs in to the SA Client, the specified message is displayed and the user must acknowledge the message, as shown in the following figure.
User login confirmation dialog
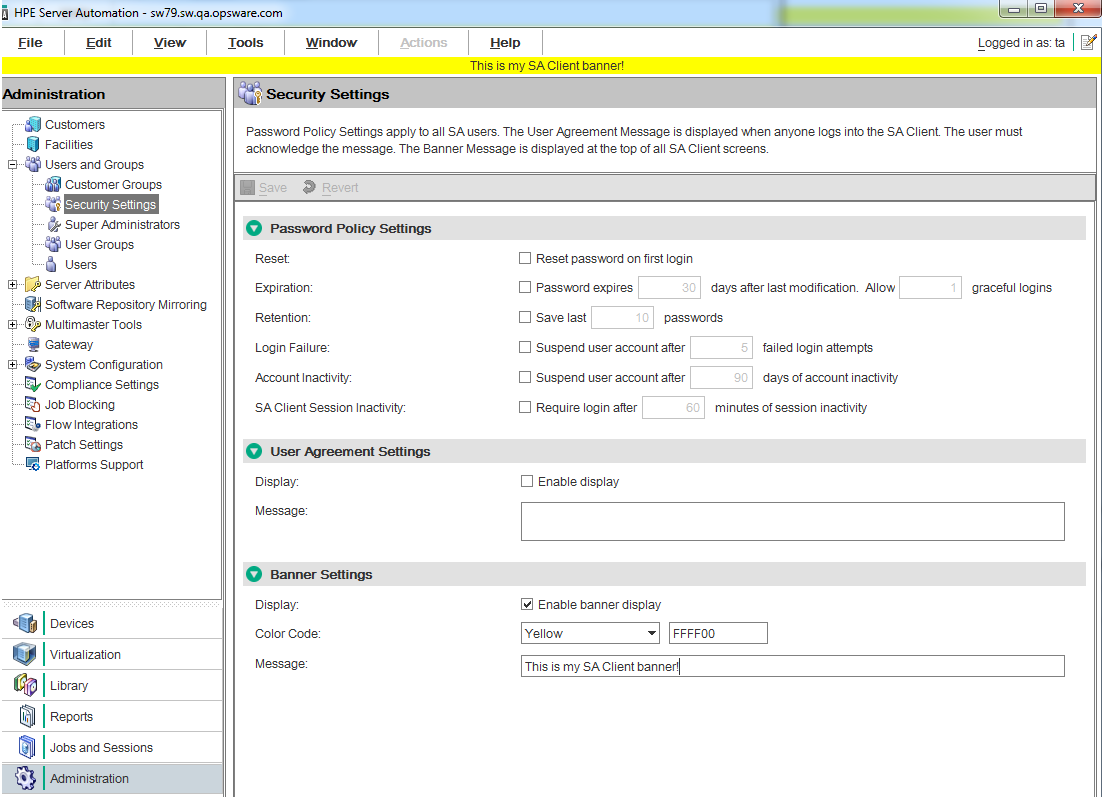
Displaying a banner on the SA Client screen
You can display a message at the top of each SA Client screen in any background color. Perform the following steps:
- In the SA Client, select the Administration tab.
- In the navigation panel, open the Users and Groups node. This displays the Security Settings node.
- Select the Security Settings node. This displays the user agreement settings and the banner settings.
- Under Banner Settings, select Enable banner display.
- Select either a color from the drop-down list or specify a hexadecimal color code between 000000 and FFFFFF. The first 2 digits are the red component, the second 2 digits are the green component and the last 2 digits are the blue component.
- Enter the text you want displayed in the banner.
- Select Save. This displays the banner at the top of all SA Client screens as shown in the following figure.
SA Client banner settings