


Step 2 - Create a version to deploy
After you have defined your application, you must create a new version of the application. You then deploy the components that constitute that version to your targets.
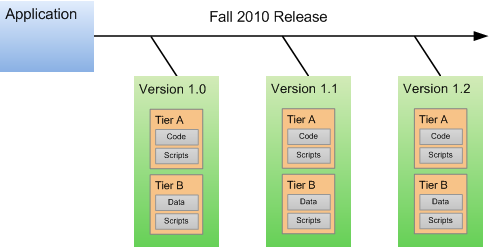
The figure below shows an application that is being developed for a release named “Fall 2010.” Three versions of this application have been built: versions 1.0, 1.1 and 1.2. Any of these three versions can be deployed to a target.
Applications, releases, and versions
Make sure that you have successfully created a version of your application before you attempt to deploy it.
To create a new version of your application:
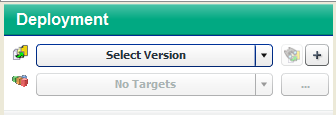
- Go to the Deployment screen (click Deployment in the lower left corner).
- In the Select Version drop-down field, navigate to your application.
- Under the pertinent release of your application, click the Create New Version link.
- In the Create New Version window, enter a Version name (or number).
The version name is simply a string that you specify. If the previous version of this release contains a number, Application Deployment will automatically increment it. If the previous version was “1,” for example, “2” will appear in the Version field. If the previous version was “V 1.2.1,” the string “V 1.2.2” will appear in the Version field. - Regardless of what Application Deployment puts in the Version field, you can specify any version name that you want.
- Optional: In the Description field, enter any additional information that you want to specify for this version.
- Optional: If you want to see a list of the files included in the Code components, select Show Code Component Changes.
- Click Create. This creates a new version of your application by gathering all the artifacts that are components of this application.
- Click Close. The Application Deployment tool has created a new version of your application that is ready for deployment.