


Deploy a version
When you deploy an application, you deploy a specific version of that application. A version is associated with a particular release. There are two steps required to deploy a version:
- Creating a new version (or using an existing version)
- Deploying a specific version
You can deploy any application that you have permission to deploy provided that you have Deploy permission for the environment (see Overview).
Creating a new version
Provided that you have permission to deploy an application (see Overview), you can create a new version of a specific release of that application.
To create a version of your application:
- Select the Deployment tab in the lower left corner.
- In the Select Version drop-down field, navigate to your application.
- Under the pertinent release of your application, click the Create New Version link.
- In the Create New Version window, enter a Version name (or number).
The version name is simply a string that you specify. If the previous version of this release contains a number, however, Application Deployment will automatically increment it. If the previous version was “1,” for example, “2” will appear in the Version field. If the previous version was “V 1.2.1,” the string “V 1.2.2” will appear in the Version field.
Regardless of what Application Deployment puts in the Version field, you can specify any version name that you want. The version name must be unique within a release, however. - Optional: In the Description field, enter any additional information that you want to specify for this version.
- Optional: If you want to see a list of the code components that have been updated since the previous version was created, select Show Code Component Changes.
- Click Create. This creates a new version of your application by gathering all the files that are components of this application.
This starts a job that creates the version. The progress bar in the lower left shows you the status and progress of the job. If the job fails, go to the Jobs screen to find out why. - Select Close. A new version of your application is now ready for deployment.
Deploying a specific version
You deploy a version of your application to one or more targets. Application Deployment translates component definitions (from your application definition) into deployment steps that will be executed on servers specified in the selected targets. The deployment steps do the following things:
Copy the application files to the target servers.
Execute scripts that you provided with your application.
Apply items from the SA Library that you have specified.
Execute OO flows referenced by the application.
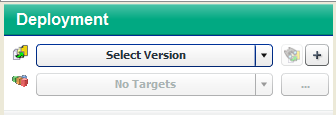
To deploy a version:
- Select the Deployment button in the lower left corner.
- From the Select Version drop-down list, navigate to and select the version of the application that you want to deploy. Select an existing version, or create a new one (see Creating a new version).
When you hover over an existing version in the list, its tiers are displayed to the right of the list. If a release is marked with an asterisk (*), this means that this release of the application has been modified since the last version was created. - From the Select Target drop-down list, select the target where you want this version of the application to be deployed.
If you do not see your target in the list, make sure that the following conditions are true:- The tiers of the target match (or are a superset of) the application tiers.
- You have Deploy permission for this environment.
- Each tier contains at least one server.
- The environment is not marked Not Ready in the lifecycle.
The lifecycle for the release containing your version must include your environment and target.
For additional target options, click Advanced Target Selector to the right of the Select Target drop-down list:
- You can specify multiple targets if you want to deploy this version to more than one target. Only those targets that meet all of the requirements listed above can be selected.
- If your SA Core and Application Deployment are configured to support them, you can specify a just-in-time target to create a new target for this deployment. This option is available only when the following conditions are true:
- Your SA core is configured to run HPE Operations Orchestration (HPE OO) flows.
A Just-In-Time Targets Flow has been specified in the Application Settings area on the Administration screen.
For more information, see Just-in-time targets.
- Optional: Review the deployment job settings in the right panel. You can modify some of these settings (see Deployment screen). To expand a section, click the
 icon.
icon. - Click Start Job. This launches a Deployment job that will copy your application components to the target server and run any necessary code, scripts, and flows.
You can see the status of the deployment on the Jobs screen.