


Deployment screen
The Deployment screen enables you to deploy a specific version of a release to one or more targets. The left panel of the deployment screen represents the structural view.
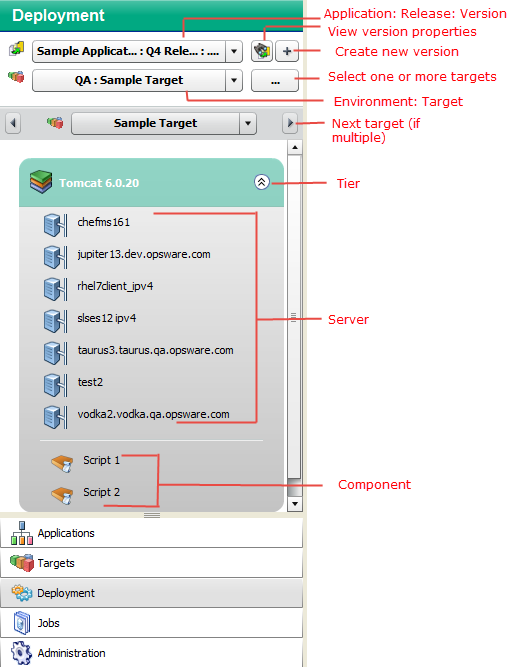
In this example, a single target has been selected (Advantage123), and each tier has exactly one server. You can select multiple targets for a deployment, but all targets must be in the same environment.
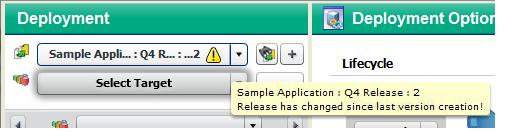
The “Warning” sign ![]() is visible here, because the Green Checking 1.0 release has changed since the RC 3 version was created. When this icon appears, hover over it to see more information.
is visible here, because the Green Checking 1.0 release has changed since the RC 3 version was created. When this icon appears, hover over it to see more information.
Tool tip associated with Warning sign
The right panel of the Deployment screen shows you the content view—the settings that are specific to this deployment job.
Deployment screen right panel
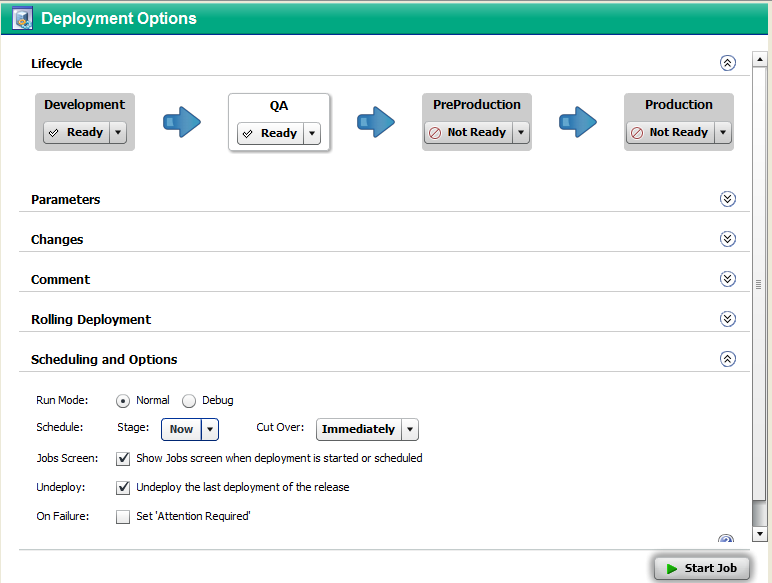
The following sections in the right panel contain information about the deployment job that will be created when you click the Start Job button:
To expand a section, click the ![]() icon (or double-click the blue bar).
icon (or double-click the blue bar).
Lifecycle
The Lifecycle section at the top of the panel shows you the status of all the environments included in this lifecycle. The environment to which you are deploying is highlighted.
You can only deploy to any environments that are not marked Not Ready. Your Application Deployment administrator or the environment owner determines which environments are available. Anyone with Deploy permission for this environment can update the status of the environment at deployment time.
Parameters
The Parameters section enables you to view and customize the values of any editable Parameters used by the application’s components. At deployment time, Application Deployment checks to make sure that all required parameters have values—if they do not, the Deployment job will not start.
Parameters information on the Deployment Job screen
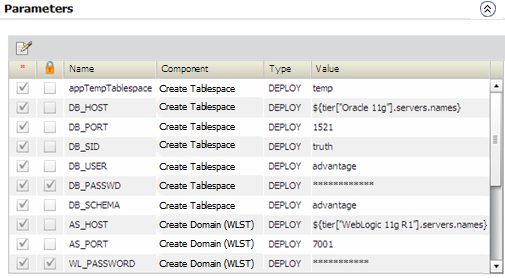
In this example, the parameters have the values that were specified in the components of the application—these are the “application default” values. The DB_HOST and AS_HOST parameters use “special variables” and take their values from the names of the servers in their respective tiers. Special variables are placeholders for data that cannot be known until deployment time (when destination servers are chosen).
You can override the application values at deployment time for a specific target or an entire environment (see Customize deployment parameters).
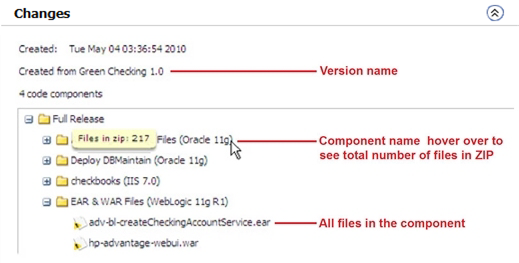
Changes
The Changes section shows you how the Code component files associated with this release have changed. For a full release, all files are listed (as shown here). For a delta release, any files that have been added or modified since the “baseline” version of the release was deployed are listed.
Code component changes listed on the Deployment Job screen
Comment
The Comment section provides a place where you can enter a text comment. This will be displayed in the reports and in the Job Logs.
Rolling deployment
The Rolling Deployment section enables you to decide how many servers in each tier to take offline for deployment purposes at the same time. The Number of Servers per Group setting controls this. By default, the setting is the number of servers in the tier—by default, all servers will be deployed at once.
For example, an application should be written such that servers are removed from a load-balanced pool while they are updated and then added back in. This ensures that the majority of serves remain in service while the rolling batch is updated.
If a tier has nine servers, you might choose to deploy each component in the corresponding application tier to three servers at a time before proceeding to the next group of three. In this case, you would set the Number of Servers per Group to three.
If Rolling Deployment is used, groups of components in the same tier will be deployed to the specified number of servers in the tier. If Rolling Deployment is not used, a component will not be deployed until the previous component has been successfully deployed to all servers in the tier.
Scheduling and options
The Scheduling and Options section enables you to specify how and when the deployment is performed, including options for debugging (see Manage Application Deployment jobs).
|
Option |
Purpose |
|---|---|
|
Run Mode |
Determines whether the deployment job should run normally or in debug mode. If you select “Debug” here, the Debugger window will open when you click the Start Job button. |
|
Stage |
Determines when Application Deployment should copy any files required for the deployment from the SA core to a temporary directory on the target servers. This option is automatically set to “Now” when the Run Mode is “Debug.” |
|
Cut Over |
Determines when the components should actually be deployed on the targets. At the specified Cut Over time, a backup of pertinent files and directories is performed (provided that Rollback is enabled), and then the components are deployed. Be careful when scheduling the Cut Over time. For example, if Staging requires 20 minutes to complete, you should schedule the Cut Over at least 30 minutes later. Application Deployment will not allow you to schedule the Cut Over time ahead of the Staging time. If you specify “Immediately,” the backup and deployment steps will begin as soon as the files are staged. This options is automatically set to “Immediately” when the Run Mode is “Debug.” |
|
Jobs Screen |
Determines whether the Jobs screen is displayed after you click the Start Job button. If you select the “Show job status when deployment starts” box, the Jobs screen will open. A filter is applied such that only your Deployment job is visible. You can watch the Job Logs as each step in the deployment is performed. If you do not select this option, the Deployment screen remains displayed. This option is automatically selected when the Run Mode is “Debug.” |
|
Undeploy |
Determines whether the previous deployment of this version is undeployed before the current deployment happens. If the “Undeploy the last deployment of this release” box is not selected, Application Deployment makes no attempt to undeploy the previous deployment. This option is not available when the Run Mode is “Debug.” |
|
On Failure |
Determines whether the Deployment job should be placed in Attention Required status prior to rolling back if the job fails. When a Deployment job fails, one of two things happens: If this option is not selected, Application Deployment sets the job status to Failed and performs an automatic rollback. If this option is selected, the job is placed in a suspended state (Attention Required) so that you can check the status of your managed servers to troubleshoot the failure. After you have collected enough information about the failure, you can resume the job. Application Deployment will then set the job status to Failed and initiate the automatic rollback. This option is automatically selected when the Run Mode is “Debug.” |
Enabling the Job button
The Start Job button becomes enabled after both a version and a target have been selected. Click the button to schedule or start the Deployment job according to the options that you have specified.
If any required parameters do not have values, or if the version and target have a mismatch (for example: components are for Red Hat Linux but target servers are running SUSE Linux), the Deployment job will not start.