Searching the Help
To search for information in the Help, type a word or phrase in the Search box. When you enter a group of words, OR is inferred. You can use Boolean operators to refine your search.
Results returned are case insensitive. However, results ranking takes case into account and assigns higher scores to case matches. Therefore, a search for "cats" followed by a search for "Cats" would return the same number of Help topics, but the order in which the topics are listed would be different.
| Search for | Example | Results |
|---|---|---|
| A single word | cat
|
Topics that contain the word "cat". You will also find its grammatical variations, such as "cats". |
|
A phrase. You can specify that the search results contain a specific phrase. |
"cat food" (quotation marks) |
Topics that contain the literal phrase "cat food" and all its grammatical variations. Without the quotation marks, the query is equivalent to specifying an OR operator, which finds topics with one of the individual words instead of the phrase. |
| Search for | Operator | Example |
|---|---|---|
|
Two or more words in the same topic |
|
|
| Either word in a topic |
|
|
| Topics that do not contain a specific word or phrase |
|
|
| Topics that contain one string and do not contain another | ^ (caret) |
cat ^ mouse
|
| A combination of search types | ( ) parentheses |
|
Work with Source Control Management (SCM)
- Click the SCM
 button to open the SCM pane.
 -
Click the Changes tab to see the changes that were made to the folders and files. Items that were modified, deleted, or added appear in distinct colors.

- Green - indicates that a new item has been added to the project, locally.
- Grey - indicates that an item has been removed from the project, locally.
- Blue - indicates that an item has been edited.
- Red - indicates that an item is in conflict.
Before starting to work, you must import the most recent changes from the repository to your workspace.
To import, complete the following steps:
- Click the SCM
 button to open the SCM pane.
 - Click the Pull
 button to download the most recent changes to your workspace.
After you make changes locally, you must upload these changes to the remote repository.
To upload, complete the following steps:
Note In some applications, there are two steps: "committing" files to a local repository in preparation for upload and "pushing" them to the remote repository. In OO Designer, these steps are merged into a single action.
- Make sure you have saved all your changes.
- Click the SCM
 button to open the SCM pane.
 -
Click the Commit and Push
 button to upload your most recent changes to the remote repository.
Note All changes will be committed and pushed to the remote repository.
-
In the Commit and Push Changes to the Remote Repository dialog box, enter a description for the changes that were made, and then click Commit & Push.
The changes are saved to the remote repository.
Conflicts may arise if another author has made change to a file you are currently modifying. If the changes occur in different lines in the file, Git is able to automatically merge the two versions. If there are two sets of changes in the same line, they cannot be merged and you need to decide which of the 2 versions you want to keep.
Note Items that are in conflict appear in red in the Changes pane.
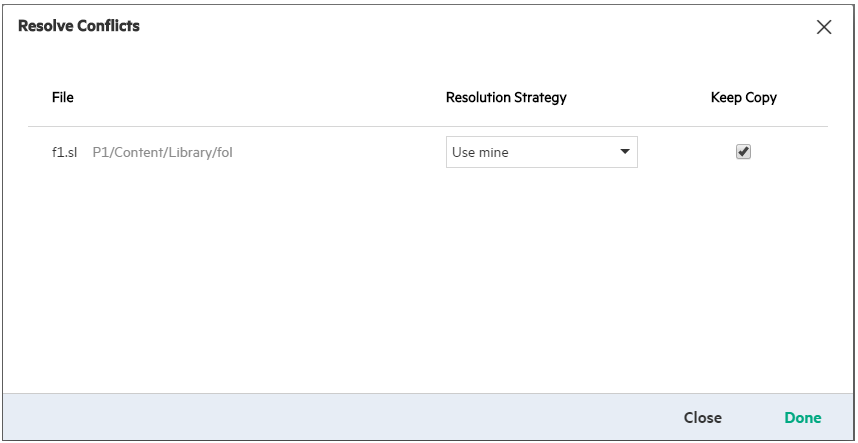
When there is a conflict, you can solve it in the Resolve Conflicts dialog box, by choosing whether to keep your version of the file (Use mine) or the version that it is in conflict with (Use theirs).
-
When a conflict occurs (for example, when you try to pull a file from Git and another user has pushed a conflicting version of that file), the Resolve Conflicts dialog box appears.

-
Under Resolution Strategy, select one of the following:
- Use mine - to use your version of the file to the repository
- Use theirs - to keep the file that the other user created
- Select the Keep Copy check box to save a local copy of the version that was not selected under Resolution Strategy.
- Click Done.
You can revert changes that you made to an individual file or revert everything to a previous version. This action discards the changes that you have made.
- To revert changes for one file: Select the file in the SCM pane and click the Revert changes for the selected file
 button.
 - To revert all changes, click the Revert all changes
 button.
Note In case you Revert from a state of conflict (conflict dialog was closed without resolving), you will get the version of the file prior to triggering the conflict. You can then also Revert once again to discard your not pushed changes.
The Console tab is a console that displays a record of all the SCM actions that were taken in this session.
- Click the SCM
 button to open the SCM pane.
 -
Click the Console tab.

- To clear the console, click Delete
 .
.
We welcome your comments!
To open the configured email client on this computer, open an email window.
Otherwise, copy the information below to a web mail client, and send this email to clouddocs@hpe.com.
Help Topic ID:
Product:
Topic Title:
Feedback:


