Searching the Help
To search for information in the Help, type a word or phrase in the Search box. When you enter a group of words, OR is inferred. You can use Boolean operators to refine your search.
Results returned are case insensitive. However, results ranking takes case into account and assigns higher scores to case matches. Therefore, a search for "cats" followed by a search for "Cats" would return the same number of Help topics, but the order in which the topics are listed would be different.
| Search for | Example | Results |
|---|---|---|
| A single word | cat
|
Topics that contain the word "cat". You will also find its grammatical variations, such as "cats". |
|
A phrase. You can specify that the search results contain a specific phrase. |
"cat food" (quotation marks) |
Topics that contain the literal phrase "cat food" and all its grammatical variations. Without the quotation marks, the query is equivalent to specifying an OR operator, which finds topics with one of the individual words instead of the phrase. |
| Search for | Operator | Example |
|---|---|---|
|
Two or more words in the same topic |
|
|
| Either word in a topic |
|
|
| Topics that do not contain a specific word or phrase |
|
|
| Topics that contain one string and do not contain another | ^ (caret) |
cat ^ mouse
|
| A combination of search types | ( ) parentheses |
|
- Audit and snapshot rules
- Configuring the application configuration rule
- Configuring the COM+ rule
- Configuring the custom scripts rule
- Configuring the discovered software rule
- Configuring the file rule
- Configuring the hardware rule
- Configuring the IIS metabase rule
- Configuring the IIS rule
- Configuring the IIS 7.0 rule
- Configuring the local security settings rule
- Configuring the registered software rule
- Configuring the Windows .NET framework configurations rule
- Configuring the Windows registry rule
- Configuring the Windows services rule
- Configuring the Windows/UNIX users and groups rule
Configuring the file rule
The file rule allows you to audit and compare files and directories on a target server by specifying the following options:
- Directory Name: The absolute path of the selected file or directory.
 (Optional) You can add a reference to an environment variable (
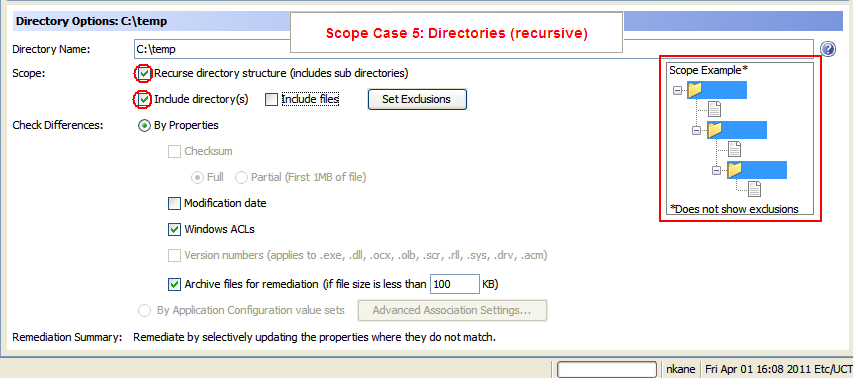
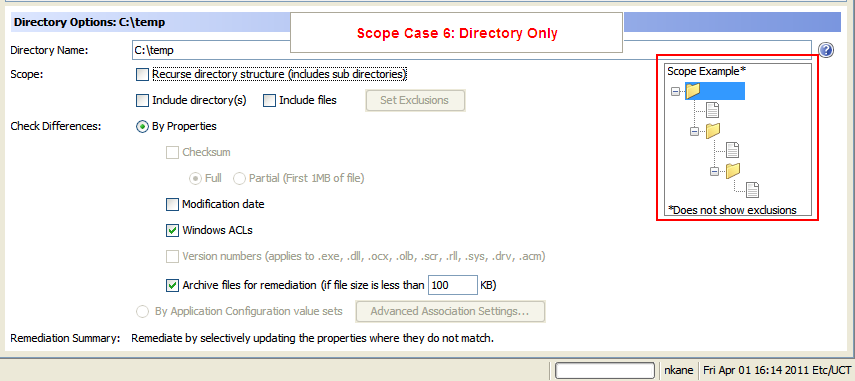
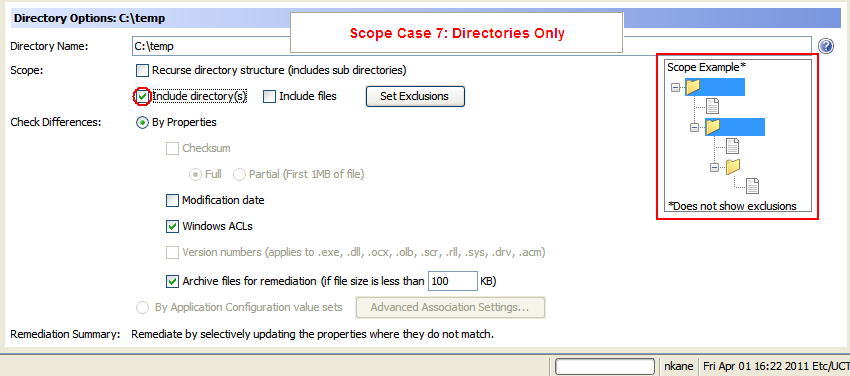
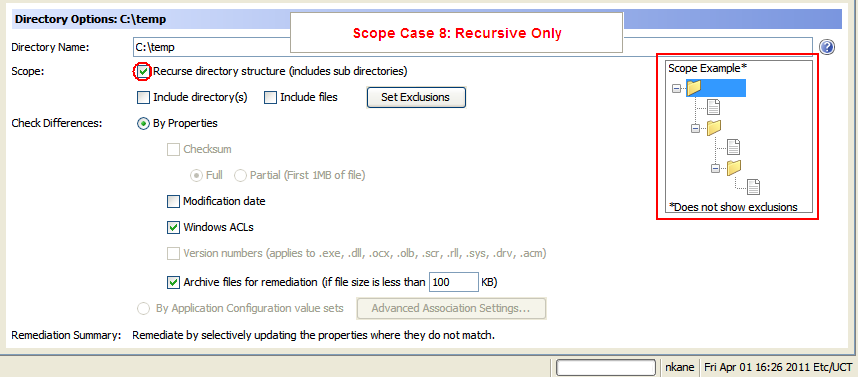
${varName}) or a custom attribute (@varName@). See Parameterizing filenames for SA/custom attributes and Environment variables in pathnames. - Scope: The default scope is directories + files. The Scope Example diagram in the Directory Options pane shows the scope use case hierarchy that is based on the options you selected. This diagram does not show exclusions. Click View Exclusions to view exclusions in the Set Includes/Excludes window.
- Recurse Directory Structure—Includes contents of all subdirectories for a selected file system folder to the audit, such as directories + files (recursive), files only (recursive), and directories only (recursive).
- Include Directory(s)—Specify directories in the file system you want included in and excluded from the audit. See File inclusion and exclusion rules.
[Include Files—Specify files in the file system you want included in and excluded from the audit. See File inclusion and exclusion rules.
The following list identifies 8 common use cases, in priority order. See the following Common scope cases :
- Check Differences:
By Properties
Checksum: Performs a checksum on the contents of the selected file or files in a directory. You can choose to audit the entire contents of the file (Full) or only the first 1MB of the file (Partial).
Modification Date: Audits the file modification date to use for file or folder comparison.
User and Group Access Rights (Unix only): Audits the user and group access related to the file and directories.
Windows ACLs(Windows only): Audits the Windows Access Control List (ACL) for files and directories.
Note If you are checking ACLs for the file rules and the user and group ACL does not exist on the target, after the audit and remediation processes complete, a temporary user and group will be created and assigned an unknown name. The next time you run an audit, the user and group displays as unknown. For more information on remediation, see Audit results .
Version Numbers: For certain Windows file types (.exe, .dll, .ocx, .olb, .scr, .rll, .sys, .drv, .acm), the author of the file can set a file version and a product version. This option compares these version numbers. If they are different, the rule is considered non-compliant and the actual values on the target file can be viewed in the audit results.
Note Not all files with these extensions always have a product version or a file version attribute.
Archive Files for Remediation: Archives the entire file. This option enables the audit to check for differences of a specified file, based on the differences you specify in the rule. Use this option when you want to remediate and view file differences found between the rule and the target file. If differences are found, remediating the differences will copy the source file to the target server and replace the target file with the source.
Note This option can potentially create disk space demands on the SA core’s database, depending on the size and number of files being compared.
- By Application Configuration Value Sets: Uses an application configuration to evaluate configuration files on a target server. This option (including the AdvancedAssociation Settings) lets you use a configuration template to compare any differences in values between a source configuration file and one on a target server.
- Remediation Summary: Remediate by copying the file and its properties from the source when selected properties do not match.
Common scope cases
The following examples show Windows directory options for each type of scope use case and related file system diagrams. For Windows, the Windows ACLs option is available. For UNIX, the User and Group Access Rights option is available.
- Scope Case 1: Directories + Files (recursive)
- Scope Case 2: Directories + Files (default)
- Scope Case 3: Files Only
- Scope Case 4: Files (recursive)
- Scope Case 5: Directories (recursive)
- Scope Case 6: Directory Only
- Scope Case 7: Directories Only
- Scope Case 8: Recursive Only
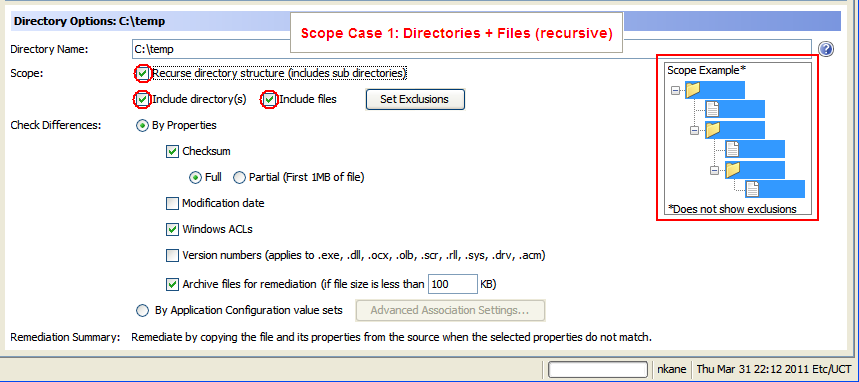
The following figure is an example of options required for Directories + Files (recursive).
Scope Case 1: Directories + Files (recursive)
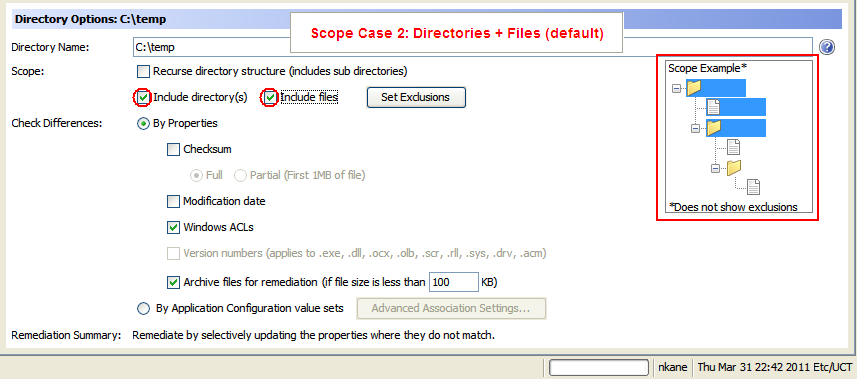
The following figure is an example of options required for Directories + Files. These are the default options.
Scope Case 2: Directories + Files (default)
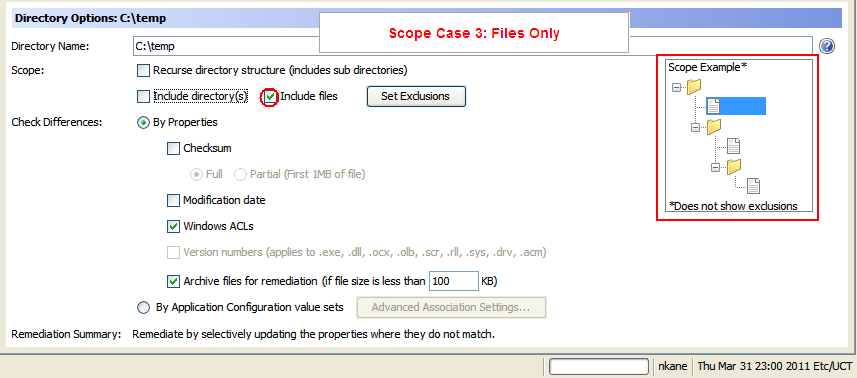
The following figure is an example of options required for Files Only.
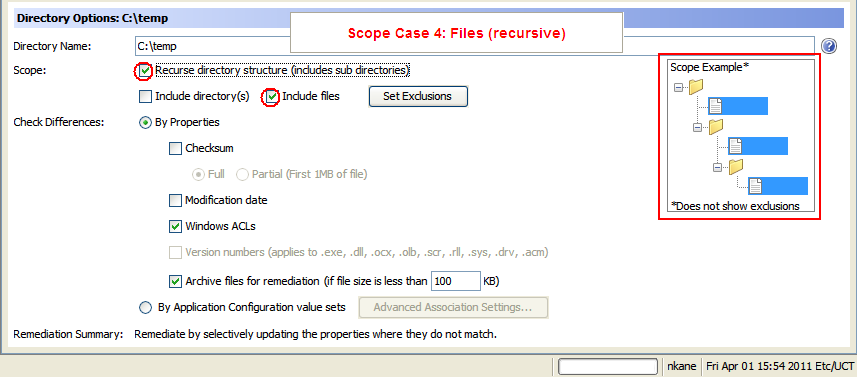
The following figure is an example of options required for Files (recursive).
Scope Case 4: Files (recursive)

The following figure is an example of options required for Directories (recursive).
Scope Case 5: Directories (recursive)

The following figure is an example of options required for Directory Only.

The following figure is an example of options required for Directories Only.
Scope Case 7: Directories Only

The following figure is an example of options required for Recursive Only.
Adding a rule to an audit
There are several ways you can add a rule to an audit.
You can:
- (Recommended) Link to an existing audit policy. See Linking an audit policy to an audit or a snapshot specification and Linking audit policies to a master audit policy.
- Import an audit policy. See Importing audit policy rules.
- Select a rule inside an audit.
To configure a file rule:
- Create the new audit using one of the methods in Creating an audit . If you want to create this rule for a snapshot specification, see Creating a snapshot specification .
- Specify the source of the reference data against which target values will be compared. The source should represent the ideal configuration of the server or its applications.
- In the Audit window, in the Views pane, select Source.
-
In the Source pane, specify the source of the reference data against which target values will be compared, such as No Source, Server, Snapshot-One for All Targets, or Snapshot Specification-Most Recent per target. If you select a snapshot, you will only be able to compare those files captured in the snapshot. Some audit rules, such as Application Configurations and Windows Users and Groups, must have a source. Depending on which Source you select, one of the following windows appears:
- If you select Server, the Select Server window appears.
- If you select Snapshot-One for All Targets, the Select Snapshot window appears.
- If you select Snapshot Specification-Most Recent per target, the Select Snapshot Specification window appears.
- Make your selection and click OK to save your settings and close the selection window.
-
Select the file rule:
In the Audit window, in the Views pane, select Rules > Files.
(Recommended) In the Rules content pane, click
 to open the Select an Audit Policy window. Select a policy and then click OK.
This selection allows you to create a linked rule, which is a link to a existing audit policy. This means that any changes made to the policy will also be reflected in this audit rule.
Or
(Optional) If you want to create an unlinkedrule, check Enable unlinked rules (prevents linking to predefined audit policies).
In the Rules content pane, click Import Rules to open the Select an Audit Policy window. Select a policy and then click OK.
Or
(Optional) In an audit or audit policy, check Enable unlinked rules (prevents linking to predefined audit policies).
- Click
 to open the Select Files window. Expand the file system and select files or directories. Click OK to add selected rules to the audit.
 -
Select the files and directories you want to audit.
- In the Audit window, in the Views pane, select Rules > Files.
- In the Source Server content pane, click
 to open the Select Files window.
 - In the Available for Audit section, expand the top level node and select a folder or file to apply the rule to.
-
Make your selections and then click Select to save your settings and close the Select Files window.
Or
In the Audit window, in the Views pane, select Rules > Files.
-
In the Source Server content pane, select a file or directory to modify the File Options or the Directory Options in the details pane.
-
(Optional) For folders, you can select a file/directory wildcard option to specify files and directories that you want to include or exclude from the audit.
-
Click
 to add a new rule or click
  to remove a rule. For more information on how to enter files and directories and how this affects the audit, see File inclusion and exclusion rules.
 -
(Optional) If you want to use an application configuration to compare configuration files, select By Application Configuration Value Sets and then click Advanced Association Settings.
-
In the AppConfig File Comparison Associations window, in the AppConfig Templates list, select the template you want to use to compare a source and a target configuration file.
- In the Associated Files section, use the default path to the source configuration file or edit the path. Click
 to add another path to a source configuration file that you want to compare with a configuration file on the target.
 - When you are finished, click OK.
- To finish configuring the audit, set the target servers, schedule, and notification for the audit.
-
To save the audit, from the File menu, select Save. You can also save the Audit as a policy. For more information, see Saving an audit or a snapshot specification as an audit policy.
-
To run the audit, from the Actions menu, select Run Audit. For more information about running an audit, see Creating an audit policy .
-
Use Refresh to refresh the Select Files screen.
Comparing files in audits with configuration templates
Another way you can audit files on a target server is to compare them with a source server file, using application configuration (AppConfig) templates as the basis of the comparison.
Configuration templates model the structure of a configuration file and determine its contents and organization. When you use configuration templates in an audit’s file rule to compare files, the audit uses the configuration template to filter both the source and the target files’ contents for the comparison. This ensures that you are comparing only the value sets defined in the template when you run the audit and compare the files.
For example, you might want to compare the /etc/passwd file on several target servers to make sure they contain only the values defined in the /etc/passwd file on a golden server that you know has acceptable values. Using the configuration file comparison feature, you select a configuration template that models the /etc/passwd file (passwd.tpl) and associate that configuration template with the actual passwd file on both the golden source server and the servers that are targeted by the audit.
You create the association by selecting the template and then by entering the file pathname to where the file exists on the target servers. You can also compare multiple files using this feature. For example, you can select a directory that you know contains several configuration files to compare and you can associate configuration templates with directories you know contain the files you want to compare.
To use the configuration file comparison feature in an audit:
- Create the new audit using one of the methods in Creating an audit .
- Specify the source of the reference data against which target values will be compared.
The source should represent the ideal configuration of the server or its applications. - In the Audit window, in the Views pane, select Source.
- In the Source pane, specify the source of the reference data against which target values will be compared, such as No Source, Server, Snapshot-One for All Targets, or Snapshot Specification-Most Recent per target. If you select a snapshot, you will only be able to compare those files captured in the snapshot. Some audit rules, such as Application Configurations and Windows Users and Groups, must have a source.
Depending on which Source you select, one of the following windows appears:- If you select Server, the Select Server window appears.
- If you select Snapshot-One for All Targets, the Select Snapshot window appears.
- If you select Snapshot Specification-Most Recent per target, the Select Snapshot Specification window appears.
- Make your selection and click OK to save your settings and close the selection window.
- In the Audit window, in the Views pane, select Rules > Files.
- In the Audit window, in the details pane, select By Application Configuration Value Sets and then click Advanced Association Settings.
- In the AppConfig File Comparison Associations window, in the AppConfig Templates list, select the template you want to use to compare a source and a target configuration file.
- In the Associated Files section, use the default path to the source configuration file or edit the path. Click
 to add another path to a source configuration file that you want to compare with a configuration file on the target.
 - In the Associated Files section, enter the pathname to where the actual source and target configuration file exists on both the source and the target servers.
The files you want to compare with the configuration template must exist in the same directory. - (Optional) If you want to make more than one association for a template, click
 to add another directory. Each directory you add applies to whatever template you have selected in the AppConfig Templates section. You can make as many associations as you want in this window.
 - When you are finished, click OK.
- To finish configuring the audit, set the target servers, the schedule, and the notification for the audit.
- To save the audit, from the File menu, select Save.
You can also save the Audit as a policy.
For more information, see Saving an audit as an audit policy. - To run the audit, from the Actions menu, select Run Audit.
For more information about running an audit, see Creating an audit policy .
We welcome your comments!
To open the configured email client on this computer, open an email window.
Otherwise, copy the information below to a web mail client, and send this email to hpe_sa_docs@hpe.com.
Help Topic ID:
Product:
Topic Title:
Feedback:


