Searching the Help
To search for information in the Help, type a word or phrase in the Search box. When you enter a group of words, OR is inferred. You can use Boolean operators to refine your search.
Results returned are case insensitive. However, results ranking takes case into account and assigns higher scores to case matches. Therefore, a search for "cats" followed by a search for "Cats" would return the same number of Help topics, but the order in which the topics are listed would be different.
| Search for | Example | Results |
|---|---|---|
| A single word | cat
|
Topics that contain the word "cat". You will also find its grammatical variations, such as "cats". |
|
A phrase. You can specify that the search results contain a specific phrase. |
"cat food" (quotation marks) |
Topics that contain the literal phrase "cat food" and all its grammatical variations. Without the quotation marks, the query is equivalent to specifying an OR operator, which finds topics with one of the individual words instead of the phrase. |
| Search for | Operator | Example |
|---|---|---|
|
Two or more words in the same topic |
|
|
| Either word in a topic |
|
|
| Topics that do not contain a specific word or phrase |
|
|
| Topics that contain one string and do not contain another | ^ (caret) |
cat ^ mouse
|
| A combination of search types | ( ) parentheses |
|
- Importing Data from External Sources
- Overview
- Comma Separated Value (CSV) Files
- Databases
- Properties Files
- How to Import CSV Data from an External Source – Scenario
- How to Convert Strings to Numbers
- The External_source_import Package
- Import from CSV File Job
- Import from Database Job
- Import from Properties File Job
- External Source Mapping Files
- Troubleshooting and Limitations – Importing Data from External Sources
How to Import CSV Data from an External Source – Scenario
The UCMDB administrator must model a vehicle catalog that is stored in a CSV file.
This task includes the following steps:
-
 Prerequisites
The admin opens the CSV file and analyzes the data:

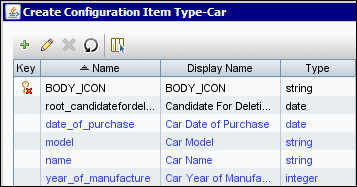
The file includes the name, model, year of manufacture, and the date when the car was purchased, that is, there are four columns of data:
1
Name
string
2
Model
string
3
Year of manufacture
integer
4
Date of purchase
date
There are three rows to the file, which means that the admin expects three CIs to be created in UCMDB.
-
 Create a CIT
The admin creates a CIT.
-
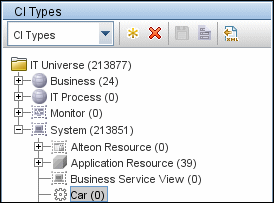
The admin creates a CIT named Car to hold the attributes that are to be mapped to the data in the CSV file (name, model, and so on):
-
During the creation of the CIT, the admin adds these attributes as follows:

For details, see "Create a CI Type" in the Universal CMDB Modeling section of the UCMDB Online Help.

For details, see "Attributes Page" in the Universal CMDB Modeling section of the UCMDB Online Help.
-
-
 Create a mapping file
The admin uses the template, mapping_template.xml, to create a mapping file that makes the information available to the Import_CSV adapter. The mapping file is located in the following folder: Adapter Management > Resources pane > External_source_import > Configuration Files
.-
For each attribute, the admin adds a <map> marker:
-
The admin then adds information about the attribute type:
<?xml version="1.0" encoding="UTF-8"?> <mappings xmlns:xsi="http://www.w3.org/2001/XMLSchema-instance" xsi:noNamespaceSchemaLocation=".\mapping_schema.xsd"
parserClassName="com.hp.ucmdb.discovery.library.
communication.downloader.cfgfiles.CiMappingConfigFile">
<ci type="car"> <map> <attribute>name</attribute> <column>0</column> </map> <map> <attribute>model</attribute> <column>1</column> </map> <map> <attribute>year_of_manufacture</attribute> <column>2</column> </map> <map> <attribute>date_of_purchase</attribute> <column>3</column> </map> </ci> </mappings><?xml version="1.0" encoding="UTF-8"?> <mappings xmlns:xsi="http://www.w3.org/2001/XMLSchema-instance" xsi:noNamespaceSchemaLocation=".\mapping_schema.xsd"
parserClassName="com.hp.ucmdb.discovery.library.
communication.downloader.cfgfiles.CiMappingConfigFile">
<ci type=""> <map> <attribute>name</attribute> <column>0</column> </map> <map> <attribute>model</attribute> <column>1</column> </map> <map> <attribute>year_of_manufacture</attribute> <column>2</column> <converter module="import_converters">stringToInteger</converter> </map> <map> <attribute>date_of_purchase</attribute> <column>3</column> <converter module="import_converters">stringToDate</converter> </map> </mappings>All conversions between the values in the CSV file and the CI attributes are done by a converter. Several converter types are included in the package by default. For details, see How to Convert Strings to Numbers.
-
-
 Run the job
How you run this job depends on the software version being used.
UCMDB 9.04 (and later), with CP10 In the Integration Studio, create a new integration point.
-
Provide a name and description for the integration point.
-
Under Integration Properties > Adapter, select the Import from CSV adapter.
-
Under Adapter Properties > Data Flow Probe, select the Data Flow Probe.
-
Under Adapter Properties > Trigger CI instance select:
- Select Existing CI (if you have a valid, existing CI). The Select Existing CI pane appears. Select the CI; or
- Create New CI (if you need to create a new CI). The Topology CI Creation Wizard appears. Complete the creation of the CI using the Wizard.
-
Save the Integration Point.
-
Run the job.
Note For details on the Topology CI Creation Wizard, see "Topology CI Creation Wizard" in the Universal CMDB Data Flow Management section of the UCMDB Online Help.
Note For details on running an integration job, see "Integration Studio" in the Universal CMDB Data Flow Management section of the UCMDB Online Help.
UCMDB 9.03 (and earlier) This job uses the Shell Trigger CIT to discover the CSV file on a remote machine. The Input CIT is Shell and the discovered CIT is declared as IT Universe. However, the actual discovered CIs depend on the mapping configuration.
The admin activates the following job: Import from CSV file.
For details on activating jobs, see "Discovery Modules Pane" in the Universal CMDB Data Flow Management section of the UCMDB Online Help.
-
-
 Add the discovered Shell CI to the job
Note This step only applies if using UCMDB 9.03 and earlier.
After activation, the admin locates the
ShellCI (of the machine where thecars.csvfile is located) and adds it to the job. For details, see "Choose CIs to Add Dialog Box" in the Universal CMDB Data Flow Management section of the UCMDB Online Help. -
 Result
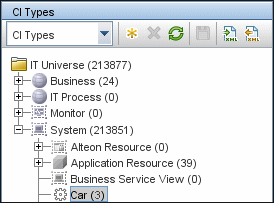
The admin accesses the CIT Manager and searches for instances of the Car CIT. UCMDB finds the three instances of the CIT:

We welcome your comments!
To open the configured email client on this computer, open an email window.
Otherwise, copy the information below to a web mail client, and send this email to cms-doc@microfocus.com.
Help Topic ID:
Product:
Topic Title:
Feedback:


