Searching the Help
To search for information in the Help, type a word or phrase in the Search box. When you enter a group of words, OR is inferred. You can use Boolean operators to refine your search.
Results returned are case insensitive. However, results ranking takes case into account and assigns higher scores to case matches. Therefore, a search for "cats" followed by a search for "Cats" would return the same number of Help topics, but the order in which the topics are listed would be different.
| Search for | Example | Results |
|---|---|---|
| A single word | cat
|
Topics that contain the word "cat". You will also find its grammatical variations, such as "cats". |
|
A phrase. You can specify that the search results contain a specific phrase. |
"cat food" (quotation marks) |
Topics that contain the literal phrase "cat food" and all its grammatical variations. Without the quotation marks, the query is equivalent to specifying an OR operator, which finds topics with one of the individual words instead of the phrase. |
| Search for | Operator | Example |
|---|---|---|
|
Two or more words in the same topic |
|
|
| Either word in a topic |
|
|
| Topics that do not contain a specific word or phrase |
|
|
| Topics that contain one string and do not contain another | ^ (caret) |
cat ^ mouse
|
| A combination of search types | ( ) parentheses |
|
The Architect Target Designer enables you to define a Target entity as well as link associations, or extend an existing entity. Each Target entity in the Architect Target Designer contains columns of fact, or dimension (or both) and associations to other Target entities.
Architect Target Designers can contain one or more Target entities. Usually each Architect Target Designer includes several entities that are related to the same subject (Designer). Target entities can be included in several Architect Target Designers.
The IDE supports the extension of a target entity by creating an association called Target Extension. This enables you to extend an entity by adding to the new entity columns. Adding an extension enables Fact extension and the ability to link a group of Dimensions specifically to the same group. You then use the extension entity to make all associations and links.
Note Make sure you have selected the IDE perspective before beginning to work on your designer diagram.
Note It is recommended to create a separate general project in the Package Explorer for the Architect Target Designer files.
In the IDE main page,select File > New > Other > DWH IDE Wizards > Architect Target Designer.
The Architect Target Designer enables the following:
-
Create a new entity metadata which is translated into the Target model.
-
Load an existing Target entity.
-
Add columns which affect entity generation.
-
Add associations between entities.
-
Link a Fact to Dimension
-
Link a Dimension to a Dimension
- Link an entity to an extension
-
 Create a new Architect Target Designer in the IDE
-
In the IDE main page, select File > New > Other > DWH IDE Wizards > Architect Target Designer and click Next.
-
Select the parent directory and enter the file name for the Stream Designer diagram - make sure you do not change the suffix of the file name - and click Next.
-
Select the relevant Target Content Pack directory and click Finish.
 Define a new Target entity
-
In the Architect Target Designer, in the palette area, select New Target Entity and click on the canvas.
-
Name the entity.
-
Add relevant columns to the entity.
-
Click
 Save.
Save.
 Load an existing Target entity
-
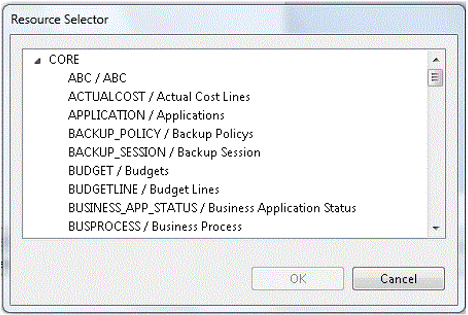
In the Architect Target Designer, in the palette area, select Load Target Entity and click on the canvas. The Resource Selector dialog box opens.
-
Expand the target directory and select an entity. The entity is displayed with all of the previously added columns and dimensions.
-
Add relevant columns to the entity. You can then edit and configure columns in the Properties view.
-
Click
 Save.
Save.
 Extend a Target Entity
-
In the Architect Target Designer, in the palette area, select Load Target Entity and click on the canvas to load the target entity that you want to extend. The Resource Selector dialog box opens.
-
Expand the target directory and select an entity. The entity is displayed with all of the previously added columns and dimensions.
-
Select New Target Entity and click on the canvas to add the entity which will be the target extension.
-
Name the entity. If you are extending the Person entity, for example, you can enter PERSON_CSTM.
-
In the Properties tab of the new entity, configure the entity Type (Fact or Dimension). Must be the same entity type as the base entity.
-
In the palette area, click Target Extension.
-
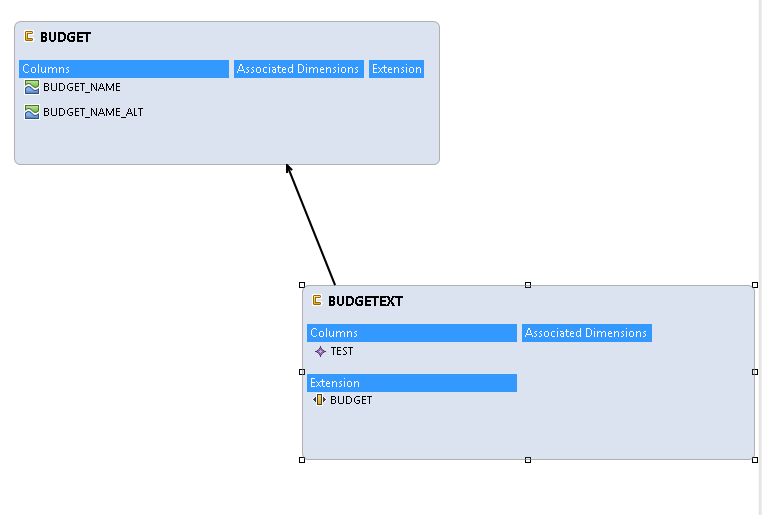
Drag the arrow from the new extending entity to the original loaded entity.
-
This relation creates an extension to the new entity. The new entity name is displayed as an extension in the original entity. You can add relevant columns and configure the extended entity as necessary. Mapping is then done from the Integration to the Target extension.
Note
-
The extending and base targets are referred to as a single entity. Therefore, you can not add a column with the same Column ID of one in the original base entity.
-
When you add an extension, make sure that the Source and Target are from the same type. The types can be: Fact or Dimension.
-
Target Extensions can also be extended.
-
The name of the extension is derived from the name of the extended entity and cannot be changed.
-
 Add a column
-
In the Architect Target Designer, in the palette area, select Target Column.
-
Click in the Column area of your entity and enter the Column ID in the text box.
The column is added to the entity. You can then edit and configure columns in the Properties view.
- Click
 Save.
Save.
 Link a Dimension to a Dimension
-
In the Architect Target Designer, in the palette area, click Dimension to Dimension.
-
Drag the arrow from a Dimension to the Dimension you want it linked to.
-
The New Dimension to Dimension dialog box opens. The default name is displayed and can be edited. This relation links a Dimension entity to another Dimension.
Note If you link to an entity from an existing association, you can connect using the arrow without naming the Associated Dimension.
The default Associated Dimension name is the Target entity.
- Click
 Save.
Save.
 Link a Fact to a Dimension
-
In the Architect Target Designer, in the palette area, click Fact to Dimension.
-
Drag the arrow from the Fact entity to the Dimension you want it linked to.
-
The New Fact to Dimension dialog box opens. The default name is displayed and can be edited. This relation links a Fact entity to another Dimension.
Note If you link to an entity from an existing association, you can connect using the arrow without naming the associated Dimension.
The default associated dimension name is the Target entity.
- Click
 Save.
Save.
Create Architect Target Designer > Target Content Pack > Architect Target Designer View >
![]() Create Architect Target Designer
Create Architect Target Designer
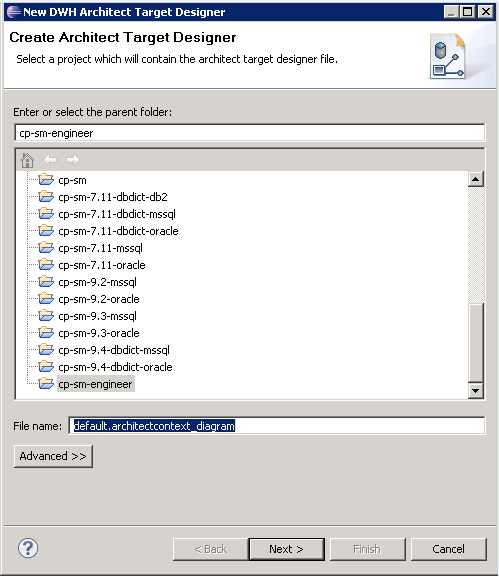
User interface elements are described below (when relevant, unlabeled elements are shown in angle brackets):
|
UI Element |
Description |
|---|---|
| Enter or select the parent directory |
Select the directory in which this Designer will be contained, from the directory list. |
| File Name | Enter a file name for your Designer diagram. |
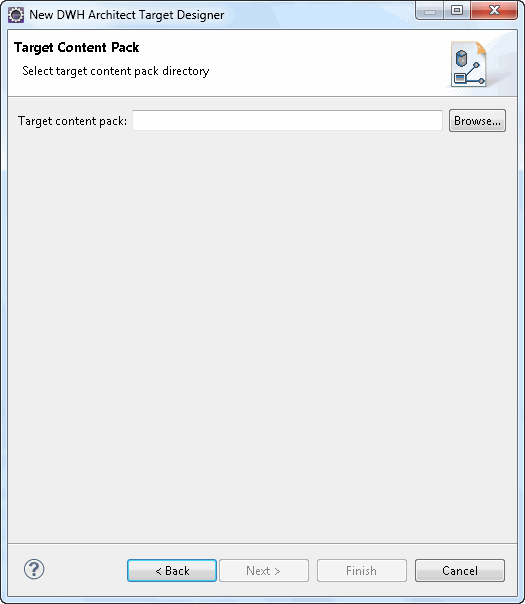
User interface elements are described below (when relevant, unlabeled elements are shown in angle brackets):
|
UI Element |
Description |
|---|---|
| Target Content Pack |
Select or browse for the Target Content Pack directory. |
![]() Architect Target Designer View
Architect Target Designer View
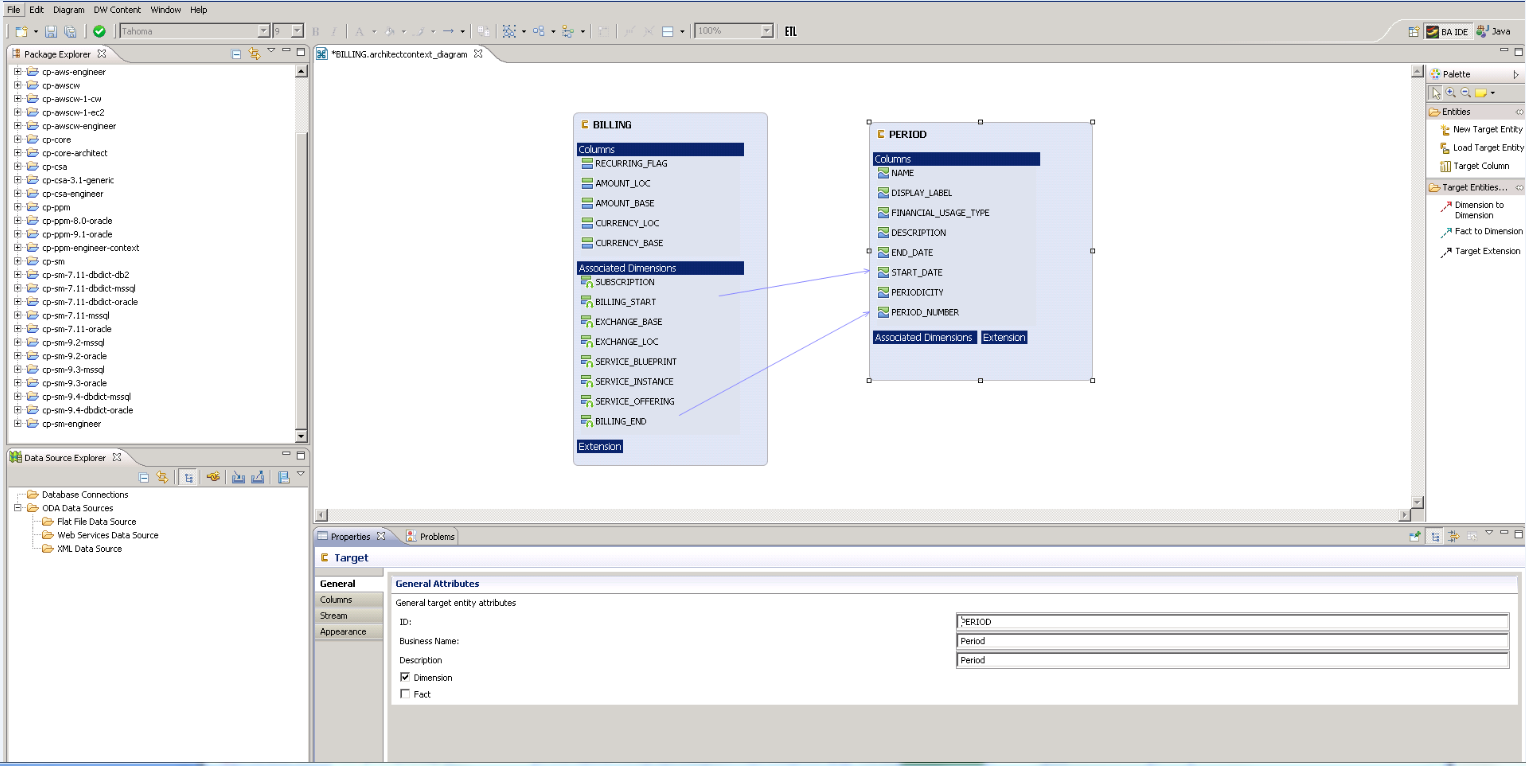
User interface elements are described below (when relevant, unlabeled elements are shown in angle brackets):
|
UI Element |
Description |
|---|---|
| Entities |
Contains the following Target entity options:
|
| Target Entities Relation |
Click a link to create connections for building the model.
|
To view the Properties tab, right-click on the specific entity and click Show Properties View.
You first configure the Target entity properties, and then the properties for each specific column.
|
UI Element |
Description |
|---|---|
| General tab |
Displays the Entity, Dimension and Fact attributes for the target entity. General Target entity attributes:
Note Make sure to select the required option connected to the relevant Fact or Dimension column properties. |
| Columns tab |
Displays information for each column in the Target entity. Column property options are displayed according to the entity selection of Fact or Dimension in the General tab.
|
| Appearance tab |
Displays font and appearance information. |
When you link to an unlinked Dimension, the following dialog box opens.
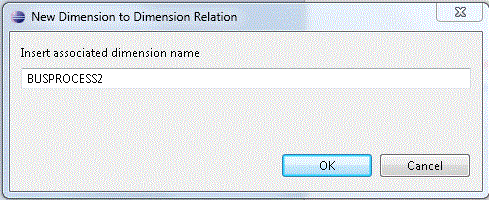
Edit an Associated Dimension name. The default is the Target entity name.
Target Extension Entity
To view the Properties tab, right-click on the specific entity and click Show Properties View.
|
UI Element |
Description |
|---|---|
| Associations tab |
Displays Dimension association information:
|
| Appearance tab |
Displays font and appearance information. |
We welcome your comments!
To open the configured email client on this computer, open an email window.
Otherwise, copy the information below to a web mail client, and send this email to SW-Doc@hpe.com.
Help Topic ID:
Product:
Topic Title:
Feedback:


 New Target Entity. Creates a new Target entity. Entity type can be defined in the Properties tab. To view the Properties tab, right-click on the specific entity and click Show Properties View.
 Load Target Entity. Opens the Resource Selector dialog box. Select the relevant entity for your model.
 Target Column.
  Dimension to Dimension.
  Fact to Dimension.
  Target Extension. Link from a new target entity to the base/original target entity. A black arrow is displayed between the entities.