Migration from Executive Scorecard 9.50 to Business Analytics 10.10
IT Business Analytics (ITBA) 10.10 includes improvements in the ETL performance, installation time, time to deploy content, and UI response time, as well as the use of different technology and infrastructure like Vertica and Linux.
Because the technology and infrastructure in ITBA are different from those used in Executive Scorecard (XS) 9.50, a migration process is provided to help existing XS 9.50 customers migrate to ITBA 10.10.
This section provides a complete set of solutions to help you migrate from XS 9.50 to ITBA 10.10.
Note The only supported migration path is from XS 9.5 SP 004 to ITBA 10.10.
Migration Strategy for Components and Features
The migration strategy is as follows:
| Item | Migration Strategy |
|---|---|
| Data source content (IDE metadata, ETLs, data models, streams) | Tool + Manual step |
| Application content (Scorecards, KPIs, Metrics, Contexts, Pages, .CSV data) | Tool + Manual step |
| BOE content (Universes, Webi reports) | Tool + Manual step |
| User management data migration (Users, Groups, Roles, Permissions) | Tool |
| Email Notifications (Mail Server Configuration, Entity Reports) | Tool |
| Configuration (LDAP settings, Data Loader, Context Scheduler) | Tool |
| Customized Extractors | Manual step |
| Customized ETL logic (BODS workflow, BODS dataflow) | Manual step |
| Customized SQL Server Database View | Manual step |
| Configuration (License, SSO, ETL Scheduler) | Manual step |
| Explorer (Annotations) | Not migrated to ITBA 10.10 |
| Incorrect Customization (direct changes to OOTB content: Contexts, ETLs, data models, Extractors) | Not migrated to ITBA 10.10 |
| ETL Target data. | Manual step |
| KPI Result data | Manual step |
| ITFM (Allocation Management, Budget Management, Cost Explorer, FPA Content Pack, ITFM CAP). | Not supported in ITBA 10.10 |
About the Migration
The migration consists of a mixture of tools and manual procedures.
Migration Steps
To perform the migration, proceed as follows:
| Steps
|
Step Details Legend: Preparation Manual Using tool |
| Prepare the Environment |
To prepare the environment for the ITBA and the BOE instances:
|
|
|
|
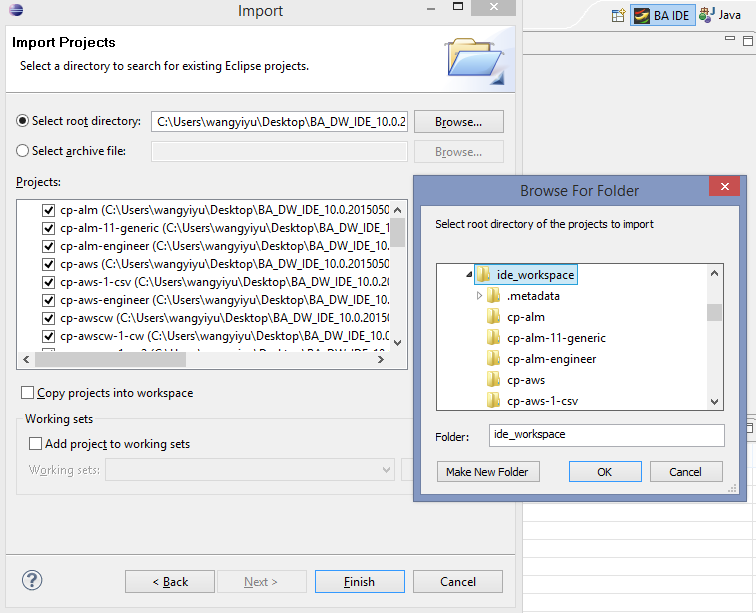
| Download and install the ITBA 10.10 IDE environment |
|
|
|
|
| Download and Install the Migration Tool |
|
|
|
|
|
|
The XS Usage Analysis Tool scans all user usage data in the XS 9.50 database and directories, and summarizes the results in the XS Usage Report. The report provides a reference to understand and plan the scope of the migration before starting the migration itself. To run the tool:
The report is organized in different sections:
|
|
|
|
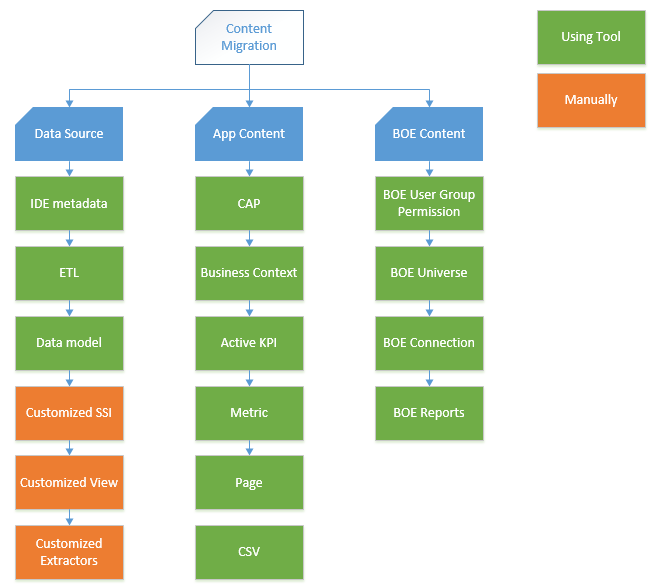
| Data Source Migration |
The data source migration includes the migration of IDE metadata, ETL, data models, and streams.
|
|
|
|
| Convert your customized extractors |
Customized extractors cannot be migrated from XS 9.50 to ITBA 10.10. You must recreate your customized extractors by following the DCS Extractor SDK Guide. For details, see . |
|
|
|
| Convert your customized ETL and View |
|
|
|
|
| Incorrect Customization |
Tip Customizing content by modifying the OOTB content is not recommended. Instead, it is better to make a copy and modify the copy or to start from scratch. If a list of entities appear in the Incorrect customization section in the XS Usage report, recreate these entities using the above approach. For details, see Customize the SSI Layer. ------------- Incorrect customization, directly change OOTB content ------------- data source Core , Total entity to redevelop : 80, entity name = INCIDENT, APPLICATION, PRJOBJECTIVE, SUBSCRIPTION, CYCLE, SLA, SERVICE_INSTANCE, AGREEMENT, SLA_BREACHED_UC, SERVICE_OFFERING, STORAGE_EVENTS, REQUEST_TYPE_UD_PLHD, SERVICE_CATEGORY, BUSINESS_APP_STATUS, STORAGE_VOLUME, CHANGE_REJECTION, SLT, REQUIREMENT, ORG, REQUIREMENTHIST, INTERACTION, NODE_METRIC, POLICY_REMEDIATION, ACTUALCOST, BUSPROCESS, BUSINESS_APP_PERF, CHANGE_PHASE, REQUEST_USERDATA_PLHD, COMPLIANCE_STATUS, DEFECTHIST, EXCHANGE, CONTRACT, REQUEST_HEADER_PLHD, MODEL, SERVICE_PROVIDER_BILLING, DEFECT, COMPONENT, REQUIREMENT_BRIDGE, TESTINSTANCE, POLICY_RESULT, BUSPROCSERVICE, ASSET, BILLING, DAILY_ROI, NODE, PROJECT, BACKUP_SESSION, STORAGE_UTILIZATION, PROBLEM, SERVICE_BLUEPRINT, BUDGETLINE, SLASTATUS, SLAOUTAGE, SLA_BREACHED_OLA, BUSTRANSACTION, SLTSTATUS, SERVICESTATUS, BACKUP_POLICY, CHANGE, PROJECTTASK, TESTHIST, PROJECTISSUE, SERVICE_PROVIDER_UTILIZATION, RESTORE_SESSION, BUSTRANSERVICE, PLANNEDCOST, SERVICE, REQUEST, TEST, CI, COSTCENTER, CI_TOPOLOGY, LOCATION, PROGRAM, REQUEST_DETAIL_PLHD, PERSON, POLICY, NODE_CONSUMPTION, STORAGE_PATH_COMPLIANCE, SERVICE_CATALOG data source SM , Total entity to redevelop : 24, entity name = INTERACTION, INCIDENT, NODE, SERVICE, APPLICATION, CHANGE_PHASE, REQUEST, PROBLEM, SLA, AGREEMENT, CI, EXCHANGE, LOCATION, SLA_BREACHED_UC, MODEL, SLASTATUS, SLAOUTAGE, PERSON, SLA_BREACHED_OLA, SLTSTATUS, CHANGE_REJECTION, SLT, CHANGE, ORG data source UCMDB , Total entity to redevelop : 4, entity name = CI, CI_TOPOLOGY, NODE, APPLICATION data source AM , Total entity to redevelop : 5, entity name = CI, ASSET, PERSON, NODE, ORG Content Pack Folder Scan Detail.This section shows how many files the tool has scanned in the customer XS 9.50 instance. Each line shows if the scanned file is new/modified/deleted compared to the XS 9.50 CP 0004 benchmark (the tool compares the file in the customer environment with the file in the XS 9.50 CP 0004 benchmark). For example, the section shows that INCIDENT belongs to an incorrect customization (see above), and the changes were done to the file (see below). --------------------------Content Pack Folder Scan Detail------------------------------ C:\HPXS\agora\ContentPacks\AM\ABC\upstream_instance.xml : modified C:\HPXS\agora\ContentPacks\AM\ETL\entities\ASSET\AM_ASSET_SSI_WF.xml : modified C:\HPXS\agora\ContentPacks\AM\ETL\entities\CI\entity_integration.xml : modified C:\HPXS\agora\ContentPacks\AM\ETL\entities\NODE\entity_integration.xml : modified … C:\HPXS\agora\ContentPacks\AM\dataModel\dataIntegration\extraction\AM\AM_AMEMPLDEPT_EXT.xls : modified C:\HPXS\agora\ContentPacks\AM\dataModel\dataIntegration\extraction\AM\AM_AMEMPLDEPT_EXT.xml : modified C:\HPXS\agora\ContentPacks\AM\dataModel\dataIntegration\extraction\AM\_CUSTOMIZATION\AM_XXX_ASSET_CLASS_REL_CSTM_EXT.xml : added C:\HPXS\agora\ContentPacks\AM\dataModel\dataIntegration\extraction\AM\_CUSTOMIZATION\AM_XXX_ASSET_CSTM_EXT.xml : added C:\HPXS\agora\ContentPacks\AM\dataModel\dataIntegration\extraction\AM\_CUSTOMIZATION\AM_XXX_ASSET_OS_VENDOR_CSTM_EXT.xml : added C:\HPXS\agora\ContentPacks\AM\dataModel\dataIntegration\source\AM\5.2\mssql\AM_AMASSET_SRC.xls : modified ... C:\HPXS\agora\ContentPacks\Core\ETL\entities\EXCHANGE\EXCHANGE_XREF_WF.xml : modified C:\HPXS\agora\ContentPacks\Core\ETL\entities\INCIDENT\INCIDENT_CSNP_WF.xml : modified C:\HPXS\agora\ContentPacks\Core\ETL\entities\INCIDENT\INCIDENT_DIM_WF.xml : modified C:\HPXS\agora\ContentPacks\Core\ETL\entities\INCIDENT\INCIDENT_FACT_WF.xml : modified ... |
|
|
|
| Migrate the application content |
The Application Content contains Scorecard, KPIs, Metrics, Contexts, Pages, and data files (Excel import). The current Content Acceleration Pack (CAP) mechanism supports to export application content into an XS 9.50 CAP (.zip file). An XS 9.50 CAP cannot be directly imported into ITBA 10.10. To do so, you must use the CAP Migration Tool. The tool is a command-based interface application.
|
|
|
|
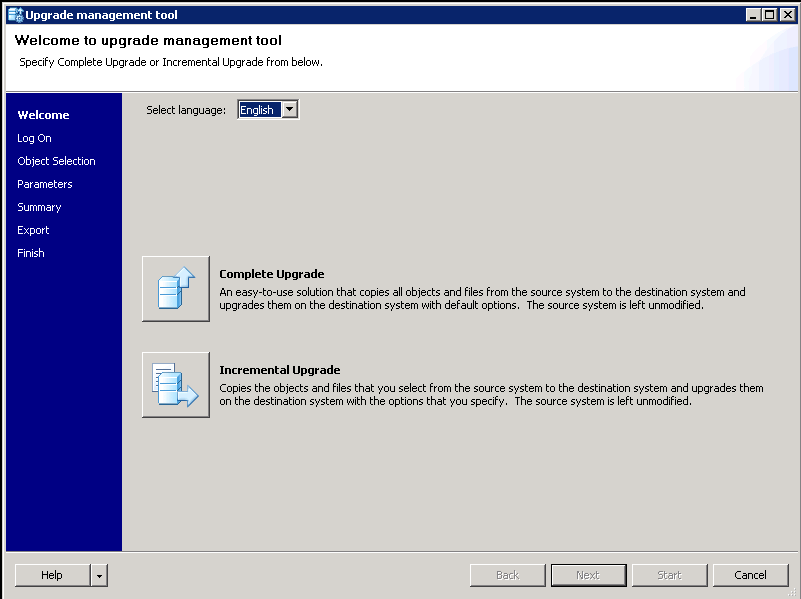
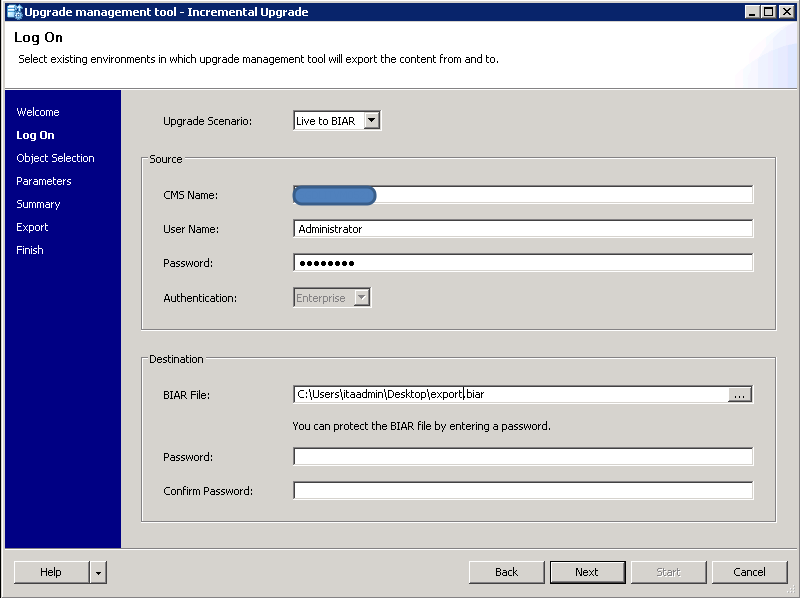
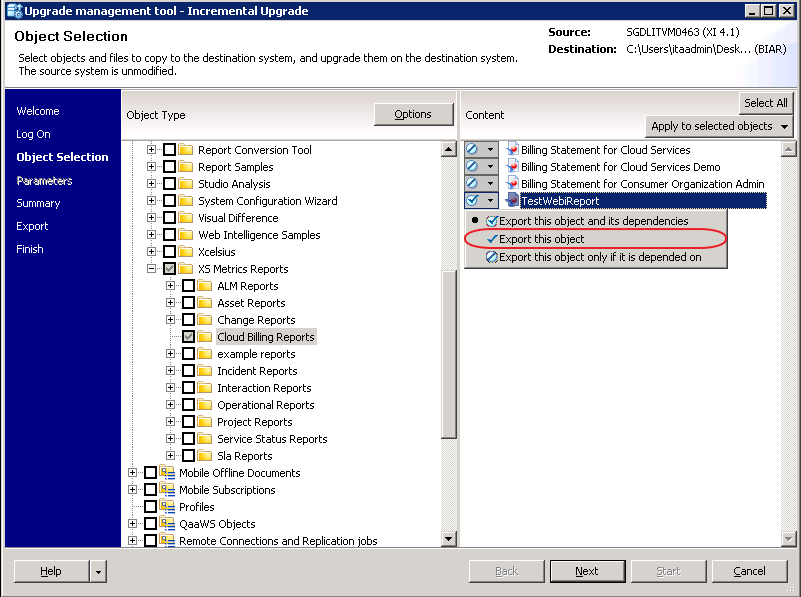
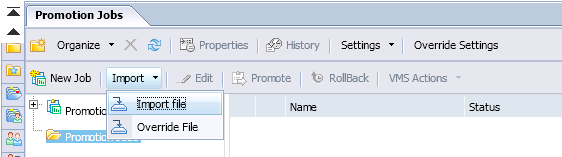
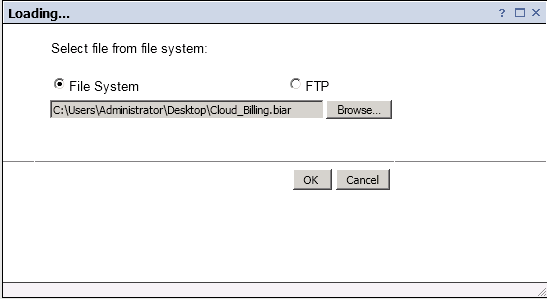
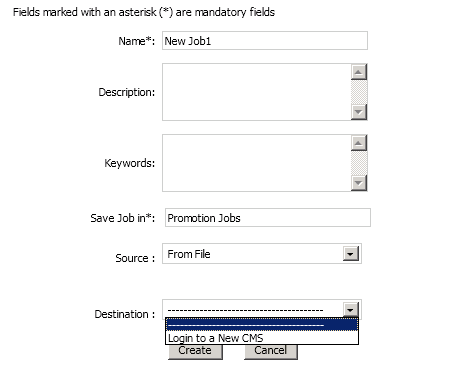
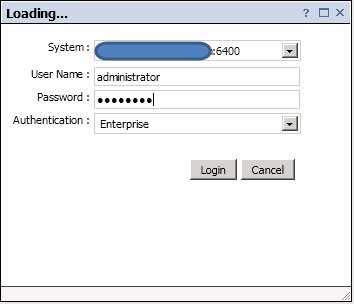
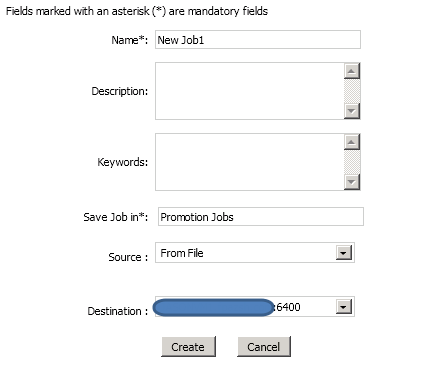
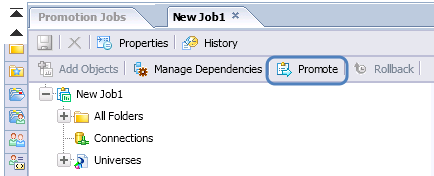
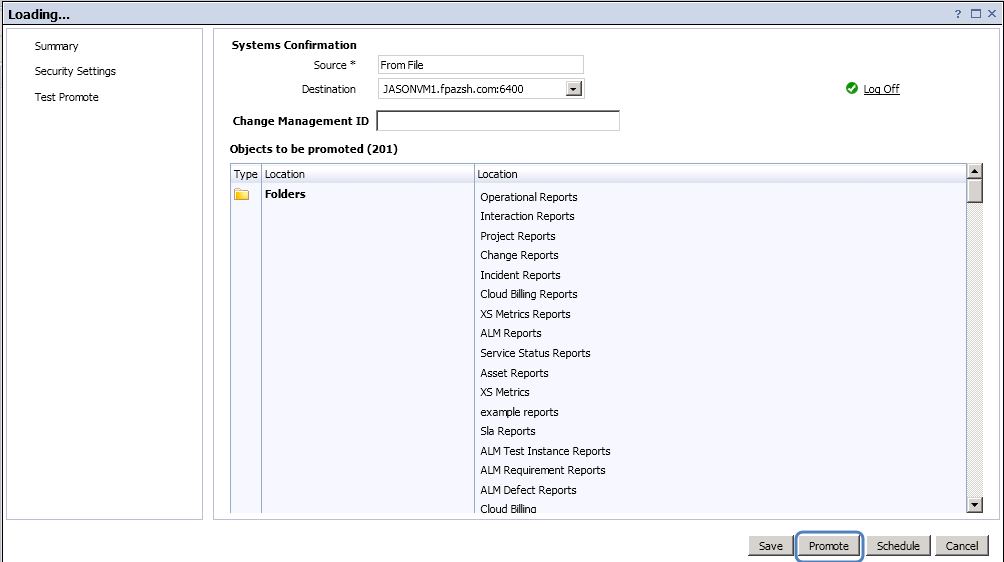
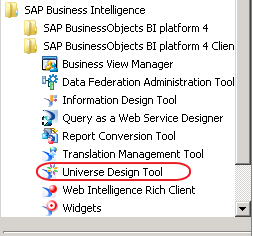
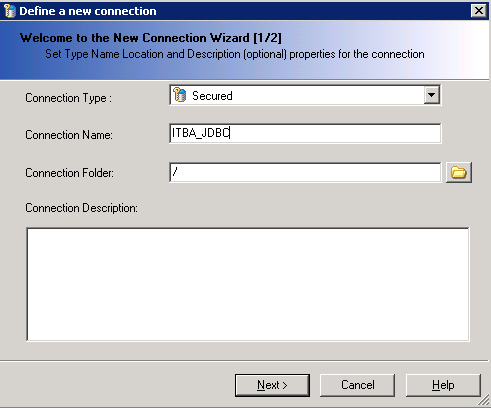
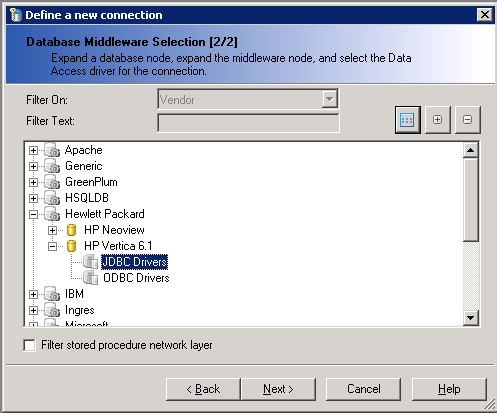
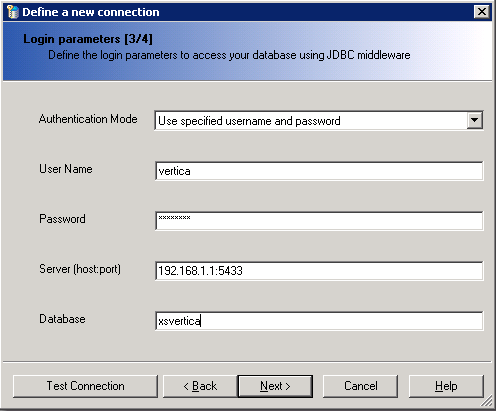
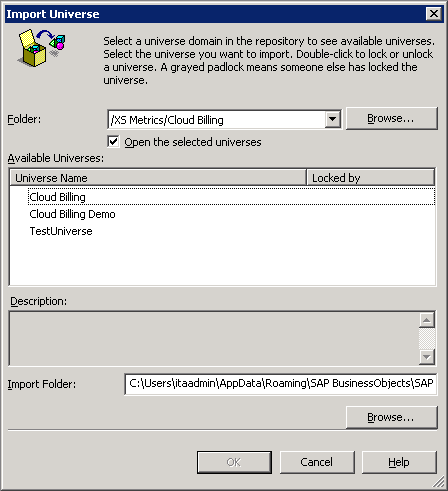
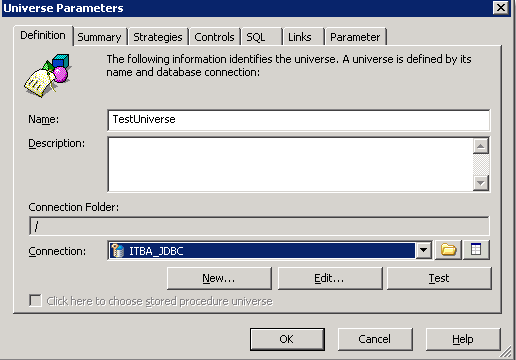
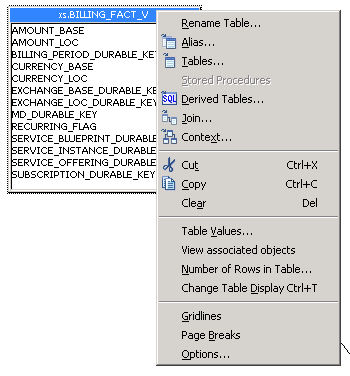
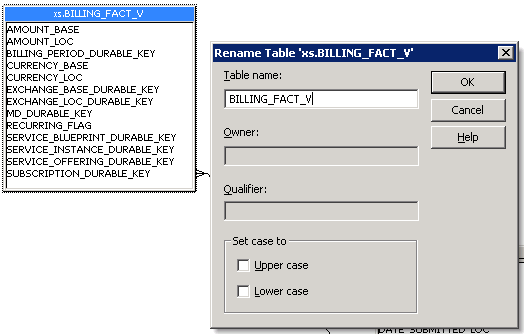
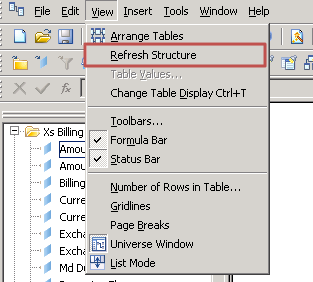
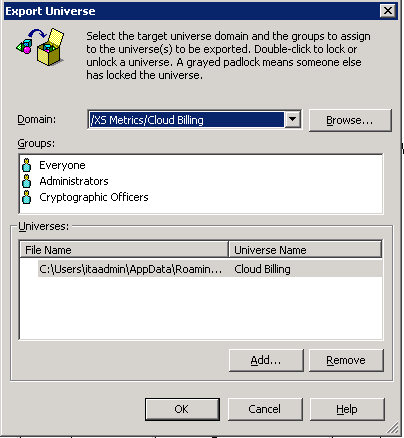
| Migrate the BOE Content |
Note Make sure you know what BOE Content must be migrated. BOE provides an Upgrade management tool, a Promotion management tool, and a Universe design tool to migrate the BO Users/Groups/Permissions, BO Universe/Connections, and BO reports from one machine to another. The detailed steps are provided below. If your BOE is a new installation, go to step 1, otherwise go directly to step 3:
|
|
|
|
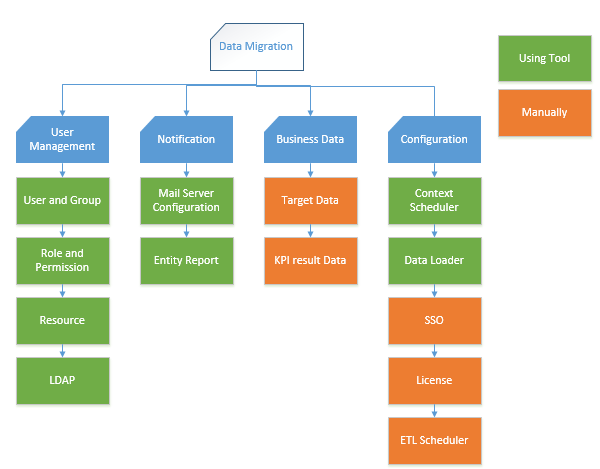
| User Management and Admin Configuration Data Migration |
This section describes how to migrate the User Management and Admin Configuration data, which include the Users, Groups, Role and Permission, LDAP, Notification, Data loader, and Data Loader Scheduler created in the XS 9.50 environment. The Migration Tool is a command-based interface application that helps you export data from the XS 9.50 repository and then import into the ITBA 10.10 repository.
Note For LDAP configuration, reconfigure the LDAP password on your LDAP account. |
|
|
|
| License Data Migration |
License data cannot be migrated from XS 9.50 to ITBA 10.10. You can only reimport the license using the Maintenance Tool. For details, see Update ITBA Licenses. |
|
|
|
| SSO Data Migration |
SSO data cannot be migrated from XS 9.50 to ITBA 10.10. In the ITBA 10.10 application, click ADMIN > Setting >Single Sign-On, and reconfigure the SSO settings. For details, see Settings - Single Sign-On |
|
|
|
| Target Data Migration |
The Target data exists in each dimension and fact tables. Each data source can be configured to extract the source data from a previous date such as 1-2 years ago. When the ETL job runs, it automatically populates the data into the dimension and fact tables.
|
|
|
|
| KPI Results Data Migration |
KPI result data contains KPI historical calculation results. To migrate the KPI result data, each Context can be recalculated from a previous date such as 1-2 years ago. Once this is done, the KPI engine automatically populates the data into KPI result tables.
|