


Manage policies
This section describes how to view, author, and edit policies.
Policy header
When you select a policy, information about that policy appears in a new view. The policy header is the bar that appears directly beneath the HPE ITOC tabs.

-
The overall compliance score is the number on the left side of the header, showing that the policy in the example is 0 percent compliant.
The header background color indicates the policy's compliance state:
- Green - Compliant based on the compliance threshold
- Red - Not compliant based on the compliance threshold
- Gray - Not calculated or unknown
- Policy ID - "POL_0001" in the example.
- Policy name - "p1" in the example.
- Revision - Revisions of this policy and the lifecycle for each revision.
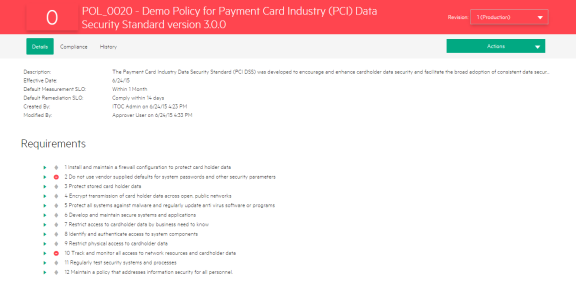
Policy details
Navigate to the Details tab of a policy in draft state to view information about the policy, edit policy properties, and modify policy requirements and rules.
Edit the details of a policy
-
From a policy in Draft state, click Actions > Edit Properties.

-
The Edit Properties dialog appears. Modify the policy as needed.
- Click OK.
Modify the requirements of a policy
From the Details view of the policy in draft state, you can use the Requirements table to add or delete requirements and rules.
-
Click the
 icon next to Requirements to create a new requirement at the top level.
 -
The New Requirement dialog appears.
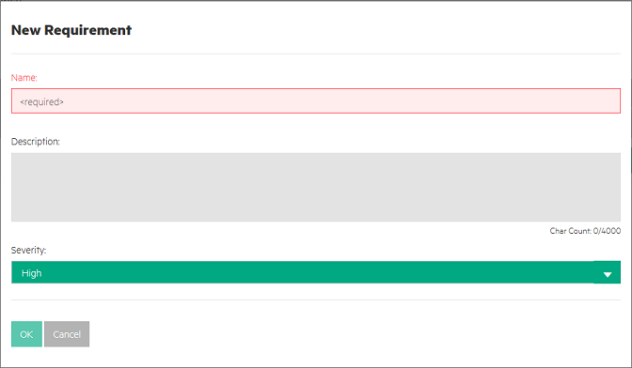
Complete the following fields:
- Name (required): Name of the requirement
- Description: Description of the requirement
- Severity: Use the dropdown list to select the level of severity (high, medium, low)
- Click OK.
Requirements 1, 2, and 3 in the following figure are examples of top requirements. Highlight the requirement, and use the icons next to the requirement to modify its level, edit its value, add a sub-requirement, and a rule.
 Move up: Move the requirement branch up. In this example, clicking the icon results in Requirement 2 displaying above Requirement 1.
 Move down: Move the requirement branch down. In this example, clicking the icon results in Requirement 2 displaying below Requirement 3.
 Indent: Indent this requirement branch, making this requirement branch a sub-requirement of requirement 1.
 Edit: Edit this requirement.
 Add a sub-requirement: Add a sub-requirement as a child of a requirement.
 Delete: Delete this requirement branch and its children, including rules.
Modify the sub-requirement of a policy
Depending on a sub-requirement's place in the structure, you can move the sub-requirement up, down, indent, or outdent it.
- To be moved up or down, a sub-requirement must have sibling requirements above or below.
- To be indented, a sub-requirement needs a sibling above it. You can outdent
 this sub-requirement to make it one level higher.
Modify the rules of a policy
The rule scope limits the controls that can be associated with a rule, based on the control's applicable scope. When a scan is run, the system matches the resource type to the rule scope and performs the compliance check for the applicable matches, which are rule-resource pair matches.
One requirement can have multiple rules. You need to define a rule for each resource type to evaluate compliance with the requirement (for example, one rule that uses the Windows control and another that uses the Linux control). A complex requirement may need multiple rules to evaluate its compliance.
-
To create or add a rule, click the
 icon. The Add Rule dialog appears.
-
Complete the following fields:
- Type (required): Set the type of rule (Evaluation or Evaluation and Remediation).
- Scope (required) - Select the resource type to which this rule applies (Platform or Software).
- Control (required) - The list of available controls shows controls with a production revision only, filtered by the Type and Scope selected. Select a control from the dropdown list or search for a specific control by entering text the Search box and clicking the
 icon.
icon. - Rule Name - The field defaults to the selected control name. You can customize this field.
- Press OK.
Hover over a rule to edit rule name or parameter values, or to delete the rule.
- To edit a rule, click the icon. The Edit Rule dialog appears.
- Modify the rule as needed and click OK.
Policy compliance
The Compliance view of a policy is visible only for the revision of the policy that is in production state. The compliance view is based on the last compliance job for all SoAs that include the policy. This view shows an aggregation of job results for this policy across business services:
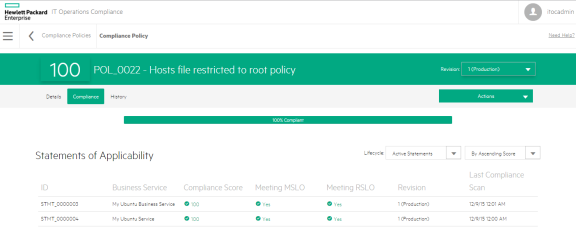
The policy compliance bar in this view displays the overall compliance score for the policy across all business services that need to comply with this policy. The example shows:
- 100% Compliant (green) - 100 percent compliance in MSLO.
- Non-Compliant (within RSLO) (orange) - Percent of rules are not in compliance within the remediation SLO.
- Non-Compliant (out of RSLO) (red) - Percent of rules that must comply with this policy are not in compliance and are out of RSLO.
- Unknown (gray) - Percent of rules have not been scanned or have failed.
The Statements of Applicability table shows SoAs for this policy.
The Compliance Score column is sorted by Ascending Score and shows business services that are performing poorly against a policy.
The following information is shown in this view:
- ID - SoA ID
- Business Service - The business service that needs to comply with this policy.
- Compliance Score - The icon and color indicate whether or not the policy is compliant based on the compliance threshold.
- Whether the SoA is Meeting MSLO
- Whether the SoA is Meeting RSLO
- Revision - SOA revision and lifecycle state.
- Last Compliance Scan - Date and time on which the last compliance scan was run.
You can filter SoAs by lifecycle state and sort them by compliance score or ID. Results for SoAs filtered by revisions in draft, submitted, or approved state may show multiple revisions of the same SoA. The list can be sorted By Ascending Score (default), By Descending Score, or By ID.
Click on a statement of applicability to view details.
Policy history
The History view of a policy shows details about each revision's history, including:
- Action - What was done (created, submitted, approved, and so on).
- Notes - Information provided by the user who created or modified the policy (approval notes made by the approver, submit notes made by the submitter, and so on).
- User - Who performed the action.
- Date - Date and time on which the action was performed.

View the history of a policy
You can view the history of a policy in any state.
- Navigate to the Policies tab and click the policy whose history you want to view.
- Click History.