Searching the Help
To search for information in the Help, type a word or phrase in the Search box. When you enter a group of words, OR is inferred. You can use Boolean operators to refine your search.
Results returned are case insensitive. However, results ranking takes case into account and assigns higher scores to case matches. Therefore, a search for "cats" followed by a search for "Cats" would return the same number of Help topics, but the order in which the topics are listed would be different.
| Search for | Example | Results |
|---|---|---|
| A single word | cat
|
Topics that contain the word "cat". You will also find its grammatical variations, such as "cats". |
|
A phrase. You can specify that the search results contain a specific phrase. |
"cat food" (quotation marks) |
Topics that contain the literal phrase "cat food" and all its grammatical variations. Without the quotation marks, the query is equivalent to specifying an OR operator, which finds topics with one of the individual words instead of the phrase. |
| Search for | Operator | Example |
|---|---|---|
|
Two or more words in the same topic |
|
|
| Either word in a topic |
|
|
| Topics that do not contain a specific word or phrase |
|
|
| Topics that contain one string and do not contain another | ^ (caret) |
cat ^ mouse
|
| A combination of search types | ( ) parentheses |
|
- Virtual machine and VM template tasks
- Supported tasks
- Creating and provisioning a VM - vCenter
- Creating and provisioning a VM - SCVMM
- Deploying a VM from a VM template - vCenter
- Deploying a VM from a VM template - SCVMM
- Cloning a VM - vCenter
- Installing the SA Agent on a VM
- Modifying a VM - vCenter and SCVMM
- Migrating a VM - vCenter
- Migrating a VM - SCVMM
- Deactivating the SA Agent on a VM
- Deleting a VM - vCenter and SCVMM
- Powering on/off a VM - vCenter and SCVMM
- Suspending a VM - vCenter and SCVMM
- Pausing a VM - SCVMM
- Reseting a VM - vCenter
- Shutting down a VM guest OS - vCenter and SCVMM
- Restarting a VM guest OS - vCenter
- Converting a VM to a VM template - vCenter
- Converting a VM to a VM template - SCVMM
- Modifying a VM template - vCenter and SCVMM
- Deleting a VM template - vCenter and SCVMM
Modifying a VM - vCenter and SCVMM
A VM must be powered off before it can be modified. For more information, see Powering on/off a VM - vCenter and SCVMM .
- In the SA Client, select the Virtualization tab to display your virtualization inventory.
- Navigate to the VM you want to modify. Make sure it is powered off.
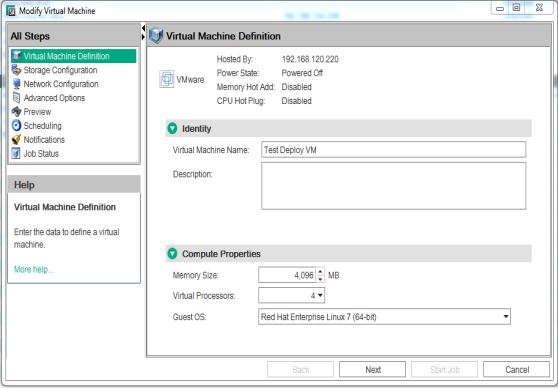
- Select the desired VM and right-click or select the Actions menu. Select VM Manage > Modify to display the Virtual Machine Definition window, as shown below.

- Virtual Machine Definition: Change the VM name, description, memory size, number of virtual processors, or the guest operating system setting, then select Next.
- Storage Configuration: Use the
 and
and  buttons to add or remove storage for the VM. Select any storage item to modify its settings, then select Next.
 - Network Configuration: Use the
 and
and  buttons to add or remove NICs. Select a NIC to change its settings, then select Next.
After modifying the network configuration, make sure that the network adapter selected for cloning or deploying from template is seen by the operating system and that an SA Agent hardware registration was performed on the VM. Failure to do so may cause cloning jobs or deploy VM from template jobs to fail. This is because full network configuration discovery is done by the SA Agent.
- Integration Services: For SCVMM, select the desired services for the VM, then select Next.
- Advanced Options: Set the following, then select Next.
- vCenter - Set the power on boot delay time, if desired.
- SCVMM - Set the start and stop options and the boot order, if desired.
- Preview: Verify the information about the VM. Use the Back button or select a previous step to make changes, then select Next.
- Scheduling: Select when you want the modify VM job to run, then select Next.
- Notifications: Optionally enter a notifier, then select Next.
- Job Status: Select the Start Job or Schedule Job button. This runs the job or schedules it to be run in the future and displays the Job ID number in the window banner. You can use the Job ID number to look up the job under the Jobs and Sessions tab.
When the job runs, it modifies the VM and displays the results.
We welcome your comments!
To open the configured email client on this computer, open an email window.
Otherwise, copy the information below to a web mail client, and send this email to hpe_sa_docs@hpe.com.
Help Topic ID:
Product:
Topic Title:
Feedback:


