


How to set up UCMDB server and UCMDB Browser environment with F5 BIG-IP load balancer and WebSEAL reserve proxy
This end-to-end use case describes how to set up a high-availability UCMDB and UCMDB Browser environment with F5 BIG-IP load balancer and WebSEAL reverse proxy.
Note Product versions used in this end-to-end use case:
- F5 BIG-IP version 13.00 Build 0.0.1645 Final
- WebSEAL version 8.0.1.0
- UCMDB version 11.0
- UCMDB Browser Standalone version 11.0
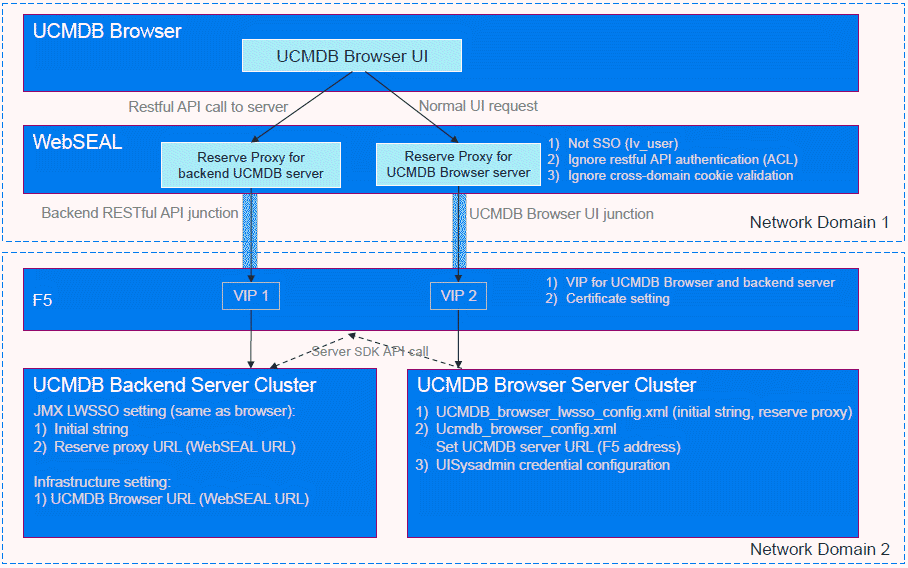
The diagram below illustrates the overall architecture of the environment we will set up.
This case contains the following key tasks:
- UCMDB Server configuration
- F5 load balancer configuration
- WebSEAL reverse proxy configuration
- UCMDB Browser configuration
UCMDB Server configuration
-
Prerequisites
- You have installed the UCMDB Server and UCMDB Browser.
-
(Optional) You have set up high availability mode by following the instructions in the Deployment Guide: "Set Up High Availability Mode".
-
Export the out-of-the-box UCMDB server keystore to a cert file
If using the out-of-the-box (OOTB) UCMDB cert, export it for later use.
To export the UCMDB server keystore (server.keystore) to a cert file (server.cert), do the following:
-
Open the command prompt and run the following command:
C:\UCMDB\UCMDBServer\bin\jre\bin\keytool.exe -export -alias <certificate alias> -keystore <Keystore file path> -file C:\UCMDB\UCMDBServer\conf\security\server.cert
where:
-
certificate alias is the name given to the certificate.
-
Keystore file path is the full path of the location of the keystore file.
For example, for the out-of-the-box server.keystore use the following command:
C:\UCMDB\UCMDBServer\bin\jre\bin\keytool.exe -export -alias hpcert -keystore C:\ucmdb\ucmdbserver\conf\security\server.keystore -file C:\UCMDB\UCMDBServer\conf\security\server.cert
Note If self-signed certificate is not used, but a company generated certificate, use the following command to get the alias for this certificate:
C:\UCMDB\UCMDBServer\bin\jre\bin\keytool.exe -list -keystore c:\ucmdb\ucmdbserver\conf\security\server.keystore
Keystore type: JKS
Keystore provider: SUN
Your keystore contains 1 entry.
<alias>, 14 Sept. 2012, PrivateKeyEntry.
Certificate fingerprint (SHA1): 2A:52:DF:17:D9:A5:37:2D:1F:1D:BA:4B:41:46:33:A8:18:42:5B:D7
The alias will look like: {45789-15478-1236-7895}
Use this alias to export the certificate.
-
-
Enter the keystore password.
-
Verify that the certificate was created in the following directory: C:\UCMDB\UCMDBServer\conf\security\server.cert
-
Convert the generated JKS file into PKCS12 format using UCMDB key tool keytool.exe (located in the <UCMDBServer>\bin\jre\bin directory). (WebSEAL requires PKCS12 format cert.)
Run the following command:
C:\UCMDB\UCMDBServer\bin\jre\bin\keytool.exe -importkeystore -srckeystore server.keystore -destkeystore server.p12 -srcalias <source serverkey> -destalias <target serverkey> -srcstoretype jks -deststoretype pkcs12 -srcstorepass <keystore password> -deststorepass <keystore password> -noprompt
The
server.p12file is the resulting PKCS12 format cert.
-
-
(Single Sign-On only) Set IDM User Name
- Go to UCMDB server JMX console.
- Locate the setUserName JMX operation under the UCMDB-UI:name=LW-SSO Configuration category.
-
Provide the following parameter values for the setUserName JMX method:
- Is inbound handler enabled: True
- LW-SSO IDM User Name: <The real value for the IDM user name>. For example, iv-user (if you are using LDAP with user iv-user).
- Click Invoke.
-
Set UCMDB Browser URL
- In UCMDB UI, go to Administration > Infrastructure Settings Manager.
- Locate the UCMDB Browser URL infrastructure setting, and set the value to your WebSEAL URL.
F5 load balancer configuration
- Make sure you have a working F5 BIG-IP load balancer environment.
- Log in to the F5 BIG-IP load balancer environment.
-
Make sure you have created the following in the F5 BIG-IP load balancer environment (Local Traffic > Virtual Servers > Nodes|Pools):
- A node for each of the virtual machines on which UCMDB server and/or UCMDB Browser are running.
- A pool that contains all the above nodes.
-
Import the UCMDB CA cert/key into F5.
- In the navigation pane, go to Main > System > Certificate Management.
- Click Import
 .
. -
In the SSL Certificate/Key Source page, select Import Type:
-
When selecting Certificate, do the following:
- Certificate Name: Keep Create New selected and provide the certificate name.
- Certificate Source: Keep Upload File selected, click Browse... to select the UCMDB server.cert file you exported earlier.
-
When selecting Key, do the following:
- Key Name: Keep Create New selected and provide the key name.
- Certificate Source: Keep Upload File selected, click Browse... to select the UCMDB key file.
-
- Click Import
 .
.
-
Add UCMDB CA cert/key to Certificate Key Chain.
-
In F5, go to Local Traffic > Virtual Servers > Profiles > SSL.
-
Select and click an existing UCMDB cert profile.
Note Create a SSL profile for HTTPS by clicking Create
 if you do not have one.
 -
Go to the Certificate Key Chain configuration setting, click Add
 .
. -
In the Add SSL Certificate to Key Chain dialog, select or provide values for the following settings as appropriate and click Add
:Certificate: Select the UCMDB certificate file.
Key. Select the UCMDB key.
Chain. Select the UCMDB chain.
Passphrase. Provide a pass phrase.
-
-
Create a cookie-based persistence profile.
- In F5, go to Local Traffic > Virtual Servers > Persistence, and click Create .
- Select Cookie for Persistence Type and provide a name for the persistence profile.
- Click Finished.
- In F5, go to Local Traffic > Virtual Servers > Persistence, and click Create
-
Create a virtual server.
- In F5, go to Local Traffic > Virtual Servers, and click Create .
-
Specify values the following settings:
- Configuration > HTTP Profile: http
- Configuration > SSL Profile (Client): Select the UCMDB cert you imported in step 5 from the Available column and add it into the Selected column.
- Configuration > Source Address Translation: Auto Map (If you select SNAT, make sure you configure SNAT related settings properly)
- Resources > Default Persistence Profile: Select the persistence profile you created in step 6.
- Provide values for other settings as appropriate.
- Click Finished.
- In F5, go to Local Traffic > Virtual Servers, and click Create
WebSEAL reverse proxy configuration
-
Configure WebSEAL reverse proxy by following IBM official documentation: IBM Security Access Manager (ISAM) Reverse Proxy Scenario.
Important During the configuration, in the Identity tab of the Edit a Standard Junction window, make sure you set the following settings as described below:
- Junction Cookie: Leave the checkbox unselected
- Include session cookie: Select the checkbox
-
HTTP Basic Authentication Header: For UCMDB Browser and RESTful API authentication to work properly, select Ignore from the dropdown list.
-
(Optional) HTTP Header Identity Information: Select IV-USER if you are using LDAP with user iv-user.
-
Import UCMDB cert (OOTB or self-signed).
- In IBM Security Access Manager, go to Manage > Secure Settings > SSL Certificate.
- Go to Manage > Edit SSL certificate database menu option, and select pdsrv.
- Go to the Personal Certificates tab, check if the OOTB UCMDB cert (for example, ucmdbcert) is already listed in this tab.
-
If no, select Manage > Import from the menu.
Provide the self signed certificate from the UCMDB Browser/UCMDB Server or the OOTB UCMDB cert.
Make sure the cert type is PKCS12. If not PKCS12, you may need to convert it to PKCS12 from JKS.
Note The OOTB UCMDB cert can be converted to PKCS12 using UCMDB key tool keytool.exe (located in the <UCMDBServer>\bin\jre\bin directory). For the conversion command, see step 2.d in UCMDB Server configuration.
UCMDB Browser configuration
-
Configure the ucmdb_browser_config.xml file.
- Open the ucmdb_browser_config.xml file (located in the <UCMDB_Browser_install_dir>\conf folder) using a text editor.
- Set the
<hostname>parameter value to the VIP that you set in F5. - Set the
<host_port>parameter to the Port that you set in F5. -
(Single Sign-on only) If you are using LDAP with user iv-user, locate the
<webui>tags, then the<validation>tags, copy and paste the following into the file:<in-ui-identity-management> <identity-management> <userNameHeaderName>iv-user</userNameHeaderName> </identity-management> </in-ui-identity-management> - Save the file.
-
Create and configure a credentials file.
- Create a credentials.txt file and put it in the same directory as the ucmdb_browser_config.xml file.
-
In the file credentials.txt, enter the following content:
- user=UISysadmin
- password=<your-password>
- Save the file.
Verify the configured environment works
To do so, log in to any of the following:
| Environment | Login URL | Remarks |
|---|---|---|
| WebSEAL | https://<WebSEAL URL>:<port><WebSEAL Junction> | Including UCMDB Browser, UCMDB server, and API |
| F5 | https://<VIP>:<port> | Including UCMDB Browser and UCMDB server |
| UCMDB Browser | https://<UCMDB Browser IP address>:<port> | |
| UCMDB Server | https://<UCMDB Server IP address>:<port> |