Searching the Help
To search for information in the Help, type a word or phrase in the Search box. When you enter a group of words, OR is inferred. You can use Boolean operators to refine your search.
Results returned are case insensitive. However, results ranking takes case into account and assigns higher scores to case matches. Therefore, a search for "cats" followed by a search for "Cats" would return the same number of Help topics, but the order in which the topics are listed would be different.
| Search for | Example | Results |
|---|---|---|
| A single word | cat
|
Topics that contain the word "cat". You will also find its grammatical variations, such as "cats". |
|
A phrase. You can specify that the search results contain a specific phrase. |
"cat food" (quotation marks) |
Topics that contain the literal phrase "cat food" and all its grammatical variations. Without the quotation marks, the query is equivalent to specifying an OR operator, which finds topics with one of the individual words instead of the phrase. |
| Search for | Operator | Example |
|---|---|---|
|
Two or more words in the same topic |
|
|
| Either word in a topic |
|
|
| Topics that do not contain a specific word or phrase |
|
|
| Topics that contain one string and do not contain another | ^ (caret) |
cat ^ mouse
|
| A combination of search types | ( ) parentheses |
|
- Viewer Overview
- Viewer User Interface
- Configuring Recognition Setting
- Configuring Asset Field Settings
- Loading Data from a Scan File
- Viewing Summary Data
- Viewing Hardware and Configuration Data
- Viewing Directories and Files Data
- Viewing Stored Files Data
- Viewing Software Application Data
- Viewing Software Utilization Data
- Comparing Scans
Comparing Scans
The scan compare feature in Viewer can be an ideal tool for support personnel. It provides you with a direct comparison between two scans. It can be used to:
- Track which files have been accidentally deleted.
- Compare scan files from recently upgraded computers against their original configuration.
- Check for adherence to a standard desktop.
- Check which files have been added, changed or removed after a software installation had taken place.
- Change management.
The compare function is only available if more than one scan has been loaded into Viewer. You can perform multiple comparisons at any one time.
To set up the comparison of two scan files:
- Select the Compare option from the Edit menu, or click the Compare icon .
- Select the two different scans to be compared from the corresponding drop-down lists.
- Click Finish to compare the two scans with default options, or customize the options by clicking the Next button. The Set Options page of the wizard is displayed.
- Customize the options as required:
- Hardware and Configuration data
- Software Applications
- Directories and Files
- Ignore empty directories – Any empty directories encountered will not be included in the comparison.
-
Show equal Key Hardware Fields – Some of the fields have key fields associated with them. If any data for the fields in the list has changed, it will be displayed along with the key field for it. The key fields are displayed in grey to indicate they do not represent a change.
-
Ignore Last Accessed Time – The last accessed time stamp is ignored when carrying out the compare.
-
Use Short Dir/File Names – The file names and directories will be displayed in the 8.3 format used by DOS.
- Scanner Configuration data
- Click the Finish button.
The first page of the Compare Scan Files wizard appears.
Compares the information contained in the Hardware and Configuration page for both scans.
Compares the information contained in the Software Applications page for both scans.
Compares the information contained in the Directories and Files page for both scans. Further options are made available:
For an example of how key fields are used see Key Fields on page 230.
Compares the Scanner Configuration (as set up in Scanner Generator) for both scans.
The two data sets are compared and a Scan File Comparison window appears showing the results of the compare operation.
The Scan File Comparison window has three columns. The first column shows the compared data items.
The results of the comparison depend on the criteria you defined in the wizard. The following information can be shown in the first column:
- Hardware Data
- Software Applications
- Directories and Files
- Scanner Configuration
To expand a category, click the + sign next to the icon.
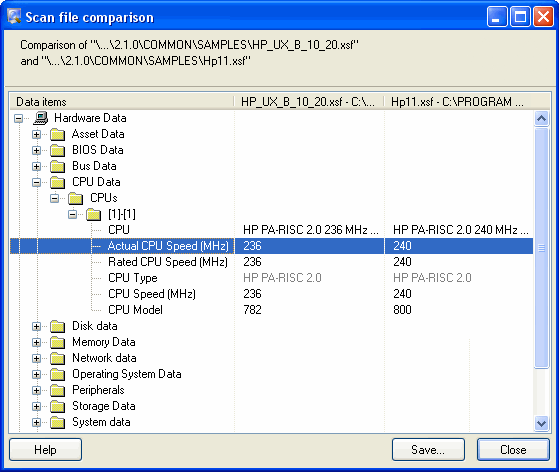
The next two columns show the results for the compared scan files. An example is shown in the following screen shot:

In this example, the Actual CPU Speed for the first scan file is 236 MHz and 240 MHz for the second scan file.
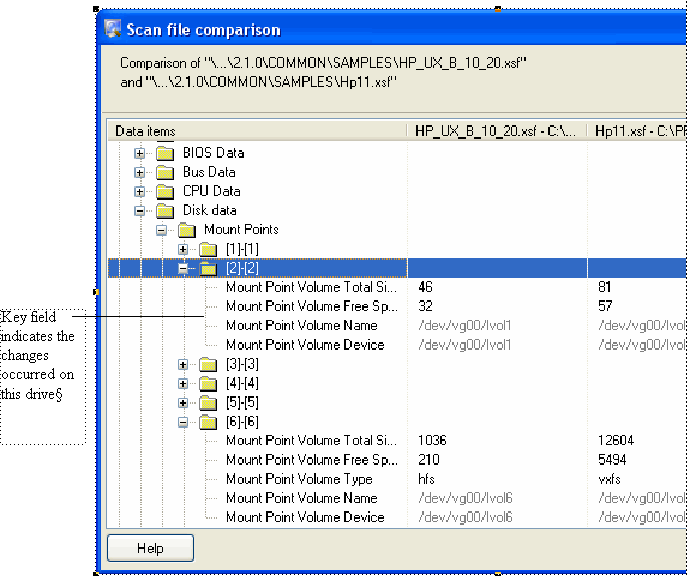
If you enabled the Show equal Key Hardware Fields option on the Set Options page of the compare wizard, some of the lists of fields will be displayed with key fields associated with them. These key fields are shown in grey. If the data for the fields in the list has changed, it is displayed along with the key field. An example is shown in the following screen shot:

The Mount Point Volume Name field is a key field (shown in grey) and this is shown even though it hasn’t changed itself. This indicates that the information changed relates to this particular drive; without the key field it would not be possible to see on which drive the change had taken place, merely that it had changed on some drive.
A Go To option is available for all categories except for Scanner Configuration data.
- Right-click on a field and select the Go To option.
- Select the Tile option from the Window menu to see both scan files with the appropriate entries highlighted.
The appropriate tab page in the Viewer main workspace will be displayed with the entry highlighted. This will be done for both of the scan files.
To save the results to a Comma Separated Variable (.csv) file:
- Click the Save button, or right-click anywhere in the results window and select the Save to .CSV file option.
- Click the Save button.
In the Save Comparison dialog box, specify a file name and path where you want the results to be saved.
We welcome your comments!
To open the configured email client on this computer, open an email window.
Otherwise, copy the information below to a web mail client, and send this email to cms-doc@microfocus.com.
Help Topic ID:
Product:
Topic Title:
Feedback:


