
Searching the Help
To search for information in the Help, type a word or phrase in the Search box. When you enter a group of words, OR is inferred. You can use Boolean operators to refine your search.
Results returned are case insensitive. However, results ranking takes case into account and assigns higher scores to case matches. Therefore, a search for "cats" followed by a search for "Cats" would return the same number of Help topics, but the order in which the topics are listed would be different.
| Search for | Example | Results |
|---|---|---|
| A single word | cat
|
Topics that contain the word "cat". You will also find its grammatical variations, such as "cats". |
|
A phrase. You can specify that the search results contain a specific phrase. |
"cat food" (quotation marks) |
Topics that contain the literal phrase "cat food" and all its grammatical variations. Without the quotation marks, the query is equivalent to specifying an OR operator, which finds topics with one of the individual words instead of the phrase. |
| Search for | Operator | Example |
|---|---|---|
|
Two or more words in the same topic |
|
|
| Either word in a topic |
|
|
| Topics that do not contain a specific word or phrase |
|
|
| Topics that contain one string and do not contain another | ^ (caret) |
cat ^ mouse
|
| A combination of search types | ( ) parentheses |
|


![]()
![]()

The Context Designer feature enables you to create and manage Contexts (universes). The Contexts can be based on your target schema tables or on Excel (or .CSV) files that can be uploaded to the target schema using the Data Loader.
Context Designer can be used to upload data and create contexts based on the data, when you want to work with the IT Business Analytics application without using Data Warehouse and SAP BusinessObjects Enterprise. It is a direct way to upload data into the IT Business Analytics Studio using files without performing integrations to external sources or to other HP products. It can be used, to integrate third party data, testing, or for Proof of Concept (POC) sessions. It can also be used as a component of IT Business Analytics to integrate third party data.
Context Designer provides KPI results based on your real data.
Note It is recommended to use Excel files instead of .CSV files.
- In ITBA, click ADMIN > Semantic Layer > Semantic Layer. The Context Management page opens. Click Launch Context Designer and select Import Content.
- In the Context Designer page, click the Import Content
 icon in the toolbar to open the Import wizard.
 - In the Context Designer page, in the Repository area, click the Import Content icon to open the Import wizard.

To understand more about Contexts, see the Learn More section in Semantic Layer - Context Designer.
 Import an Excel or a .CSV file in Context Designer or use them as data sources in IDE
The differences between the two techniques is as follows:
-
Context Designer: When you import an Excel or a .CSV file using the Context Designer located in the Admin tab, a Context based on the structure of the file is created in Context Designer. You can then extend the context by adding other tables and creating connections. The newly created context can then be used as a base for KPIs.
This process is fast and efficient and displays value very quickly. It is recommended for one-time operations, when the data does not change very often, when you don't need historical information, or for POCs.
Note that you can also schedule the automatic import of an Excel or a .CSV file. You can even schedule the automatic import of an Excel or a .CSV files with a changed structure.
-
IDE: When you use an Excel or a .CSV file as the data source in the IDE, you create a content pack and a basic ETL.
This process is more complex, but provide more flexibility. It is recommended for Production environments. Because this procedure creates a content pack and uses an ETL, it enables the use of all the other capabilities of the system. It provides the handling of historical information, the scheduling of data import from the same Excel or .CSV file when the file changes periodically, the creation of Target database tables different from the original Excel or .CSV table, the connection to other entities, the splitting of the original Excel or .CSV table into different tables in the Target database, or the addition of the original data to other tables in the Target database. In addition, the process identifies changes and deletions of data, and can handle large amounts of data.

Upload tables in Excel format to the Tables Repository
You can upload data into the Table Repository of the Context Designer, using Excel files and without integration with external sources or with other HP products. It can be used to integrate third party data sources, testing, or for Proof of Concept (POC) sessions. You can, in the same way, replace the data in an existing table, or add data to an existing table when the table has been loaded using an Excel file.
Note You can upload Excel tables with .XLSX or.XLS formats.
To upload data from the Excel file into the Table Repository:
-
Create the Excel file containing the data you want to use in the Table Repository (for example: latest.XLSX).
Recommended: Excel tables should have unique names across all active Content Acceleration Packs (CAPs). For details on CAPs, see Create Content Acceleration Packs See also additional limitations in Limitations.
- In IT Business Analytics, click the ADMIN > Semantic Layer > Semantic Layer.
- In the Context Management page, click Launch Context Designer .
-
Click Import Content
to open the Import Wizard (data loader). Follow the steps to upload the Excel file. For details, see Content Import WizardThe file is uploaded. The upload operation saves the changes you made to the Excel file. The new table appears in the External Tables area.
Upload tables in .CSV format to the Tables Repository
You can upload data into the Studio using .CSV files and without integration to external sources or to other
To upload data from the .CSV file into the Studio:
-
Create the .CSV file containing the data you want to use in the Studio (for example: latest.CSV).
Recommended: CSVtables should have unique names across all active Content Acceleration Packs (CAPs). For details on CAPs, see Create Content Acceleration Packs. See also additional limitations in Limitations .
- InITBA, click the ADMIN > Semantic Layer > Semantic Layer.
- In the Context Management page, click Launch Context Designer .
-
Click Import Content
to open the Import Wizard (data loader). Follow the steps to upload the .CSV file. For details, see Content Import Wizard.The file is uploaded. The upload operation saves the changes you made to the .CSV file. The new table appears in the External Tables area.
Use Case - Create a New Business Context Using .CSV Files
For details, see Create a New Business Context..

Content Import Wizard
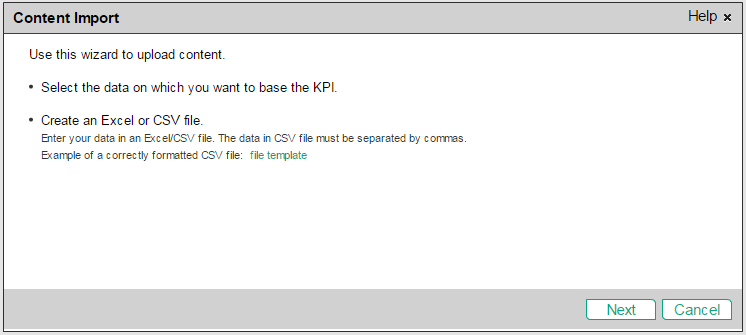
The wizard enables you to upload content.
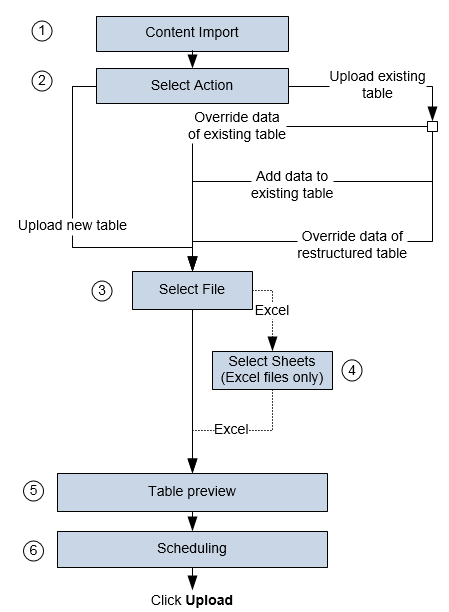
User interface elements are described below (when relevant, unlabeled elements are shown in angle brackets):
|
UI Element |
Description |
|---|---|
| Select the data on which you want to base the KPI. |
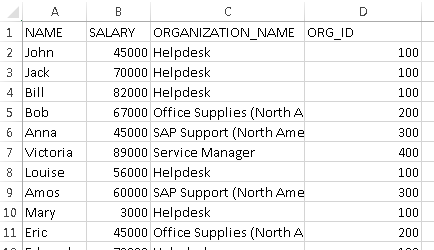
You can use Excel (or .CSV) files as a data source. A .CSV file contains data separated by commas. Each Excel file sheet or each .CSV file that is uploaded corresponds to a Context with only one entity. The name of the Context that is created is the name of the Excel sheet (or .CSV) file. The names of the columns in the Excel sheet (or for .CSV files, the first row of the file) represent the names of the entity fields. These fields become the variables that can be used to create the formula that is used to calculate the value of the KPIs or Metrics associated with the Context. The .CSV file should have a table structure. Example The following is an example of a .CSV file in CSV format: MD_BUSINESS_KEY,SLA_NAME,SLA_STATE,SLA_TYPE,DATE_START,DATE_END SLA01,SLA01,Passed,Corporate,1/1/2011 13:00:00,2/1/2011 19:00:00 SLA02,SLA02,Passed,Corporate,1/2/2011 13:00:00,2/2/2011 19:00:00 SLA03,SLA03,Passed,Corporate,1/3/2011 13:00:00,2/3/2011 19:00:00 SLA03,SLA03,Passed,Corporate,1/3/2011 13:00:00,2/3/2011 19:00:00 SLA04,SLA04,Passed,Corporate,1/4/2011 13:00:00,2/4/2011 19:00:00 SLA13,SLA13,Passed,Corporate,1/3/2011 13:00:00,2/3/2011 19:00:00 SLA14,SLA14,Passed,Corporate,1/6/2011 13:00:00,2/6/2011 19:00:00 Example The following is an example of an Excel file:
Limitations for .CSV and Excel files
Make sure you also check out the limitations in Limitations Tip
|
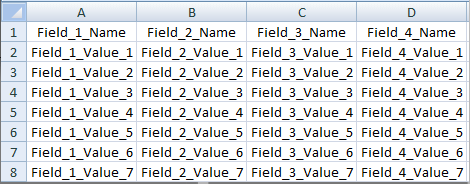
| Create a .CSV or Excel File |
Hover above file template to display an example of the file structure in table format that can be uploaded.
|
User interface elements are described below (when relevant, unlabeled elements are shown in angle brackets):
|
UI Element |
Description |
|---|---|
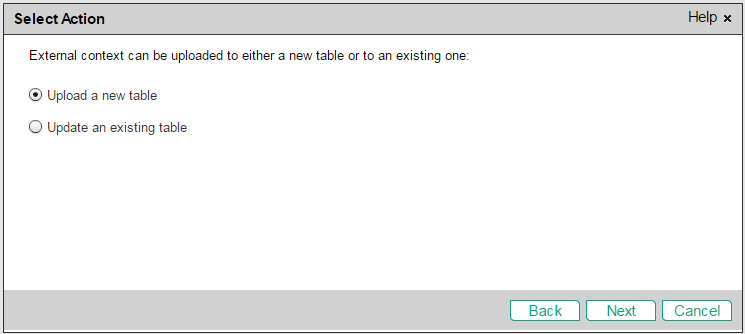
| Upload a new table |
Select this option if you want to create a new table in the Context Designer using the information from the Excel or .CSV file. |
| Update an existing table |
Select this option if you want to update an external table that was previously uploaded to the Context Designer. When you click this option, the following options are displayed:
|

This page is displayed when you selected the Upload a new table option:

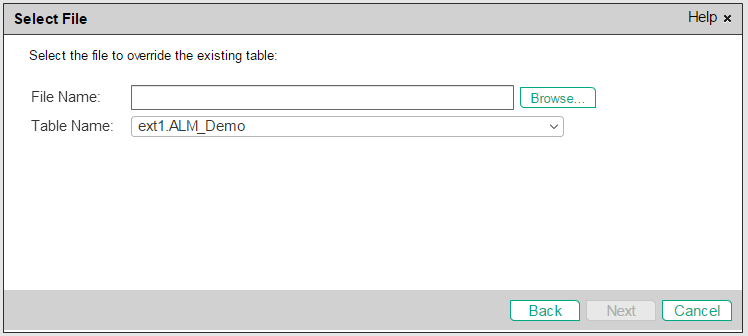
This page is displayed when you selected the Update an existing table option:
User interface elements are described below (when relevant, unlabeled elements are shown in angle brackets):
|
UI Element |
Description |
|---|---|
| File Name |
Select the file you want to upload. |
| Table Name | Select the relevant table name. |
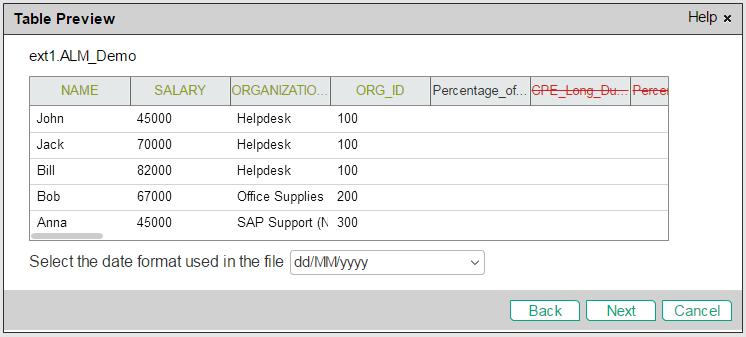
This page displays the table created from an Excel file.
Select the sheets you want to upload.

In you are performing the override of an Excel file with more than one sheet, note that you can only import one sheet at a time when you override the data of a table with changed structure. If you change the structure of more than one sheet, perform the import for each one of the sheets.
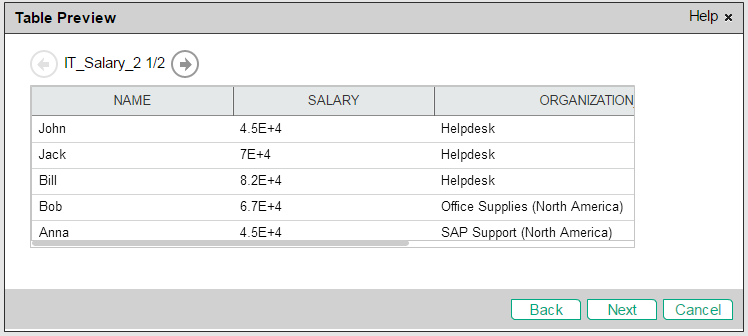
This page displays the table created from the Excel file:
This page displays the table created from the .CSV:
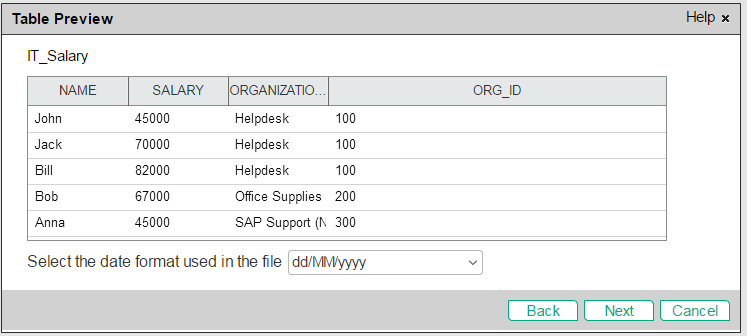
The page displays the table with a new column when you override an existing file.
User interface elements are described below (when relevant, unlabeled elements are shown in angle brackets):
|
UI Element |
Description |
|---|---|
| <table_name> |
The name of the table. It corresponds to the selected sheet in the Excel file or to the CSV file itself. |
| <sheet_nbr/total_nbr_sheets> |
The sheet number and the total number of uploaded sheets in the Excel file. Click the arrows to display the other table previews. |
| <table> |
The contents of the .CSV or Excel file are displayed in the box in table format. If you selected more than one sheet of the Excel file, arrows appear and you can view a sample of each sheet you selected. You can set the date format only for the CSV file. If you override an Excel file you can only import one sheet at a time if the sheet structure has changed. In the table in the Table Preview page:
|
| Select the date format you used in the file |
Select the date format you used in the .CSV file. |
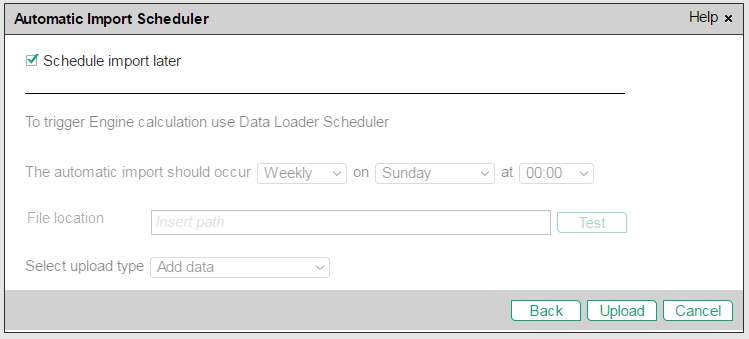
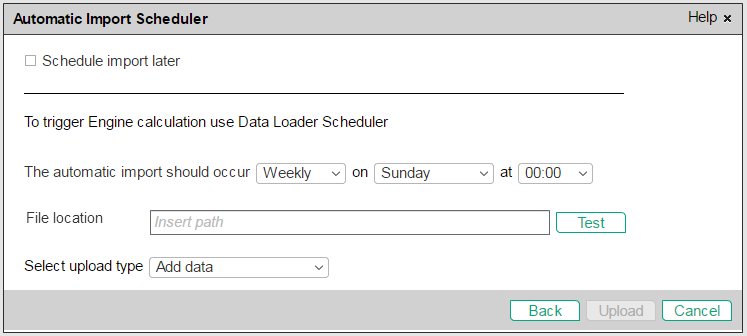
![]() 6 - Automatic Import Scheduler
6 - Automatic Import Scheduler
You can schedule the upload of a .CSV or Excel file automatically.
User interface elements are described below (when relevant, unlabeled elements are shown in angle brackets):
|
UI Element |
Description |
|---|---|
| Schedule import later |
Select to schedule the automatic import at a later time. For details, see Semantic Layer - Data Loader Scheduler. This is the default. |
| The automatic import should occur <periodicity> at <time> |
Select to import the file: Daily.and select the time (from 00:00 to 23:30) when you want to perform the import operation. Weekly. and select the day (Monday to Sunday) and time (from 00:00 to 23:30) when you want to perform the import operation. Monthly., and select the date (1 to 31, or last day of the month) and time (from 00:00 to 23:30) when you want to perform the import operation. |
| File location | The location of the .CSV or Excel file that you want to upload automatically. Use the format described in the field. The location must be accessible by BA. |
| Select upload type |
|
We welcome your comments!
To open the configured email client on this computer, open an email window.
Otherwise, copy the information below to a web mail client, and send this email to SW-Doc@hpe.com.
Help Topic ID:
Product:
Topic Title:
Feedback: