
Searching the Help
To search for information in the Help, type a word or phrase in the Search box. When you enter a group of words, OR is inferred. You can use Boolean operators to refine your search.
Results returned are case insensitive. However, results ranking takes case into account and assigns higher scores to case matches. Therefore, a search for "cats" followed by a search for "Cats" would return the same number of Help topics, but the order in which the topics are listed would be different.
| Search for | Example | Results |
|---|---|---|
| A single word | cat
|
Topics that contain the word "cat". You will also find its grammatical variations, such as "cats". |
|
A phrase. You can specify that the search results contain a specific phrase. |
"cat food" (quotation marks) |
Topics that contain the literal phrase "cat food" and all its grammatical variations. Without the quotation marks, the query is equivalent to specifying an OR operator, which finds topics with one of the individual words instead of the phrase. |
| Search for | Operator | Example |
|---|---|---|
|
Two or more words in the same topic |
|
|
| Either word in a topic |
|
|
| Topics that do not contain a specific word or phrase |
|
|
| Topics that contain one string and do not contain another | ^ (caret) |
cat ^ mouse
|
| A combination of search types | ( ) parentheses |
|


![]()
![]()

The Context Designer feature enables you to create and manage Contexts (universes). The Contexts can be based on your target schema tables or on Excel (or .CSV) files that can be uploaded to the target schema using the Data Loader.
Context Designer can be used to upload data and create contexts based on the data, when you want to work with the IT Business Analytics application without using Data Warehouse and SAP BusinessObjects Enterprise. It is a direct way to upload data into the IT Business Analytics Studio using files without performing integrations to external sources or to other HP products. It can be used, to integrate third party data, testing, or for Proof of Concept (POC) sessions. It can also be used as a component of IT Business Analytics to integrate third party data.
Context Designer provides KPI results based on your real data.
- The total number of KPI Breakdowns (STUDIO and on-Demand) is limited to 5000 per dimension.
- If the calculation of a KPI or Metric ends in error, check the engine.log for a number of Breakdowns being larger than the default value. You can update the default value in $HPBA_Home\glassfish\glassfish\domains\BTOA\config\settings\engine-settings.xml to be more or less 5000. 5000 is the recommended breakdown size. Larger numbers may bring performance and stabilization issue.
- In ITBA, click ADMIN > Semantic Layer > Semantic Layer. The Context Management page opens. If not , click Data Loader. For details, see Context Designer Page.
-
In the Context Designer page that opens:
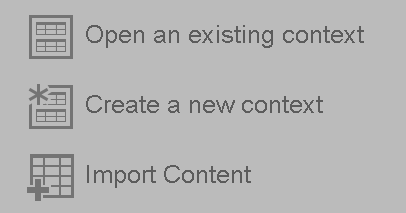
- To create a new context, click Create a new context.
- To edit a context, click Open an existing context.

 Semantic Layer (Context and Universe)
A semantic layer is a business representation of corporate data that helps end-users access data autonomously using common business terms. It maps complex data into familiar business terms such as product, customer, or revenue to offer a unified, consolidated view of data across the organization. By using common business terms, rather than data language, to access, manipulate, and organize information, it simplifies the complexity of business data. These business terms are stored as objects in a Business Context (or universe), accessed through business views. Business Contexts enable business users to access and analyze data stored in a relational database and OLAP cubes. This is claimed to be core business intelligence (BI) technology that frees users from IT while ensuring correct results.
Business Views is a multi-tier system that is designed to enable companies to build comprehensive and specific business objects that help report designers and end users access the information they require. Business Views is intended to enable people to add the necessary business context to their data islands and link them into a single organized Business View for their organization.
A Context or universe is a business representation of an organization's data that helps end-users access data using common business terms. A Context is the result of a semantic layer of metadata that creates a business oriented view of the data. A Context contains a schema of the tables that make up the dimension and measurement objects. A Context is an interface between the data warehouse and the analytics that display the data.
Context are made up of objects and classes that are mapped to the source data and are accessed through queries and reports. They correspond to the business contexts used in IT Business Analytics.
Each Context includes classes (entities), objects with a dimension attribute, and relationships between the entities. The entity's values are used in the calculation of values and statuses of the Key Performance Indicators (KPIs) or Metrics that represent them. The KPIs or Metrics are the building blocks used by the IT Business Analytics engine and the Studio.
IT Business Analytics Semantic Layer may include:
- Universes created in SAP BusinessObjects. For more details on universes, see the relevant SAP BusinessObjects documentation.
- Out-of-the-box Contexts created using the Context Designer.
- User-defined Contexts created using Context Designer and populated with data uploaded from .CSV files using Context Designer.
If you want to change the formula of a KPI or Metric , you must be aware of the relationships in the context (universe) of the KPI or Metric.
The contexts, entities, and dimensions that are displayed and used in the Studio are part of the universes that are located in the ITBA library.
For details on the KPIs and their formulas, see the KPI and Metric Library in Excel format, in the relevant integration sections or Content Acceleration Pack (CAP) sections .
Context or Universe Contents
A Context (or Universe) is a set of entities. Each entity is a set of fields. Each field can be a dimension, measurement, or fact that can provide information about the business.
A formula calculates, for a specified time period, using the values of specific entities, a value that represents a specific aspect of the business. The value is assigned to a Key Performance Indicator (KPI) so that the KPI represents a specific aspect of the business.
Each Context includes some KPIs. The KPIs are the building blocks of the Studio and the KPI engine.
These entities that are used in the calculation of the KPIs are provided by the relevant integrated data source. Each data source corresponds to a specific Content Pack that provides the connection between the data source and ITBA.
Out-of-the-Box Contexts
You can only add more tables and entities to an out-of-the-box Context, you cannot remove or modify the original elements.
Terms
Dimension. An entity that describes, qualifies, or otherwise adds meaning to the measurements (facts) that business users want to analyze.
Measure. A value collected by the executable during execution, such as the number of rows processed during an ETL job, or an amount extracted from a table that describes expenses in a source application.
Metric. A framework to establish and collect measurements of success or failure on a regulated, timed basis that can be audited and verified.
Contexts, entities, and fields UUIDs
To uniquely identify contexts, entities, and fields, a universally unique identifier (UUID) is assigned to them. When you save a new context, the UUID is auto-generated.
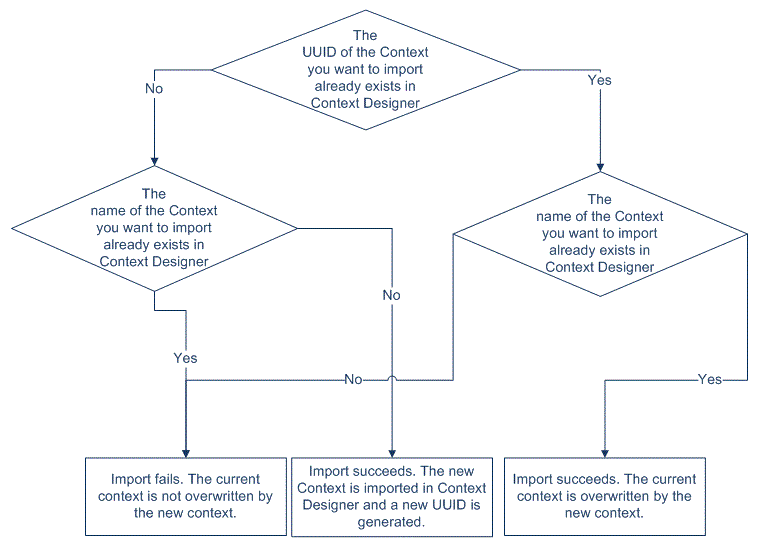
The flowchart explains the different configurations and their impact on the import of a Context in the Context Designer:
Loops in Contexts
Contexts can include tables that are linked together forming a loop.
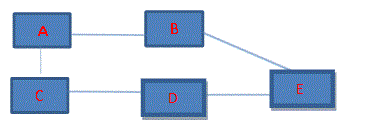
To perform the calculation of a KPI or Metric, the system selects the path with the lowest number of joins as the default path. If the formula includes both fields in A and in E, then the system will choose A-B-E (2 joins) instead of A-C-D-E (3 joins).
If the structure has the same number of joins and the formula includes fields from the three tables, then the system cannot select the path with the lowest number of joins (same number for each path).
In that case, the selection of the path used for calculation is random.
The paths could then be:
Or
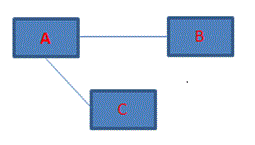
Or
Tip: The problem of loops in context structure is that calculations may have different results depending on the path selected by the system (random or lowest number of joins), therefore loops are not recommended.
Workarounds:
-
Modify the formulas: If you want the path to follow a specific path, you must modify the formula so it includes the path. For example, if the formula is SUM (A.duration, *) filter E.status=’OK’ it will follow the A-B-E path because it has the smallest number of joins, but if you want it to pass via C you can modify the formula as follows: SUM (A.duration,*) with filter E.status=’OK’ but then the path could go A-C-D-E or C-A-B-E. If you want it to follow A-C-D-E you should use SUM (A.duration, C.id=C.id and D.id=D=id) with filter E.status=’OK’.
-
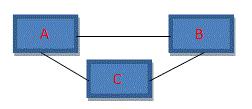
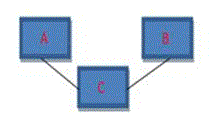
Duplicate the table:Duplicate the table that is linked to a large number of other tables. If you have the following context structure:
You can create the same structure without loops by using copies (aliases) of the Member table, give each table another name, and create the relevant joins, as follows:
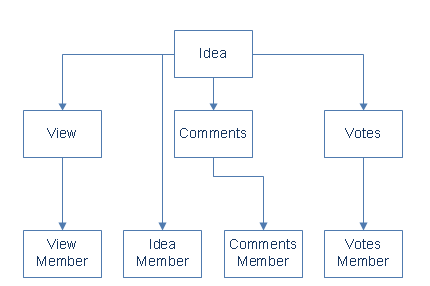
Once you have created the aliases you can drag them to the Entities area.
-
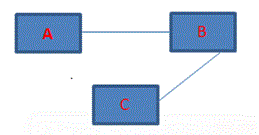
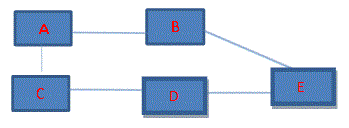
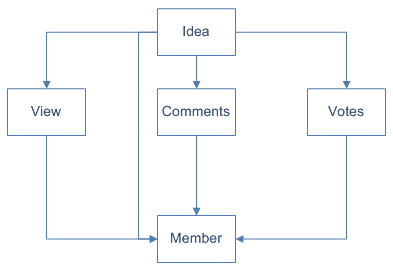
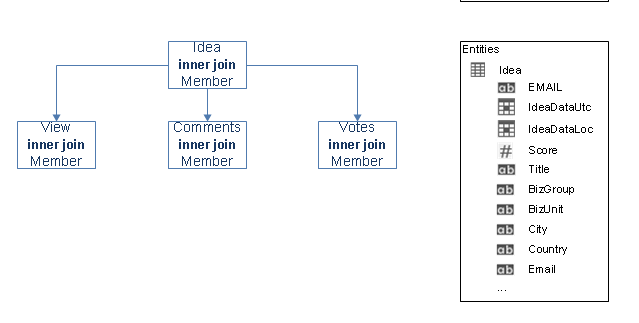
Modify the view: If you have the structure below then when the tables are dragged to the Context Designer Entities area, then each entity and its attributes appear separately .
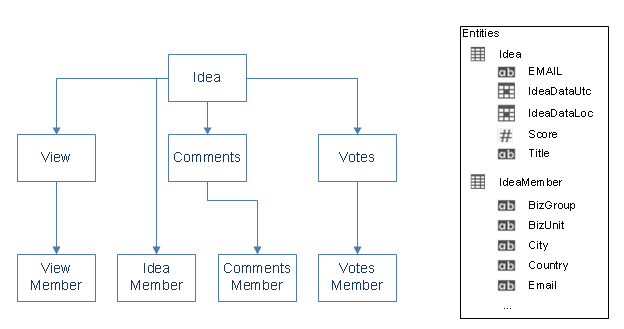
You can modify the views in the Target schema to correspond to the structure below, where the attributes of the entity include both the entity original attributes and the attributes corresponding to the person who submitted the idea. You create these views in the SQL server. This way when the tables are dragged to the Context Designer Entities area they display the entity and its attributes as well as the corresponding Member entity and its attributes.
Link between Contexts and KPI or Metric Formulas
When you create a Context, you select tables, create links between the tables, and select the relevant columns in the tables to be part of the Context. For details, see Semantic Layer - Context Designer.
When you create a KPI or a Metric you assign them a Context in the Studio. The Context tables become variables that you can use when creating KPI or Metric formulas, and the table columns become the variable entities.
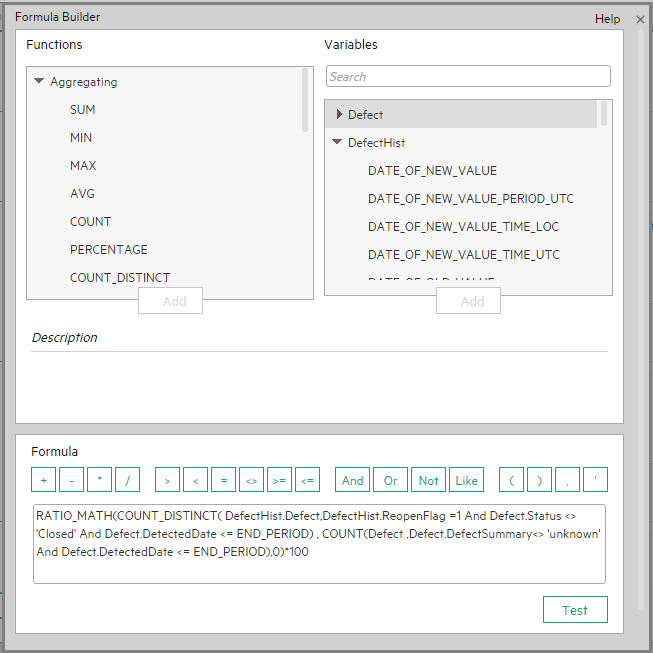
For example the % of Reopened Defects KPI has the following formula:
RATIO_MATH(COUNT_DISTINCT( DefectHist.Defect , DefectHist.ReopenFlag =1 And Defect.Status <> 'Closed') , COUNT( Defect ,Defect.DefectSummary<> 'INVALID' And Defect.DefectSummary<> 'UNKNOWN' ),0)*100
Its definition is:
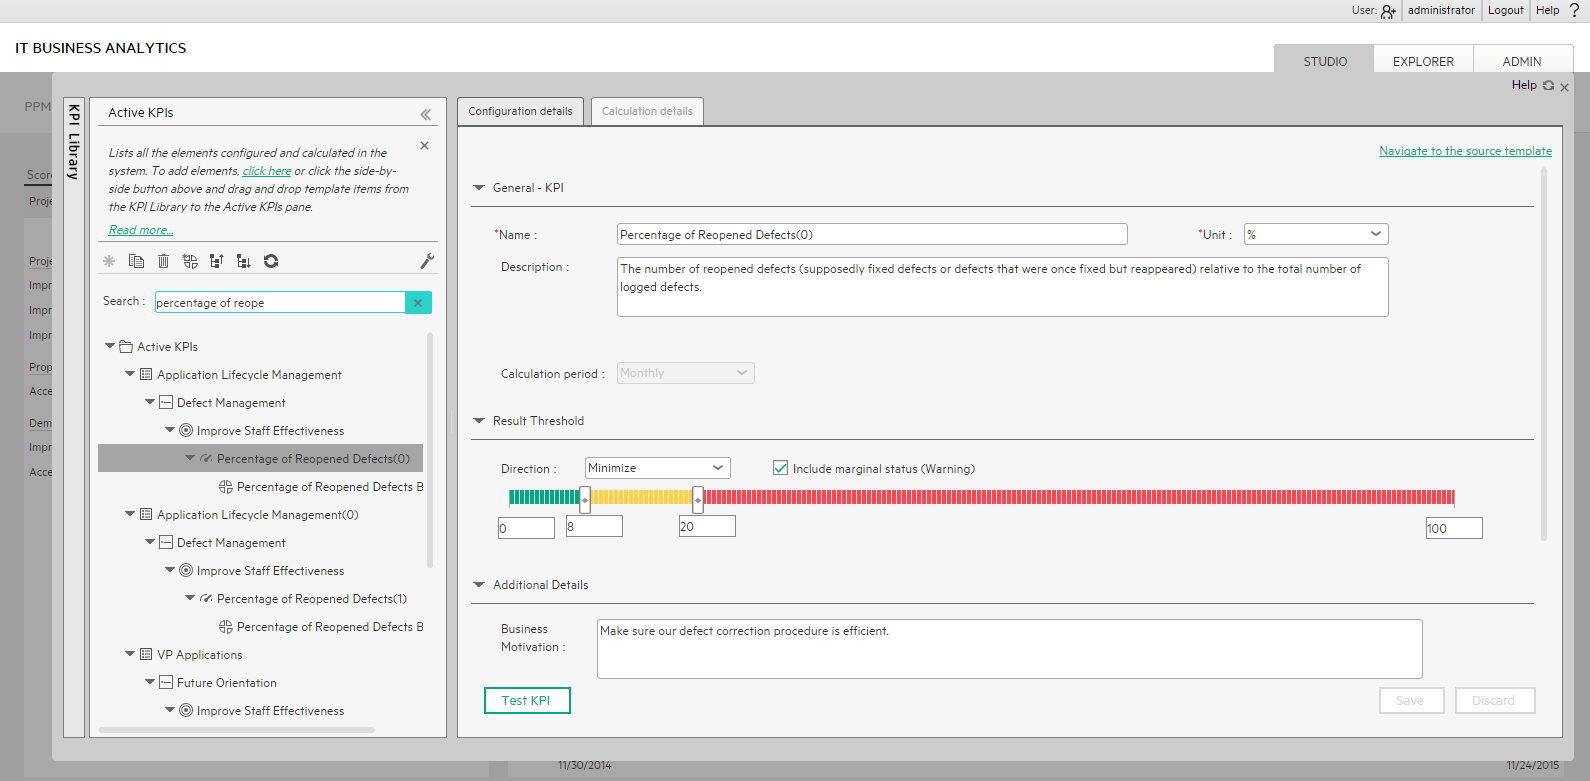
The Business Context is ALM_Defect. Click Admin > Semantic Layer and open the ALM_Defect Context:
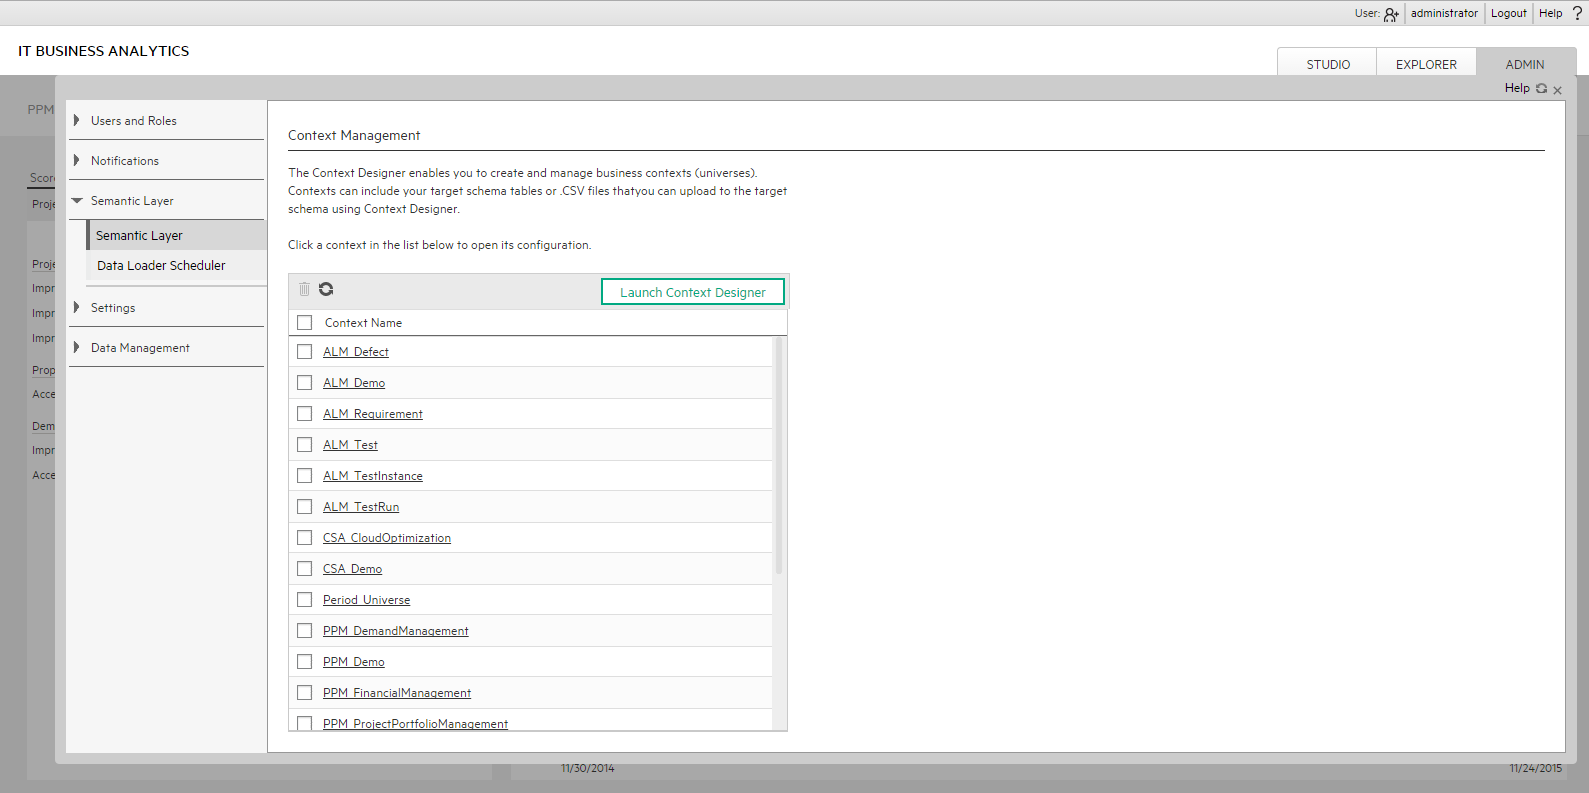
The contents of the Context including the ALM tables is displayed:

In the Entities area on the right, you can see the tables and the table columns that were selected to be part of the ALM_Defect Context itself.
It is recommended that the person who creates the KPI or Metric formula should be familiar with the ALM entities that are used in the ALM_Defect context:
The Defect_Hist table corresponds to one of the entities (DefectHist) that appears in the list of Variables that can be used when creating or modifying the formula of a KPI based on the ALM_Defect context. To access the KPI or Metric formula, click Studio, highlight the relevant KPI (% of Reopened Defects for example), click the Calculation Details tab, and then click Open Formula builder.
The variables you see in the formula builder correspond to the Entities in the Context Designer (above) and correspond to the <EntityName> in the syntax of the formulas (as explained in KPI or Metric Formula .)
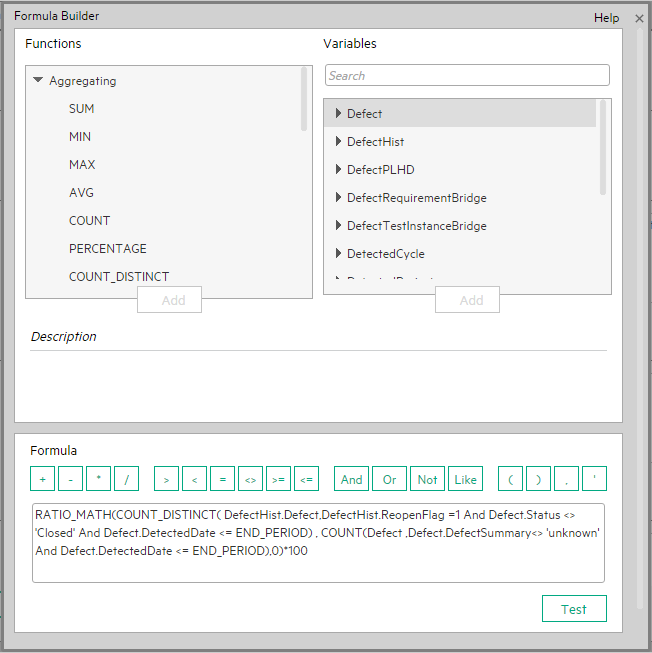
When you expand a variable, the items you see below correspond to the fields (in the Context Designer) and correspond to the <FieldName> items in the formulas syntax (as explained in KPI or Metric Formula.)

View existing Contexts (universes)
- In Business Analytics, click ADMIN > Semantic Layer > Semantic Layer. The Context Management page opens.
-
The list of out-of-the-box Contexts is displayed.
- Select the relevant context and click Launch Context Designer.
-
The structure of the Context is displayed.
Create a Context and use its contents in the Studio
-
- In ITBA, click ADMIN > Semantic Layer > Semantic Layer.
- In the Context Management page, click Launch Context Designer.
- Click Create a New Context. The Context Designer page opens.
- Enter the name of the Context .
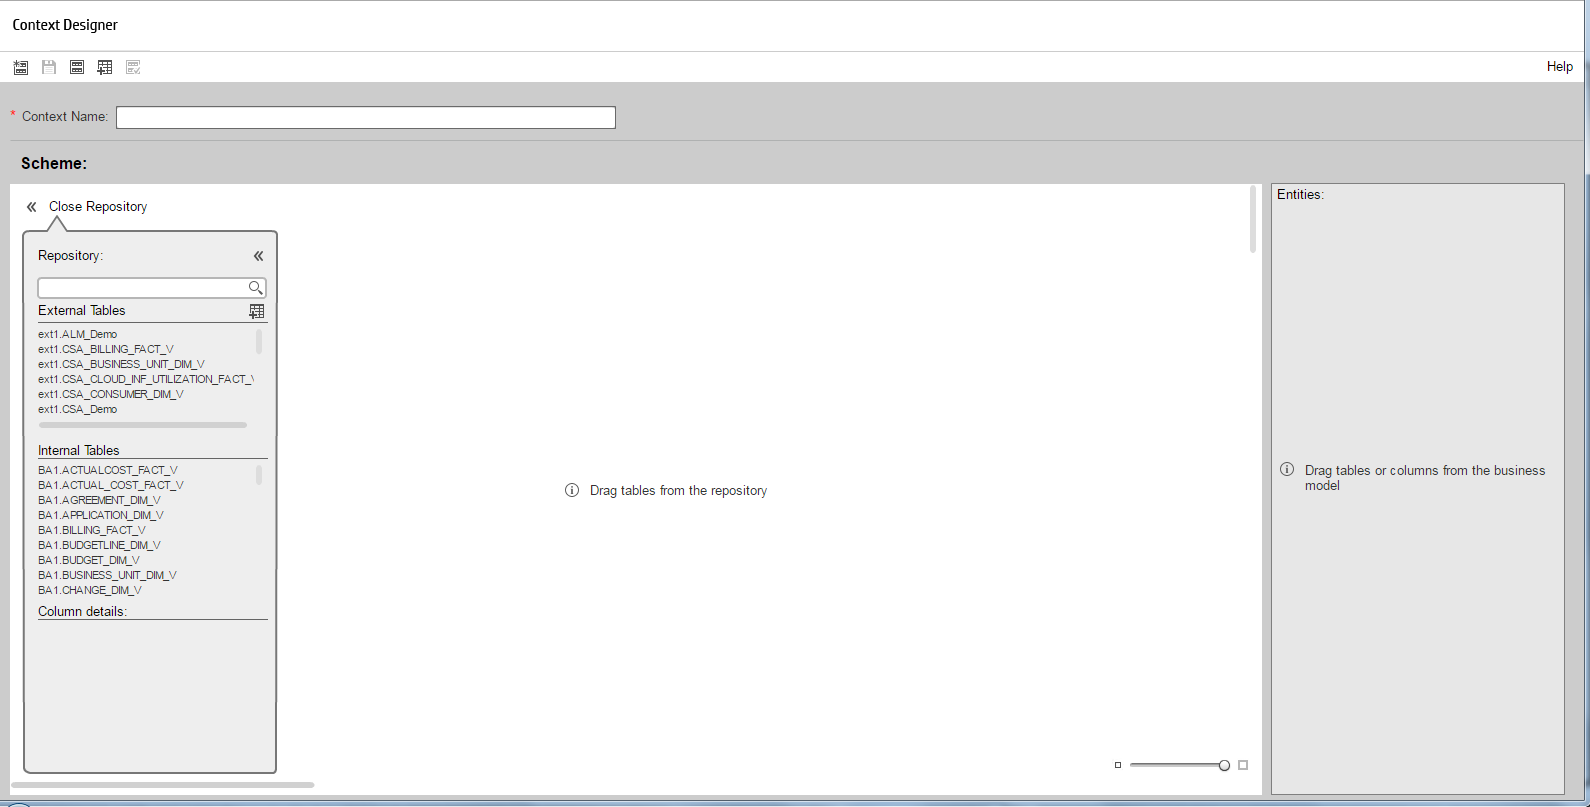
- Click Open Repository. The Repository area opens. You can use:
- Tables from the ExternalTables list. These tables are created from external tables in CSV format that are uploaded to ITBA. For details on how to upload a CSV table, see Semantic Layer - Excel (or .CSV) File Loader . After the table is uploaded, a corresponding table named ext.<csv_table_name> is listed in the ExternalTables list.
Internal tables from the InternalTables list.
If you are working with Enterprise ITBA, the tables listed in the InternalTables list are the Data Warehouse tables, the Period tables created during the post-install procedure, and the View table.
- Drag the relevant tables from the Repository to the Scheme area.
- Define the relationships between the tables by dragging a specific column from one table and dropping it over the relevant column in another table. A visual link is added to the graph to indicate the relationship.
- Drag the relevant tables from the Scheme area to the Entities pane. The tables become variables and the columns become the variable entities that can be used to create KPI or Metric formulas when a KPI or Metric is assigned the Context in the Studio.
- Click
 to save the Context.
-
Load the Context and verify the variables and entities
- In ITBA, click Studio.
- Activate a KPI or a Metric or clone any active KPI or Metric that does not have a KPI Breakdown or Breakdown Metric. For details, see Activate Scorecards, Perspectives, Objectives, Metrics, or KPIs Using Templates or Create Active Scorecards, Perspectives, Objectives, Metrics, or KPIs.
- Click the Calculation details tab, and click Select business context. For details, see KPI or Metric Configuration and Calculation Details.
- In the Business Context dialog box, change its Context to the new Context.
- You can then modify the formula that is used to calculate the KPI or Metric status by selecting the variables that correspond to the entities and fields that were defined in the Context Designer. To do that click Open Formula Builder.
-
In the Formula Builder dialog box, verify that the variables correspond to the tables you selected in the Entities area in the Context Designer, and that the entities of the variables correspond to the selected columns of those tables. Click OK to save the KPI.
Note In the same way, you can modify the Filter of the KPI or Metric to use the variables corresponding to the .CSV file-based Context (universe).
Update a Context
- In ITBA, click ADMIN > Semantic Layer > Semantic Layer. In the Context Management page, click Launch Context Designer. The Context Designer page opens. For details, see Context Designer Page.
- Select the relevant Context.
-
Make the relevant changes: delete or add entities, fields, tables, columns, or relationships.
-
Click
to save the Context. - Load the Context and verify.
Export contexts using Content Acceleration Packs (CAPs)
To export contexts, proceed as follows:
- Create a CAP that only includes the contexts you want to export. For details, see Create a CAP with the ITBA application data .
- Export the CAP you created. For details, see Download a CAP to the user's local system .
Import contexts using Content Acceleration Packs (CAPs)
To import contexts, proceed as follows:
- Upload the CAP. For details, see Upload a CAP to the Business Analytics application .
- Activate the CAP in ADMIN > Data Management > Activate CAP. For details, see Activate a CAP.
- Verify the upload by accessing the contexts in ADMIN > Semantic Layer > Semantic Layer.
Note If the context you import already exists, it is deleted and replaced by the context imported using the CAP.
Add a column to a Target database table and the impact on the context
When you restructure the Target database by adding a column to a table, the corresponding tables in the relevant Contexts are automatically refreshed. You must then proceed as follows:
-
Restructure the Target database by adding a column to a specific table.
The column is automatically and immediately inserted into the corresponding table in the Context, and the links between the Context tables are maintained. A new index is not created if you add a new column directly in the target DB so you have to create an entry for the new column accessing by the SQL Studio Manager. The index is located under the table and then under the columns.
- If needed, create additional links between the new column and the other tables.
- If needed, drag the new column into the Entities area.
- Save the context.
Note
- If you change the type of a column from a table in the Target database, the formula that calculates KPIs based on the Context that includes that table, may also be invalid.
- If you change the name of a column from a table in the Target database, the effect is the same as adding a new column. Refer to the procedure above.
Remove a column from a Target database table and impact on context
When you restructure the Target database by removing a column from a table, the corresponding tables in the Contexts are automatically refreshed. You must then proceed as follows:
-
Remove the index corresponding to the relevant column by accessing the SQL Studio Manager. The index is located under the table and then under the columns.
-
Remove the relevant column from the table in the Target database.
The column is automatically and immediately removed from the corresponding table in the Context, and the links between the Context tables are maintained. The link from this column to other tables are removed.
- Remove the column from the Entities area.
- Save the context.
Note
- If you remove a column from a table in the Target database, the corresponding column is automatically and immediately removed from the relevant Context.
- If the column was also listed in the Entities then make sure to remove it from the Entities as well before saving and validating the modified context.
- If the column is removed from a table in the Target database, and the Context is not verified, the formula that calculates KPIs based on the Context, might also be invalid. If the removed column has a link to another column, the link is also removed
Clone a context
To clone a context:
- Create a CAP that includes only the context. For details, see Create Content Acceleration Packs.
- Download the CAP to your local system. For details, see Download a CAP to the user's local system .
-
Open the <context_name>.XML file and change the context name and at least one character in the UUID. Change also the UUID of all the entities, and the fields in the context.
For example:
<?xml version="1.0" encoding="UTF-8" standalone="true"?> -<contexts> -<context uuid="4c60950d-2fdc-49c5-a34e-5c041963d0bb" active="false" name="SALARY"> -<entity uuid="c3a48abd-7156-47a7-a489-527bfa2385c9" name="ext_IT_Salary_new" isVisible="false"> <field uuid="7adedab5-9336-490b-8594-db81fe559c37" name="NAME" isVisible="false" tableName="@extension.schemaName@.IT_Salary_new" columnName="NAME" qualification="DIMENSION" type="STRING" isLOV="false"/> </entity> -<table name="@extension.schemaName@.IT_Salary_new" height="126" yPos="236.95" xPos="493.0"> <column name="NAME" type="varchar"/> <column name="ORGANIZATION_NAME" type="varchar"/> <column name="ORG_ID" type="numeric"/> <column name="SALARY" type="numeric"/> </table> </context> </contexts> - Save the XML file.
- Rename the CAP in your local system.
- Upload it. For details, see Upload a CAP to the Business Analytics application .
- Activate it. For details, see Activate a CAP .

Context Designer Page
The Context Designer page enables you to manage the Contexts that you create using the Context Designer feature.
User interface elements are described below (when relevant, unlabeled elements are shown in angle brackets):
|
UI Element |
Description |
|---|---|
|
|
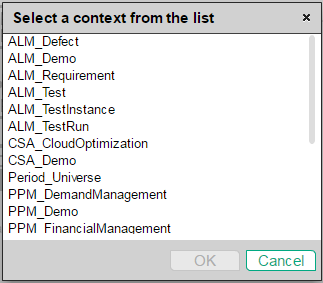
Click to display a list of existing Contexts created in the Context Designer. Select the relevant Context and click OK.
|

|
Click to create a new Context. The Context Designer Wizard opens. For details, see below. |

|
Click to open the Import Content wizard. For details, see Semantic Layer - Excel (or .CSV) File Loader . |

Context Designer Wizard
The Context Designer wizard enables you to create a Context with tables, entities, and relationships. Once you have completed the Context, save it. The Context is then added to the list of Contexts available in the Studio. The tables that compose the universe are added as variables and the table columns as variable entities. The variables and entities can be used to calculate the formulas for the KPIs that are assigned the Context. For details, see KPI or Metric Configuration and Calculation Details.
This page enables you to configure a Context.
User interface elements are described below (when relevant, unlabeled elements are shown in angle brackets):
|
UI Element |
Description |
|---|---|

|
New. Click to create a new Context. |
|
|
Save. Click to save the currently opened Context. |

|
Open. Click to display a list of existing Contexts created in the Context Designer. Select the relevant Context and click OK.
|

|
Add table. Click to add tables in CSV format to the Repository. The data loader wizard opens. For details, see Semantic Layer - Excel (or .CSV) File Loader. |

|
Click to validate the Context. The validation checks if the name of the Context is unique, if all the tables in the Context exist in the Repository, and more. When you click the |
User interface elements are described below (when relevant, unlabeled elements are shown in angle brackets):
|
UI Element |
Description |
|---|---|
| Context name |
The name of the Context. Limitation: SAP BusinessObjects Enterprise Universe names should not duplicate Context names, and all names of Universes and Contexts should be unique. Note If you have assigned to a KPI a Context created with the Context Designer, and then you modify the Context name in the Context Designer, make sure that you assign the modified Context to the KPI in the Studio otherwise the KPI becomes invalid as it uses a Context that does not exist. |
User interface elements are described below (when relevant, unlabeled elements are shown in angle brackets):
|
UI Element |
Description |
|---|---|
| Repository |
Click the button to open the table repository. For details, see Repository. |
| <Drag and drop> |
Select the relevant table in the Repository and drag and drop it in the Scheme area to make the table part of the universe.
|
| <Create relationships> |
Select the relevant entity in a table and drag and drop it on the relevant entity in another table to create the relationship between these two entities.
Note
|

|
Use the slider to zoom in or out. |


The Repository area enables you to select external or internal tables to add to the Context you are building.
User interface elements are described below (when relevant, unlabeled elements are shown in angle brackets):
|
UI Element |
Description |
|---|---|

|
Click to close the Repository. |
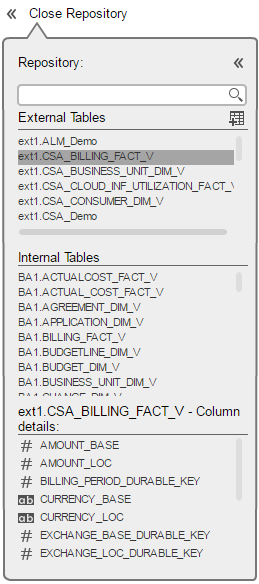
| External Tables (CSV) |
Lists the CSV tables that were uploaded using the data loader wizard. Click the relevant table to display its column details. |
|
|
Click to add tables in CSV format to the Repository. The data loader wizard opens. For details, see Semantic Layer - Excel (or .CSV) File Loader. |
| Internal Tables | Lists the tables. Click on the relevant table to display its entities in the Column details section. |
| Column Details |
Lists the entities (columns) of the table selected in the Internal Tables section. Each entity is preceded by an icon indicating the type of entity:
|
 - date.
 - string.
 - numeric
You drag tables from the Scheme area to the Entities area to add a variable corresponding to the table to the list of variables available to create the formula for the KPI that is assigned the Context. The table columns become the variable entities.

User interface elements are described below (when relevant, unlabeled elements are shown in angle brackets):
|
UI Element |
Description |
|---|---|
| <Drag and drop> |
Drag and drop a table from the middle pane to the Entities pane to add the table's entities and fields to the list of available entities and fields available to be added to a KPI formula in the Formula Builder. For details, see KPI or Metric Formula.. |
| <Table> |
The table that you dragged from the Scheme area to the Entities area is displayed followed by its columns. |
| <Left column> |
Icons indicate the format of the column.
|
| <Right columns> |
The icons to the right of the column enable you to decide to:
Note You must also have selected The list of fields that are available for breakdowns is configured in the Context Designer. By default,numeric fields are not dimensions, therefore they are not available for breakdowns. If you want them to be available for breakdown, open the Context Designer and in the Entities area, click Date fields are not available for breakdowns. |
| Remove | Click to remove the selected table or entity. |
 - Enable the auto completion feature. For details, see
  - Enables you to set the dimension permission for this entity dimension in the Dimension Permission page.
We welcome your comments!
To open the configured email client on this computer, open an email window.
Otherwise, copy the information below to a web mail client, and send this email to SW-Doc@hpe.com.
Help Topic ID:
Product:
Topic Title:
Feedback: