
Searching the Help
To search for information in the Help, type a word or phrase in the Search box. When you enter a group of words, OR is inferred. You can use Boolean operators to refine your search.
Results returned are case insensitive. However, results ranking takes case into account and assigns higher scores to case matches. Therefore, a search for "cats" followed by a search for "Cats" would return the same number of Help topics, but the order in which the topics are listed would be different.
| Search for | Example | Results |
|---|---|---|
| A single word | cat
|
Topics that contain the word "cat". You will also find its grammatical variations, such as "cats". |
|
A phrase. You can specify that the search results contain a specific phrase. |
"cat food" (quotation marks) |
Topics that contain the literal phrase "cat food" and all its grammatical variations. Without the quotation marks, the query is equivalent to specifying an OR operator, which finds topics with one of the individual words instead of the phrase. |
| Search for | Operator | Example |
|---|---|---|
|
Two or more words in the same topic |
|
|
| Either word in a topic |
|
|
| Topics that do not contain a specific word or phrase |
|
|
| Topics that contain one string and do not contain another | ^ (caret) |
cat ^ mouse
|
| A combination of search types | ( ) parentheses |
|


![]()
![]()

ETL Toolkit
You use IDE to develop your content. After the IDE generates all content artifacts, you can use the ITBA application to install the Content Pack, activate the data source, and run the ETL for data loading. But the IDE only supports very basic ETL transformation use cases, so if you want to do additional customization, you must change the Vertica script, and test it yourself. To do so, use the ETL Toolkit .
After the data is loaded into the Target database, you verify that the data is correct. If the data is not correct, check the logs. For details, see Logs and the LogTool Once you have checked the issue in the logs, open the ETL toolkit to make the corrections and check them. You can also clean the data of the last ETL run, using the Clean ETL Data function in the ETL Toolkit, and rerun the ETL.
Recommended: Use the ETL Toolkit only in the Development environment.

 Use Case
- The user completes the content development in the IDE. For details, see
- The user deploys the content artifacts generated by the IDE.
- To test the ETL flow, the user copies the entire folder to the ITBA content folder, and installs the content pack using the Content Pack manager. For details, see Data Management - Install Content Pack
-
To test the new entity, the user opens the ETL debug tool, runs each flow step by step, until all the steps are running successfully. For details, see below.
After checking that the data is correct, the unit testing is complete.
Enable the ETL Toolkit
Note It is recommended to check the logs to find out what the probable issues are before using the ETL Tookit. For details, see Logs and the LogTool.
Recommended:
- Make sure the ETL Toolkit is disabled when not in use.
- Use the ETL Toolkit only in the Development environment.
To install the tool, do the following on the ITBA server:
- Go to https://HPLN.hpe.com/group/it-business-analytics, click Resources > Tools, and download the relevant version of the dw-etl-tool.ZIP file.
-
Unzip the ETL ToolKit File and upload the file to $HPBA_HOME/apps.
-
Run $HPBA_HOME/bin/ enable-dw-etl-tool.sh.
-
Enter the ETL Toolkit using the glassfish user and password.
Access the ETL Toolkit
Open http://<hostname>:10002/dw-etl-tool/services.do
where Username is the glassfish user name and the password is the glassfish password.
Disable the ETL Toolkit
Recommended: Make sure the ETL Toolkit is disabled when not in use.
To disable the ETL Toolkit, execute the following script:
- Go to cd $HPBA_HOME/bin on the ITBA server.
- Run the following command: ./disable-dw-etl-tool.sh
- Enter the ETL Toolkit application using the glassfish user and password.
Execute a specific extractor or ETL job step
-
Make sure you have enabled the ETL Toolkit in the ITBA server.
-
Login to the ETL Toolkit using the glassfish user and password.
-
Select the relevant data source instance in the Data Source Instance Name.
The lower part of the left pane displays the list of relevant Extractors and ETL jobs.
-
Expand the relevant job to view the detailed steps of the job.
- For extractor jobs, the following tree opens: <main_extractor_job> > <entity_extractor_job>.
- For ETL jobs, the following tree opens: <main_ELT_job> > <entity_ETL_job> > <entity_SQL_Statement_section>
-
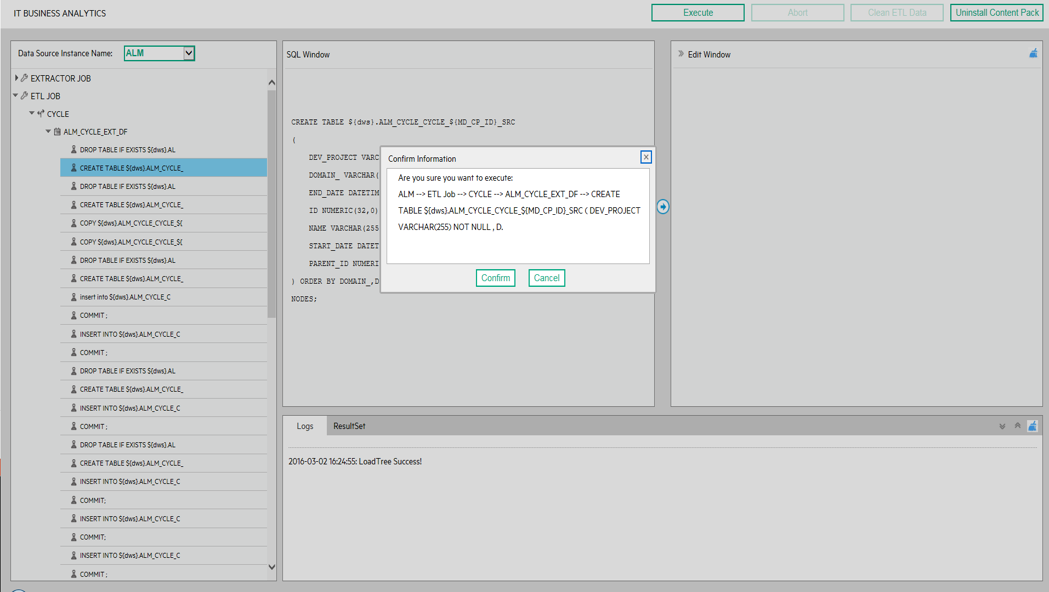
Select the relevant step and click Execute to run the selected step. Click Confirm.
The lower part of the page displays the running status of the action.
Abort the running of a specific extractor or ETL job step
-
Make sure you have enabled the ETL Toolkit in the ITBA server.
-
Login to the ETL Toolkit using the glassfish user and password.
-
Select the relevant data source instance in the Data Source Instance Name.
The lower part of the left pane displays the list of relevant Extractor and ETL jobs.
-
Expand the relevant job to view the detailed steps of the job.
- For extractor jobs, the following tree opens: <main_extractor_job> > <entity_extractor_job>.
- For ETL jobs, the following tree opens: <main_ELT_job> > <entity_ETL_job> > <entity_SQL_Statement_section>
-
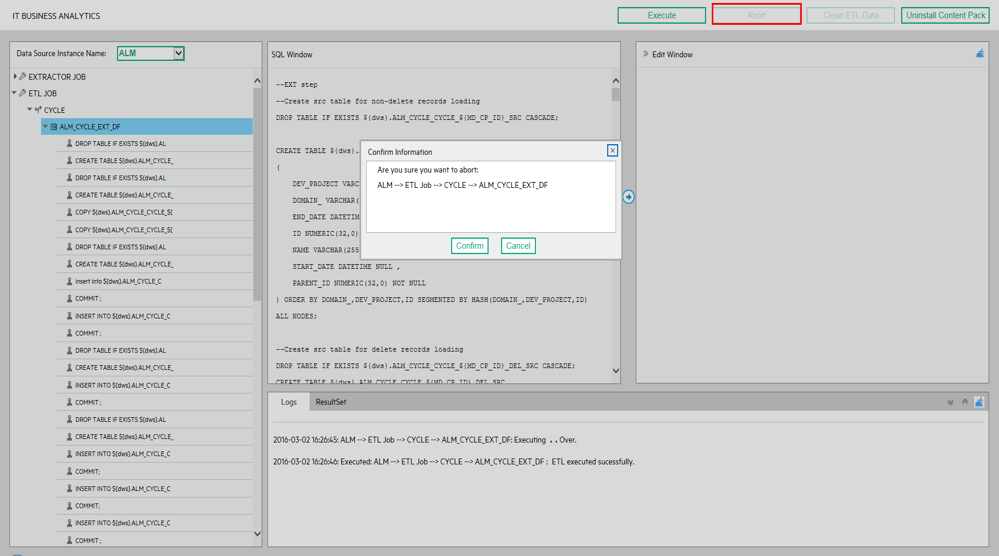
Select the relevant step (that is currently running) and click Abort.
Click Confirm.
The lower part of the page displays the running status of the action.
View the script details
-
Make sure you have enabled the ETL Toolkit in the ITBA server.
-
Login to the ETL Toolkit using the glassfish user and password.
-
Select the relevant data source instance in the Data Source Instance Name.
The lower part of the left pane displays the list of relevant Extractor and ETL jobs.
-
Expand the relevant job to view the detailed steps of the job.
-
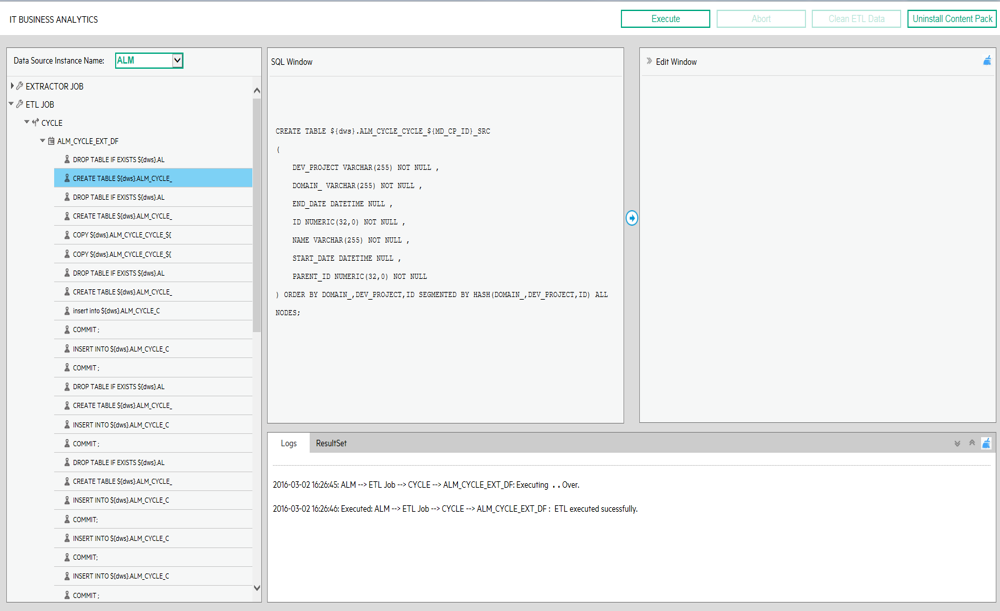
Double-click the relevant <entity_SQL_Statement_section> step to view the details of the script.
Note This is only available for <entity_SQL_Statement_section> steps.
You can click the
 to transfer the script to the Edit pane where you can edit the script.
You can then click Execute to execute the corrected script to check it.
Note Make sure you make the same change to the script once you have tested it, as the scripts in the ETL Toolkit and in the ITBA application are not synchronized.
The lower part of the page displays the running status of the action.
Clean the ETL data
-
Make sure you have enabled the ETL Toolkit in the ITBA server.
-
Login to the ETL Toolkit using the glassfish user and password.
-
Select the relevant data source instance in the Data Source Instance Name.
The left pane displays the list of relevant Extractor and ETL jobs.
-
Expand ETL job and select the relevant ETL job.
-
Click Clean ETL Data to clean all the data in the Target database. Click Confirm.

The lower part of the page displays the running status of the action.
Tip
Associated tables data are deleted after running Clean ETL Data. For detailed information, see the $HPBA_HOME/glassfish/glassfish/domains/BTOA/logs/dwhETLToolkit.log.
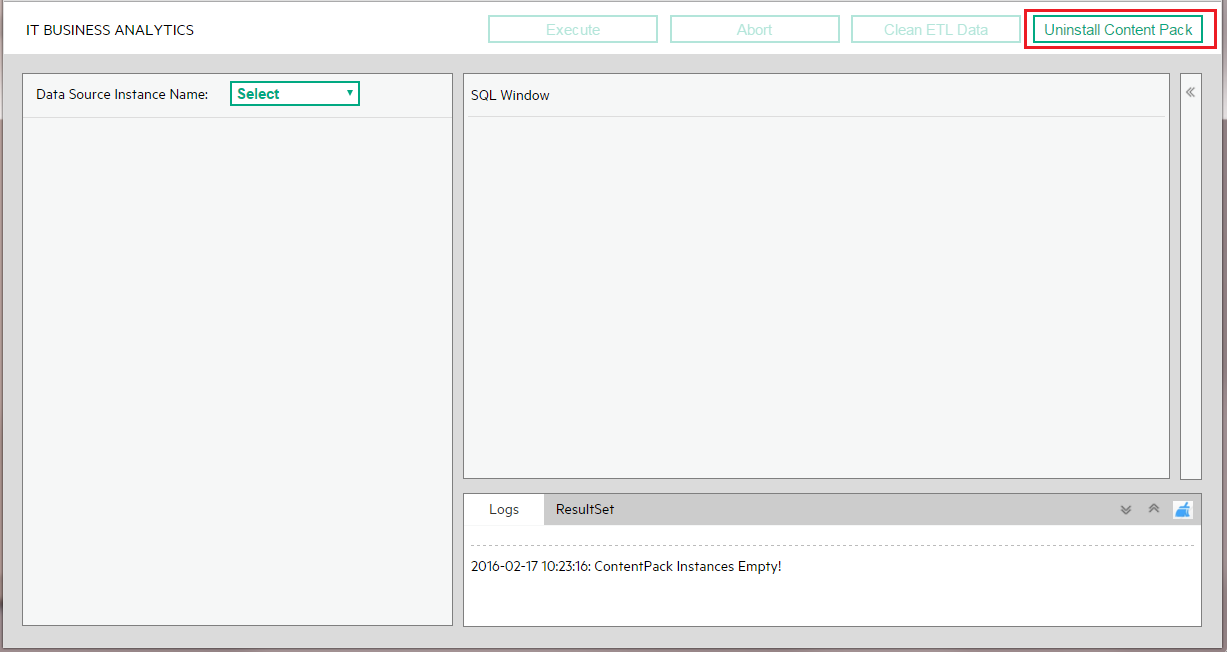
Uninstall a Content Pack
Tip It is NOT recommended to take this action Uninstall Content Pack in the production environment.
To uninstall a Content Pack:
-
Make sure you have enabled the ETL Toolkit in the ITBA server.
-
Login to the ETL Toolkit using the glassfish user and password.
-
Click Uninstall Content Pack.
-
Select the Content Pack and click Confirm.
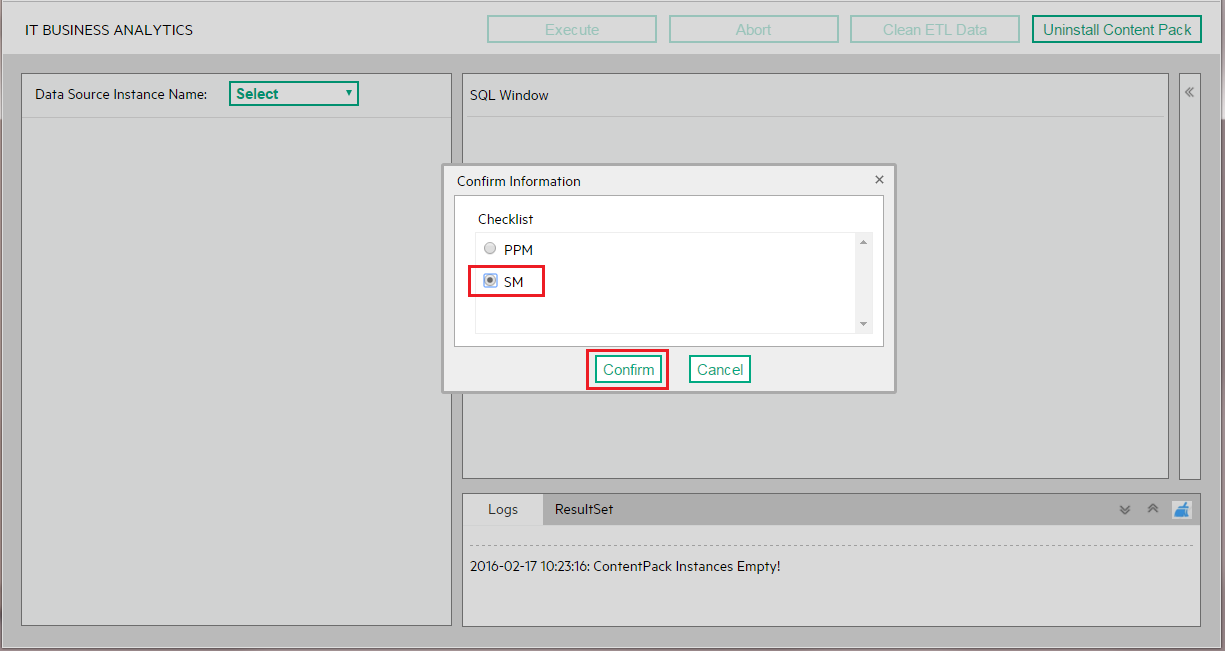
-
Check the result.
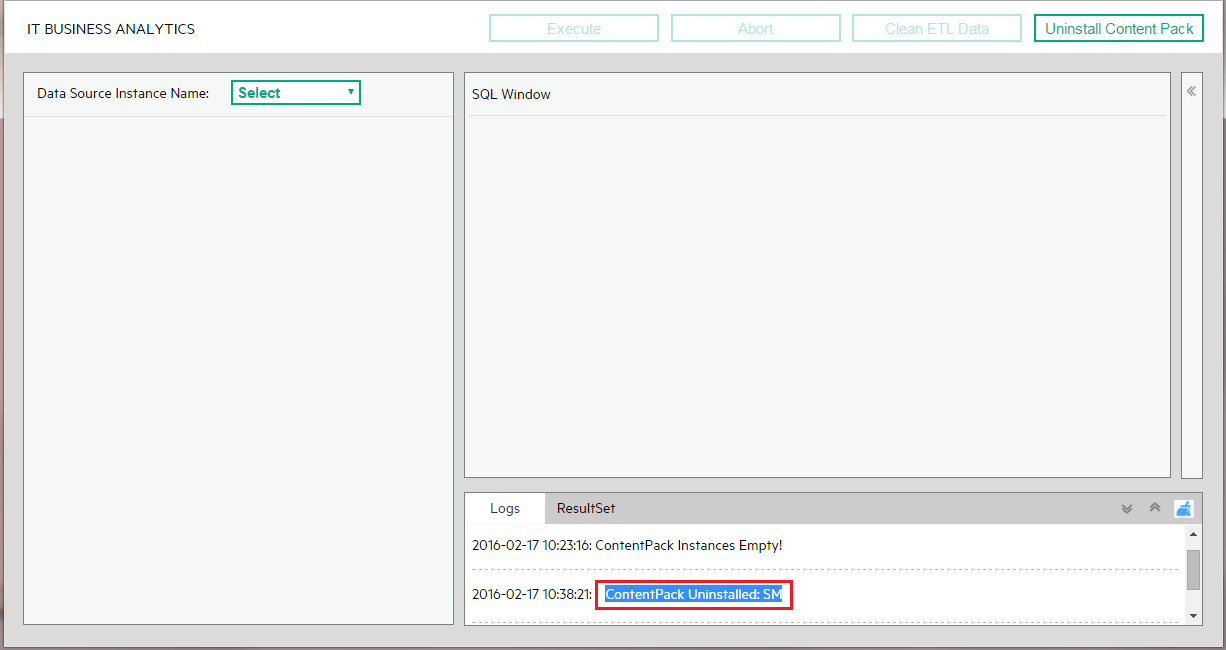
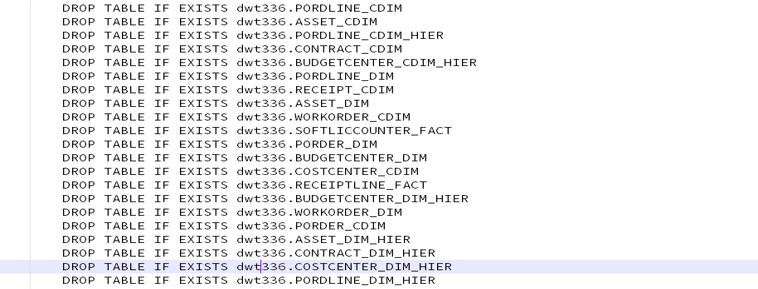
Tip
Associated tables are droped after running Uninstall Content Pack. For detailed Information, see the $HPBA_HOME/glassfish/glassfish/domains/BTOA/logs/dwhETLToolkit.log

ETL Toolkit Page
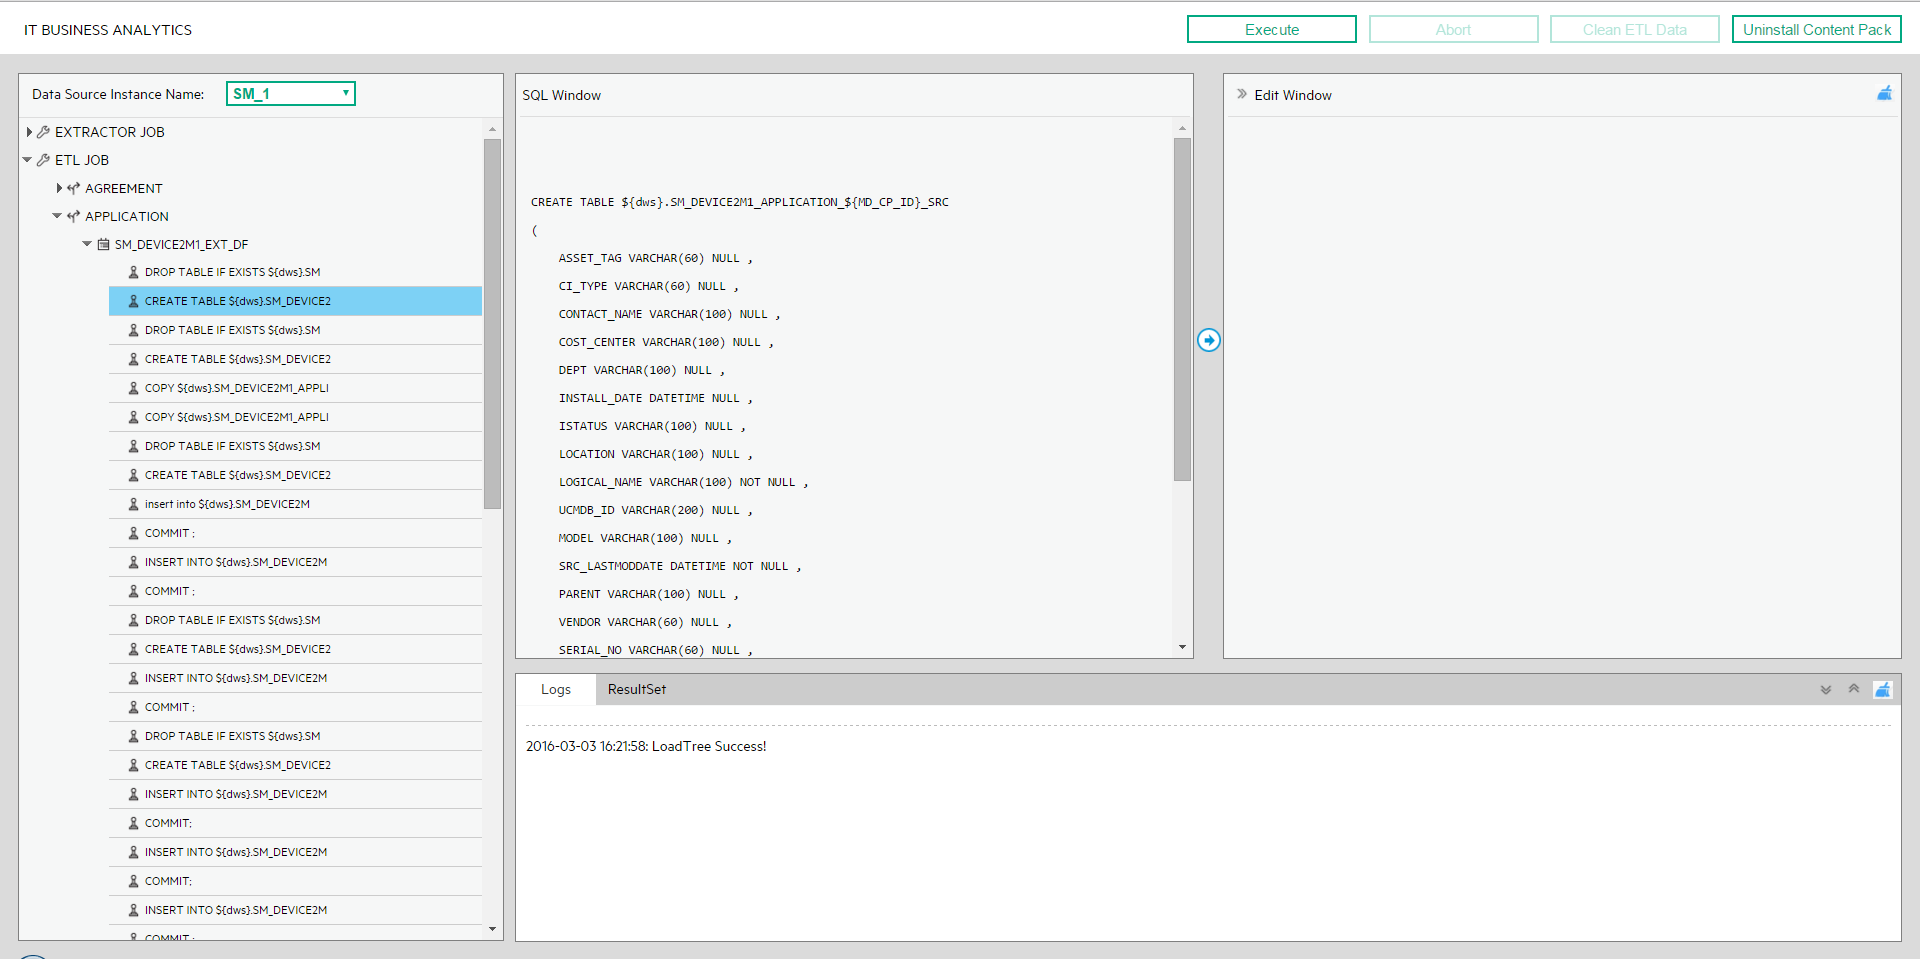
User interface elements are described below (when relevant, unlabeled elements are shown in angle brackets):
| UI Element |
Description |
|---|---|
| Data Source Instance Name | Select the relevant data source instance name. The list of instances corresponds to the data source instances you activated in the ADMIN > Data Management > Connect Data Source. For details, see Data Management - Connect the Data Sources. |
| Execute |
Runs the selected step of the extractor or ETL job. Click Confirm.
|
| Abort |
Aborts the currently running step of the extractor or ETL job. Click Confirm.
|
| <View Script> |
Displays the details of the script corresponding to the selected step. Note This is only available for <entity_SQL_Statement_section> steps.
You can click the You can then click Execute to execute the corrected script to check it. Note Make sure you make the same change to the script once you have tested it, as the scripts in the ETL Toolkit and in the ITBA application are not synchronized. |
| Clean ETL Data |
Cleans all the data of the relevant ETL job from the Target database. If you select All from the instance drop-list, all ETL data of instances in target tables is deleted. If you select one specific instance, only the data related to the instance is deleted. Click Confirm.
|
| Uninstall Content Pack | Uninstalls the selected Content Pack from the ITBA application and from the ETL Toolkit. |
| <Left pane> |
The list of relevant Extractor and ETL jobs of the selected data source instance. |
| <Right pane> |
The right pane allows you to edit a script after you select it and click the |
| <Lower pane> | The running status of the action. |
We welcome your comments!
To open the configured email client on this computer, open an email window.
Otherwise, copy the information below to a web mail client, and send this email to SW-Doc@hpe.com.
Help Topic ID:
Product:
Topic Title:
Feedback: