
Searching the Help
To search for information in the Help, type a word or phrase in the Search box. When you enter a group of words, OR is inferred. You can use Boolean operators to refine your search.
Results returned are case insensitive. However, results ranking takes case into account and assigns higher scores to case matches. Therefore, a search for "cats" followed by a search for "Cats" would return the same number of Help topics, but the order in which the topics are listed would be different.
| Search for | Example | Results |
|---|---|---|
| A single word | cat
|
Topics that contain the word "cat". You will also find its grammatical variations, such as "cats". |
|
A phrase. You can specify that the search results contain a specific phrase. |
"cat food" (quotation marks) |
Topics that contain the literal phrase "cat food" and all its grammatical variations. Without the quotation marks, the query is equivalent to specifying an OR operator, which finds topics with one of the individual words instead of the phrase. |
| Search for | Operator | Example |
|---|---|---|
|
Two or more words in the same topic |
|
|
| Either word in a topic |
|
|
| Topics that do not contain a specific word or phrase |
|
|
| Topics that contain one string and do not contain another | ^ (caret) |
cat ^ mouse
|
| A combination of search types | ( ) parentheses |
|


![]()
![]()

- Content Administrator
- Business Analytics components
- Data Management - Best Practices
- Data Management - Install Content Pack
- Customize an Existing Content Pack
- Data Management - Connect Data Source
- Data Management - Configure Consolidation - Management
- Data Management - Add New Configuration
- Data Management - Configure Consolidations - Edit
- Data Management - Run ETL - Content Flow Management
- Data Management - Activate CAPs
- Semantic Layer - Context Management
- Semantic Layer - Data Loader Scheduler
- Semantic Layer - Excel or .CSV File Loader
- SAP BusinessObjects Enterprise Contexts (Universes)
- Import or Export Contexts, Data, KPIs, Metrics, Trees, Pages, or Components
The Data Warehouse can connect to other products (data sources) and gather data about these products. An integration is available for each product (data source). The connection from the data source to the DWH is called a content pack. DCS extracts the data from the specific data source. Content packs contain all the artifacts needed to connect to the relevant data source and gather data from that data source.
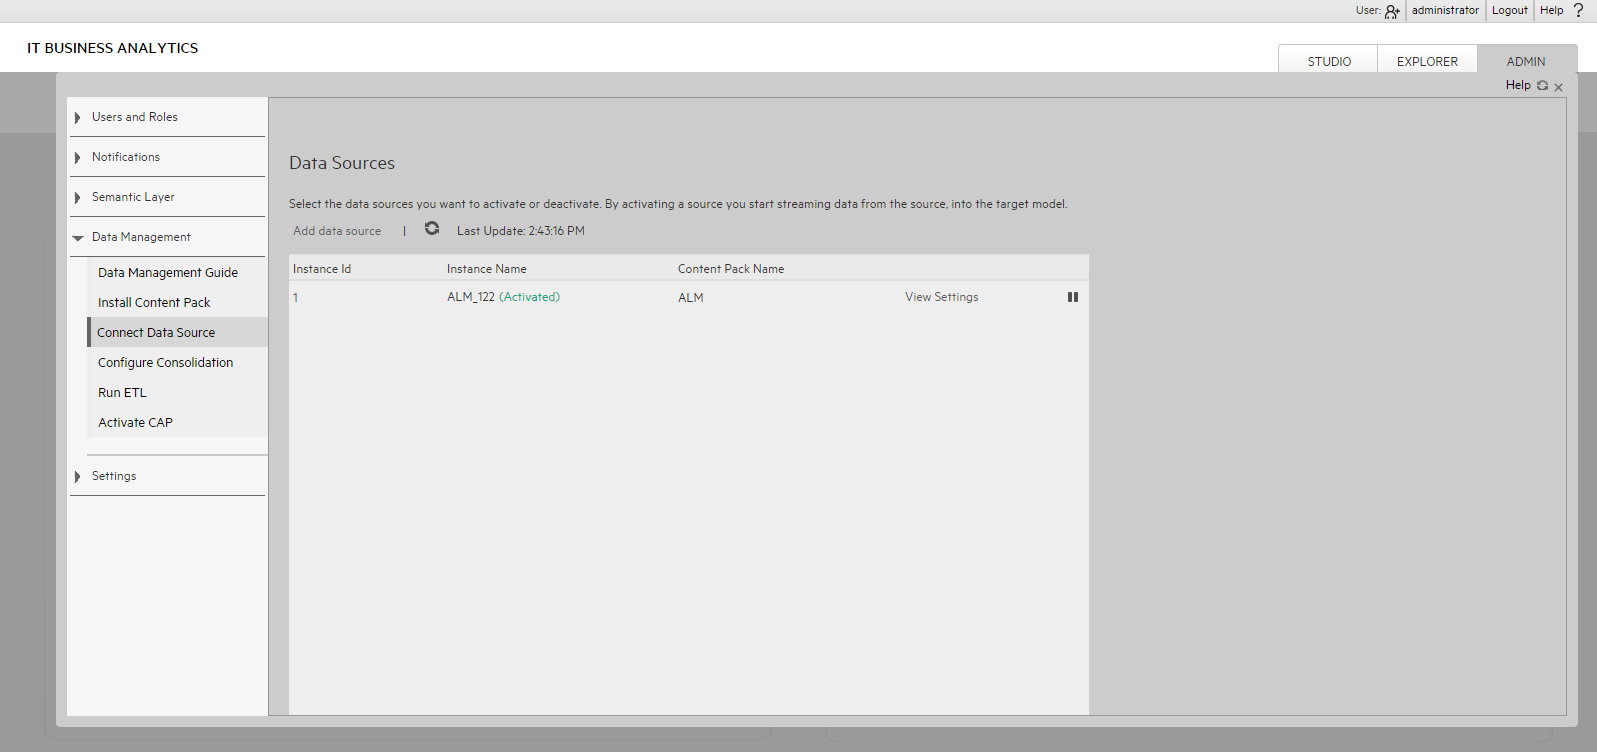
The Data Source page enables you to manage the integration of data into the data warehouse through the activation of data sources. The available data source content packs are registered in the deployment process and can then be activated in the Connect Data Source page.
Select ADMIN > Data Management > Connect Data Source then click Add data source. Select the data source type to activate the integration processes.
Note For details on activating Content Packs created in the IDE, see Activate a new CP

 Learn more about each data source integration
ITBA integrates with the multiple data sources. For details, see Semantic Layer - Context Designer
The UI elements of the wizard differ according to the selected data source.
For each source, enter the relevant information and click Next to proceed to the validation page.
Note If the activation process is taking more than one hour, you can change the status of the CP in the CONTENT_PACK table to “ERROR” and then activate the CP again.
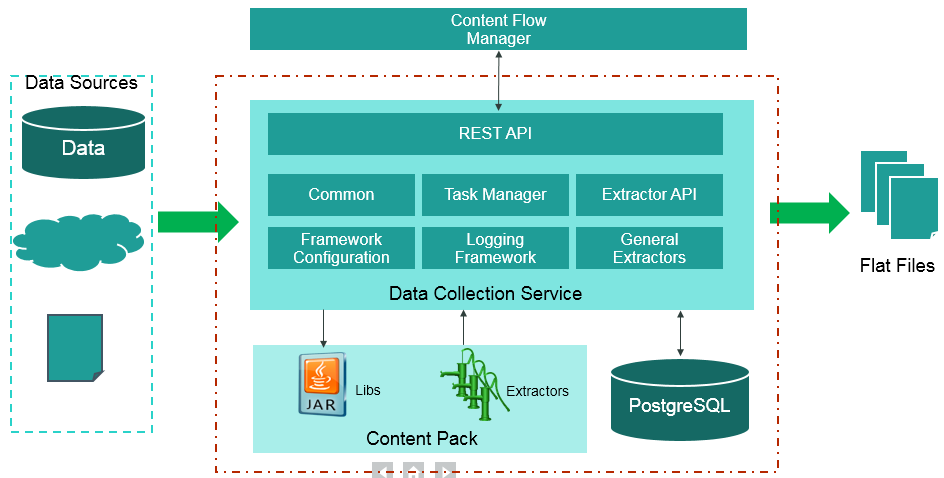
Data Collection Service (DCS)
Data Collection Service (DCS) is a standalone service module that is responsible to extract the data from various data sources into flat files according to the relevant extraction and source model that is generated by the IDE. The flat files can then be loaded into the Vertica and run ETL process. The extraction and source model consist of a plugable extractor framework for each data source. The extractor gathers data according to the request it receives from the Content Flow Manager, placing it into a set of relevant .TXT files. Each supported data source has a corresponding extractor (or multiple extractors) that is capable of extracting the relevant data out of the data source. All available extractors for Content Packs use the DCS framework.
-
Extraction Mechanism. The extraction is a self-managed web service. The data source connection information is registered to the framework when adding a new data source in ITBA > ADMIN > Data Management > Connect Data Source.
-
Extraction Methodology. The extraction is done using extractors running on the application container of the Data Warehouse. The extractors use various technologies (for example, JDBC, Web Services, data files, and other kinds of HTTP requests) to extract the data from the data source. Each extraction is an isolated job that cannot be affected by other extraction jobs. Each extraction has a unique batch ID. The batch ID is incremental and cannot duplicated even for different Content Pack instances.
-
ETL Source Extract. The first stage of the ETL is the Source Extract. In this phase, the Content Flow Manager performs an HTTP request that activates the relevant extractor.
The DCS extractor extracts the data from the data source into flat files. All Content Packs integrate using DCS, where data is extracted from the data source into .TXT files with a well-defined standard structure.
-
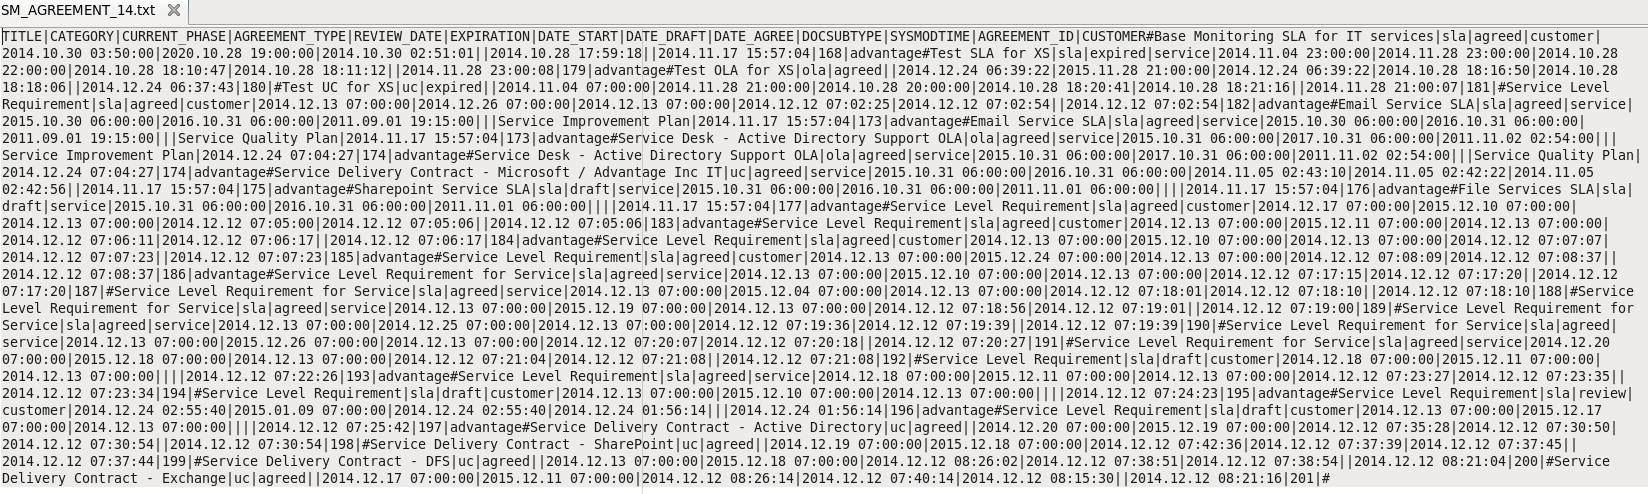
Format of flat files. The first line of a flat file should be the headers of all columns, separated with “|” symbol. The data follows with the columns values separated with a “|” symbol and the lines separated with a “#” symbol.
If a column value includes special characters like “|”, “#” and “\”, it should be escaped by adding a “\” symbol before the special character. The DCS framework has a FlatFileWriter will handle the details of writing the headers and values.
Flat file example:
-
Data sources and Content Packs.
The following data source types are available for each Content Pack:
Content Pack Data source type ALM ALM AM MSSQL, Oracle AWS AWS AWSCW AWSCW Azure GENERIC CSA CSA PPM Oracle SA Oracle SM MSSQL(Non dbdict), Oracle(Non dbdict), MSSQL(dbdict), Oracle(dbdict), DB2(dbdict) CO CO -
Troubleshooting Logs.
- $HPBA_Home/glassfish/glassfish/domains/BTOA/logs/dcs.log: This log describes all of the current activity of the DCS framework as well as the activity of the common utilities and general extractors.
- $HPBA_Home/glassfish/glassfish/domains/BTOA/logs/dcs.extractor.log: This log describes the activity of all the extractors.

Add and activate a new data source instance
The process of integrating a data source into the Data Warehouseis done through activation of the source instance.
-
Select ADMIN > Data Management > Connect Data Source.
-
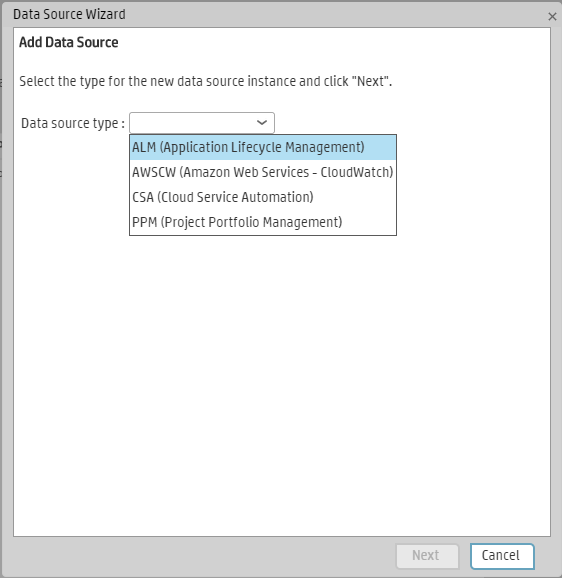
Click the Add data source to open the Data source wizard. The Add Data Source page opens.
-
Select the data source type and click Next.
The relevant data source page opens.
-
Enter and select the configuration parameters.
-
Complete the wizard.
The data source instance is activated.
Note If the first time activation of a data source instance fails, the instance is displayed in the source list with an Error status. You can then activate the data source by clicking Edit Settings and completing the configuration and activation.
Reactivate an existing data source instance
-
Select ADMIN > Data Management > Connect Data Source.
-
Click
 next to the specific source and the source is activated.
Deactivate a data source instance
You can deactivate the source and stop the integration process, in order to change configuration details.
-
Select ADMIN > Data Management > Connect Data Source.
-
Click
 and the deactivation warning opens.
 -
Click OK.
View data source configuration settings
-
Select ADMIN > Data Management > Connect Data Source.
-
Click View Settings and the relevant data source page opens.
Edit data source settings and test the connection
-
Select ADMIN > Data Management > Connect Data Source.
-
If necessary, deactivate the data source by clicking
. -
Click Edit Settings and edit the configuration parameters.
-
Click Next to validate your changes and test the connection to the data source.
Add a new data source to the integration mechanism
For details, see Add and activate a new data source instance.
Configure DCS Properties
In data source activation, each source that is extracted with DCS must have the following properties configured:
| Data Source | Location of the properties | Properties |
|---|---|---|
| PPM | HP_BA/ContentPacks/PPM/ EXTRACTOR/extractor-ppm/settings.properties |
|
| SM | HP_BA /ContentPacks/SM/EXTRACTOR/extractor-sm/settings.properties |
|
| ALM | HP_BA/ContentPacks/ALM/EXTRACTOR/extractor-alm/settings.properties |
|
| CSA | HP_BA/ContentPacks/CSA/EXTRACTOR/extractor-csa/settings.properties |
|
|
AWS AWSCW |
HP_BA/ContentPacks/ AWSCW/EXTRACTOR/extractor-aws/settings.properties |
|

Connect Data Source Page
The Connect Data Source page enables you to select from a list of Integration Content Packs recognized by the data warehouse. Additionally, it enables you to activate the integration of the data sources, as well as deactivate and make configuration changes.
User interface elements are described below (when relevant, unlabeled elements are shown in angle brackets):
|
UI Element |
Description |
|---|---|
| Add data source | Click to open the Data Source wizard. For details, see Data Source Wizard. |
| <Data Sources> |
A list of sources, by Instance Name (instance name) and Content Pack Name (data source product), that have been added to the data warehouse. The current status of the data source is displayed next to the instance name:
|
| View Settings |
Available when the data source has been activated. Displays the read-only configuration of all connection parameters. Note All connection settings are run-time related. You must deactivate the connection to the data source in order to change the settings. |
| Edit Settings |
Available when the data source has been deactivated. Displays the configuration of all connection parameters and enables you to test the connection to the data source. The parameters can be edited. If the first time activation of a data source instance fails, the instance is displayed in the source list with an Error status. You can then activate the data source by clicking Edit Settings and completing the configuration and activation. |
|
|
Activates the relevant data source.
|
|
|
Deactivates the relevant data source.
Do not deactivate a content pack while ETL is running. |

Data Source Wizard
The Data Source wizard enables you to add and activate a selected data source instance.
-
Click Next to move to the next page of the wizard.
User interface elements are described below (when relevant, unlabeled elements are shown in angle brackets):
UI Element
Description Data source type Select the data source type you want to activate. -
Each Configuration Parameters page displays parameters specific for the data source. For details, see the Content Reference Guide relevant to your data source.
-
This validation page displays activation status information pertaining to the selected data source.


A message displays the data source status information.
Click Finish to complete the wizard activation process.
We welcome your comments!
To open the configured email client on this computer, open an email window.
Otherwise, copy the information below to a web mail client, and send this email to SW-Doc@hpe.com.
Help Topic ID:
Product:
Topic Title:
Feedback: