


Data Flow Probe Upgrade Overview
When upgrading Data Flow Probes, you have the following options:
-
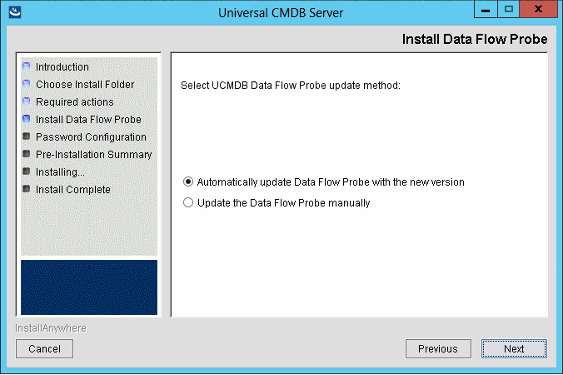
Data flow probe auto upgrade. For supported probes of version 10.22 or later (with or without a CUP, union and non-FIPS mode on Windows machine), you can select the Automatically update Data Flow Probe with the new version option in the Install Data Flow Probe wizard page when upgrading the UCMDB server to perform auto upgrade of connected probes. For more information, see Data Flow Probe Auto Upgrade Overview.
-
Data flow probe manual upgrade. In the following scenarios, you may need to perform manual upgrade of data flow probes:
-
You selected the Update the Data Flow Probe manually option in the Install Data Flow Probe page of the UCMDB server upgrade wizard while upgrading the UCMDB server.
- For probes on Linux or probes of versions not supported for auto upgrade in your environment, you need to manually uninstall the old version probe first, and then install the latest version probe.
-
Data Flow Probe Auto Upgrade Overview
The Data Flow Probe auto upgrade mechanism is fully available since version 10.33. That is, once UCMDB server is upgraded to version 10.33 or later, the probe auto upgrade capability is in place. This capability enables you to upgrade all the connected probes of version 10.22 (or later, with or without a CUP) in your environments with just several clicks while upgrading UCMDB server, without having to access the probe servers anymore.
Compared to the traditional manual probe deployment approach (uninstall the old probe and then install the new probe), in general it takes 20-40 minutes to upgrade multiple probes in parallel with the probe auto upgrade mechanism.
The time required for upgrading all the connected probes equals to that of the probe that takes the longest duration to finish upgrade among all the connected probes. The network latency would be a impact factor, which has impact on the time the probe downloads resources from the UCMDB Server. lab testing shows the following results: A total of 60 connected probes finished upgrade in 40 minutes, while the majority of them finished around 20-30 minutes with network latency less than 1 millisecond.
Supported Probes
Data Flow Probes that satisfy the following criteria are supported for auto upgrade:
-
Supported probe versions. The probe auto upgrade and deployment mechanism supports upgrading probes from any of the following versions to version 11.0 automatically:
- 10.22 (with or without a CUP)
- 10.3x
- Union and non-FIPS mode probes on Windows machine
The following probes are not supported for auto upgrade in version 10.33 (or later):
- FIPS mode probes
- Separate mode probes
- Probes on Linux machine
-
Integration service
- Two probes installed on a same Windows machine
Pre-Check List for Both Auto Upgrade and Manual Upgrade of Probes
-
Check permissions for the user account that starts the Data Flow Probe service.
- Make sure you grant the user full control of the <DataFlowProbe> folder before the upgrade, and revert the control after the upgrade.
- If the UCMDB_Probe and the UCMDB_Probe_DB services run under a custom account, make sure you grant the custom account full control of the <DataFlowProbe> folder before the probe auto upgrade starts, and revert the control after the upgrade.
For details, see Troubleshooting Probe Upgrade - Permission Check.
-
Turn off Basic Authentication (BA) if it is enabled.
Check if Basic Authentication (BA) is enabled. If yes, turn off Basic Authentication via the UCMDB UI:
- Log in to UCMDB as an administrator, and then go to Administration > Infrastructure Settings Manager.
-
Locate the Enable Basic Authentication for HTTP connections from probe setting, and then set the value to False.
-
Restart UCMDB server.
-
Check communication port between UCMDB Server and Data Flow Probe.
- Launch the UCMDB server JMX console (default username: sysadmin).
- Locate the getComponentConfiguration JMX method from the UCMDB:service=Ports Management Services category.
- In the Value field for componentName, enter mam-collectors and click Invoke.
-
Check the Current Mapped Ports value in the returned result.
- HTTP. (For version 10.2x only) It means UCMDB Server and Data Flow Probe communicate via the HTTP protocol. You need to change the HTTPS protocol to HTTP protocol after upgrading UCMDB Server and Data Flow Probe. For details, see How to Enable HTTP Communication for UCMDB Server (make sure you replaces the HTTPS-related values with HTTP related values).
- HTTPS. It means UCMDB Server and Data Flow Probe communicate via the HTTPS protocol. You do not need to change the Current Mapped Ports after the upgrade.
- HTTPS_CLIENT_AUTH. It means UCMDB Server and Data Flow Probe communicate by mutual (two-way) certificate authentication. You do not need to change the Current Mapped Ports after the upgrade.
-
Check available disk space.
Check available disk space of the probe installation folder. At least 10 GB disk space is required to perform the probe auto upgrade.
-
Check probe status.
Log in to the UCMDB server UI, and navigate to Data Flow Management > Data Flow Probe Setup, check the Domains and Probes navigation pane. Only connected probes of supported versions can be upgraded automatically.
-
Check probe versions to ensure the probes you plan to upgrade are supported.
For probe versions supported by the auto upgrade mechanism, see Supported probe versions.
-
Back up the <DataFlowProbe> folder.
-
Also make sure that:
- all Data Flow Probe related command line windows and probe related folders are closed. Otherwise automatic backing up of those folders and files may fail as they are occupied.
- ports 5436 and 5437 are free, as these two ports will be used during the probe upgrade.
- stop the UCMDB_Probe and UCMDB_Probe_DB services.
-
And you are aware of the following:
- For version 10.22 probes (with or without a CUP), the probe upgrade includes the PostgreSQL database , data, and the probe. (Probes of version 10.30 or later are already using the latest version of PostgreSQL).
- For version 10.22 probes (with or without a CUP), after upgrade to version 11.0 (or later), the data in the ddm_discovery_results and ddm_discovery_touch_results tables are removed. This is the designed behavior as the new Universal Discovery licensing model is introduced in version 11.0.
-
For probe auto upgrade, the probe upgrader will merge the following configuration files:
- DataFlowProbe.properties
- DataFlowProbeOverride.properties (If exists)
The result is that all the custom configuration settings will be written into the DataFlowProbeOverride.properties file.
Note The recommended value of the appilog.agent.probe.sendtouchResultsToServer.maxObjects setting in DataFlowProbe.properties for version 10.33 (or later) is 500. If your custom value is greater than 500, it will be reverted back to 500.
After the upgrade, the following files will be replaced with the ones from your environment:
- <DataFlowProbe>\conf\postgresql.conf
- <DataFlowProbe>\conf\probeMgrList.xml
- <DataFlowProbe>\conf\WrapperGatewayCustom.conf
- <DataFlowProbe>\conf\WrapperManagerCustom.conf
- <DataFlowProbe>\conf\security\ssl.properties
- <DataFlowProbe>\conf\security\HPProbeKeyStore.jks
- <DataFlowProbe>\conf\security\HPProbeTrustStore.jks
- <DataFlowProbe>\conf\enricher.properties
- <DataFlowProbe>\conf\EnricherServiceSettings.ini
-
<DataFlowProbe>\bin\WrapperEnv.conf
- <DataFlowProbe>\bin\wrapper-platform.conf
- <DataFlowProbe>\bin\WrapperManager.conf
- <DataFlowProbe>\bin\WrapperGateway.conf
- <DataFlowProbe>\bin\xmlenricher\WrapperEnricher.conf
Note
- During the upgrade, the probe upgrader backs up all your existing probe data and configuration to the <DataFlowProbe>\old folder. If you need to recover any old data, just go to <DataFlowProbe>\old folder.
-
During the upgrade, does not keep the configuration files for <DataFlowProbe>\pgsql\data\postgresql.conf, so make sure you reconfigure it after the upgrade (if necessary).
Data Flow Probe Auto Upgrade Workflow
The Data Flow Probe Auto Upgrade workflow contains the following steps:
-
The UCMDB Administrator upgrades UCMDB server from version 10.22 (or later, with or without a CUP) to version 10.33 (or later).
During the upgrade, the Administrator selects the Automatically update Data Flow Probe with the new version option. As a result, the probe auto upgrader package is placed under the <UCMDB_Server>\content\probe_patch folder, and the Data Flow Probe installer package is placed under the <UCMDB_Server>\content\probe_installer folder.
-
The probe auto upgrader performs the following operations:
- Performs pre-check to decide if the probe is ready for upgrade. For example, if there is enough disk space available or not, and if the probe is of a supported version.
- Generates the response file required for silent installation.
-
Downloads the Data Flow Probe installer file for Windows platform (for example, UCMDB_DataFlowProbe_11.0.exe) from the UCMDB server.
-
Stops the following services:
- UCMDB_Probe
- UCMDB_Probe_DB
- UCMDB_Probe_XmlEnricher
-
Performs silent installation with the Update option.
During this step, the upgrader performs post-upgrade tasks, including merging customized settings, creating and adjusting database tables, such as splitting tables (version 10.22 to version 11.0), columns, indexes, and so on.
- Starts all three services after the installation is done: UCMDB_Probe, UCMDB_Probe_DB, and UCMDB_Probe_XmlEnricher.
-
Reports probe upgrade status to the UCMDB server, and save probe auto upgrade logs to UCMDB Server. For example: <UCMDB_Server>\runtime\log\probeUpgradeLogs\10.22to11.0\success.
Note If the upgrade is successful, the log would be placed under the success folder; if failed, the logs would be placed under the failed folder.
Data Flow Probe Manual Upgrade Workflow
-
For probes that are supported by the probe auto upgrade mechanism, do either of the following:
Important There is no need to uninstall the old version probes first for probes supported by the probe auto upgrade mechanism.
-
Perform probe auto upgrade from UCMDB server.
To leverage the probe auto upgrade feature after the UCMDB server upgrade, then when you have finished upgrading the UCMDB server,
- Go to the <UCMDB_Server>\content\probe_patch directory.
- Copy the probe-patch-11.0-windows.zip package to the <UCMDB_Server>\runtime\probe_upgrade directory.
-
Restart the UCMDB server.
UCMDB server will then perform auto upgrade of all supported and connected probes.
-
Perform manual upgrade of probes on the probe servers.
-
Extract the package for the Windows platform, and then launch the probe installer UCMDB_DataFlowProbe_11.0.exe.
- On the UCMDB Data Flow Probe Setup Type wizard page, select Full Data Flow Probe Installation. This installs the Data Flow Probe with all its components, including the Inventory Tools (Analysis Workbench, Viewer, SAI Editor, and MSI Scanner) required for application teaching.
- On the Select Installation Type wizard page, select Upgrade.
- Follow wizard instructions to complete the probe upgrade.
For details, see "Data Flow Probe - Windows Upgrade" in the Deployment Guide.
-
-
-
For probes on Linux or probes of versions not supported for auto upgrade in your environment, perform manual install of probes on the probe servers.
This workflow contains the following steps:
-
On the probe server, uninstall the old version probe.
For details, see the "Upgrading UCMDB - Uninstall the Data Flow Probes" section in the Deployment Guide.
-
Install the latest version Data Flow Probes manually.
On Windows platform:
- Extract the package for the Windows platform, and then launch the probe installer UCMDB_DataFlowProbe_11.0.exe.
-
On the UCMDB Data Flow Probe Setup Type wizard page, select Full Data Flow Probe Installation.
- On the Select Installation Type wizard page, select New Installation.
- Follow wizard instructions to complete the probe installation.
For details, see the "Data Flow Probe - Windows Installation" section in the Deployment Guide.
On Linux platform:
-
Extract the package for the Linux platform, and then execute command to launch the installation.
- Follow the on-screen instructions to complete the probe installation.
For details, see the "Data Flow Probe - Linux Installation" section in the Deployment Guide.
-
Data Flow Probe Upgrade - Post-Upgrade Configuration
-
(Version 10.30 and earlier only) If UCMDB Server and Data Flow Probe communicate via the HTTP protocol before the upgrade, then after the upgrade, you need to enable HTTP communication on the UCMDB server.
For details, see How to Enable HTTP Communication for UCMDB Server.
-
Enable Basic Authentication
If you disabled the Basic Authentication as described in Pre-Check List for Both Auto Upgrade and Manual Upgrade of Probes, you can enable it after all probes are upgraded successfully.
Data Flow Probe Upgrade - Upgrade Success Checkpoints
-
Probe version and status: Probe version has changed to the new version.
- Log in to the UCMDB server UI, and go to Data Flow Management > Data Flow Probe Setup.
-
Check the details pane for each probe.
If the probe has been successfully upgrade, the Status should display Connected, and the Version should show the new version information.
-
Check the probe auto upgrade log file in UCMDB server's success folder
To check if a probe has been upgraded successfully, you can:
-
Check the probe_auto_upgrade.log file (in the C:\UCMDB\DataFlowProbe\runtime\log\probeUpgradeLogs folder), if the probe is upgraded successfully, you should be able to see the following message in the log file:
Finished probe upgrade. Probe has been upgraded to [version] [Build]. Probe auto upgrade agent will exit.
-
Check the success folder in UCMDB server.
The log files shows as <domain_name>_<probename>_auto_upgrade.log in the <UCMDB_Server>\runtime\log\probeUpgradeLogs\<source_version>to<target_version>\success folder. For example, <UCMDB_Server>\runtime\log\probeUpgradeLogs\10.22to11.0\success. The log files in the success folder indicate the probes that have been successfully upgraded.
For more details about the probe_auto_upgrade.log file, see Data Flow Probe Log Files.
-
-
Run some basic jobs.
Run IPs by ICMP job via the connected probe, the job should run successfully.
Data Flow Probe Upgrade - Upgrade Failure Checkpoints
-
Probe version and status: Probe version remains the old version,
- The Status shows Connected. This indicates the probes are not broken. In this case, if the upgrade fails, the probe upgrader will try to recover the probe to its old version.
- The Status shows Disconnected. This indicates the probes are broken. If the upgrade fails, you need to perform troubleshooting by following the instructions in Troubleshooting Probe Upgrade.
-
Probe upgrade log file in the failed folder on UCMDB server.
- Go to <UCMDB_Server>\runtime\log\probeUpgradeLogs\<source_version>to<target_version>\failed folder. For example, <UCMDB_Server>\runtime\log\probeUpgradeLogs\10.22to11.0\failed.
-
Check the <domain_name>_<probename>_auto_upgrade.log files.
The log files in the failed folder indicate probes with upgrade failure. Open each upgrade log and check the error messages.
Data Flow Probe Upgrade - Troubleshooting Upgrade Failures
If you encounter failure with probe upgrade, check the following for troubleshooting information:
-
The probe auto upgrade log files (with file name shown as <domain_name>_<probe_name>_auto_upgrade.log) in the <UCMDB_Server>\runtime\log\probeUpgradeLogs\<source_version>to<target_version>\failed folder. For example: C:\UCMDB\DataFlowProbe\runtime\log\probeUpgradeLogs\10.32to11.0.
The log files record errors detected by the probe auto upgrader. The errors may be related to probe version, probe mode, and disk space. For details, see Troubleshooting Probe Auto Upgrade - How to check if a probe is upgraded successfully?.
Note For probes that you upgraded manually, check the log files in <DataFlowProbe>\runtime\log for error messages about upgrade failure.
-
If you cannot find sufficient error information from the probe auto upgrade log files, you can navigate to the probe machine. We recommend you first do a general check according to Troubleshooting Probe Auto Upgrade - General Known Issues, Limitations, and Others.
Then check the following log files in the <DataFlowProbe>\runtime\log folder:
- probe_upgrade_conf_merge.log. Shows the related information when probe upgrader merges configuration files. To troubleshoot the root causes of errors, see Troubleshooting Probe Auto Upgrade - Customized Probe Configuration.
- pg_upgrade.log. Shows the running details of the pg_upgrade.bat script, including details about PostgreSQL upgrade and table splitting. To troubleshoot the errors in the log, see Troubleshooting Probe Auto Upgrade - PostgreSQL Upgrade.
- probe_post_upgrade.log
For more details about the log files, see Data Flow Probe Log Files.