


Developing an Integration Template
This section describes the tasks to develop an integration template.
Initialize global variables
Each integration has global variables, which you must initialize. To initialize the global variables of an integration, follow these steps:
-
Add a field to the
infotable, using the integration template name as its name.Note If the integration has global parameters, the field must be a structure field.
-
If the integration has global parameters, add all these global parameter names as fields to the newly added structure.
For example, an integration template named
SMBSMhas two global parameters:PIandBIR. You need to add a structure namedSMBSMunder the SMIS structure, and then add two fields,PIandBIR, to theSMBSMstructure. If the templateSMBSMhas no global parameters, you only need to add one field namedSMBSMto the SMIS structure.
Develop a source adapter and a destination adapter
To develop a source adapter, use readRecords to return records to the manager.
To develop a destination adapter, use sendRecord to process records from the manager.
Note The getFields function defines the fields used in an integration. See smis_TestSrcAdapter and smis_TestDestAdapter in the Service Manager script library for examples.
Develop a manager
A manager is required for both schedule-based and UI-based integrations.
To develop a manager, follow these steps:
- Develop
appendTasksto prepare tasks in the task queue. - Put the logic in either the
preprocessorprocessmethod. - Do cleaning in the
postProcessorfinalizemethod. - Prepare the destination object in the
getDestObjmethod for the mapping function to set mapped values. - Prepare the action in the
getActionmethod to use in the mapping callback(s). -
Implement
isScheduleBasedto indicate whether the integration is schedule-based or not.Tip See smis_TestManager in the Service Manager script library for an example.
Note For a UI-based integration, the manager only needs to implement
isScheduleBasedand add the integration specific methods to it. See the following script for an example.An example manager for a UI-based integration
var Class = lib.smis_Prototype.getClass();
var PIManagerClass = Class.create(lib.smis_Manager.getClass(),
{getUrl: function(vFile) {var baseUrl = this.configItem.getConfigParameterValue("baseurl");var url = baseUrl + "&IsmEntityId="+vFile["number"];
url += "&IsmSubject=";
var device = new SCFile("device");var RC = device.doSelect("logical.name=\"" + vFile["logical.name"] +"\"");
if ( RC == RC_SUCCESS && device["ucmdb.id"] != null){url += device["ucmdb.id"];
} else {url += vFile["logical.name"];
}
return url;
},
isScheduleBased: function() {return false;
}
});
function getClass() {return PIManagerClass;}
Develop a custom controller
A controller controls interactions between the manager, source and destination adapters, mapping function, and task manager of a schedule-based integration.
Note UI-based integrations do not need a controller.
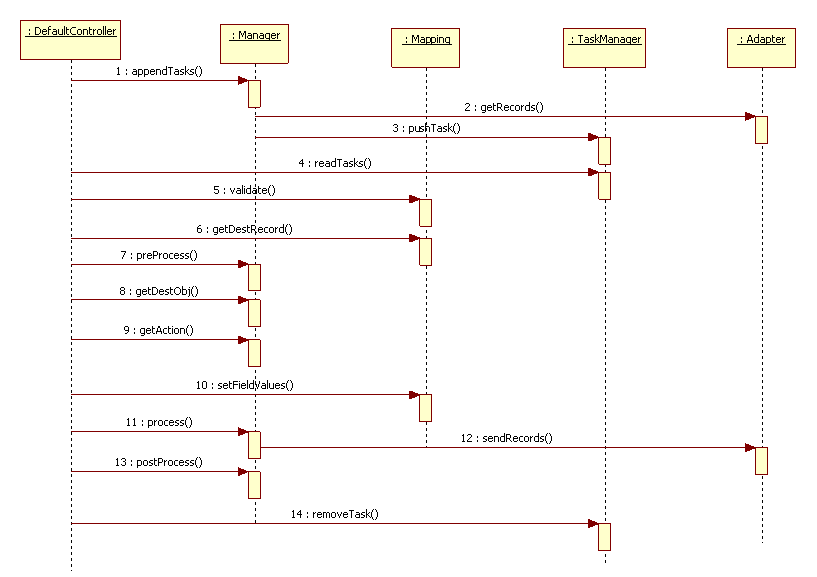
SMIS provides a default controller. The following figure shows the workflow of the default controller. If this default workflow does not suit your integration, develop a custom controller.
Workflow of the Default Controller
When developing a custom controller, you can refer to smis_Controller in the Service Manager script library.
The typical workflow of a controller is as follows:
- Call the manager to do the following to prepare tasks:
- Delegate its source adapter to retrieve data from the endpoint;
- Wrap the data as tasks;
- Pass the tasks to the taskManager to save to the failover queue.
- Read all the tasks from the failover queue.
- Pass the data in the task to the mapping function for validation.
- If the data passes validation, get the destRecord (which is the result of value mapping) from the mapping function.
- Call the manager to preprocess and prepare the following:
- The destObject (which is the target to save or update) ;
- The action (for example, add/save/delete) that the manager should perform to process the destObject.
- Call the mapping function to process the destObject. All the final mapped values by the final mapping are set to the destObject.
- Call the manager to process the final destObject, and to return the result (success or failure).
- If the result is success, remove the task from the failover queue; If the result is failure, increase the retry count and update it to the failover queue.
- Call the manager’s
postprocessandfinalizefunctions to do cleaning.
Normally, you do not need to create a custom controller. You can leave some processes empty if you do nothing in them. In some cases, you may not need a mapping function and failover queue, so you can create a simple controller.
Implement UI controls
An integration normally comes with new UI controls, such as new menu options or buttons. To control the behavior of these UI controls, the integration needs to interact with SMIS. The following are examples:
- Getting parameter values specified in SMIS;
- Calling some business logic in the integration’s manager (for example, to prepare a URL);
- Deciding if a UI element should be visible/enabled by checking the integration's global variables specified in SMIS.
To illustrate new UI controls, consider the Service Manager to Business Availability Center (BAC) Problem Isolation integration. This integration includes a new menu option to the Incident form: Launch Problem Isolation. When you select this menu option, a new browser window opens. The URL of this window is based on two things: the value of "baseurl" specified in SMIS and the affected CI field of the incident.
To implement this feature, you can use the Display Options tailoring tool to create a display option record, in which the script on the Pre Javascript tab controls the above described behavior. See the following figure.
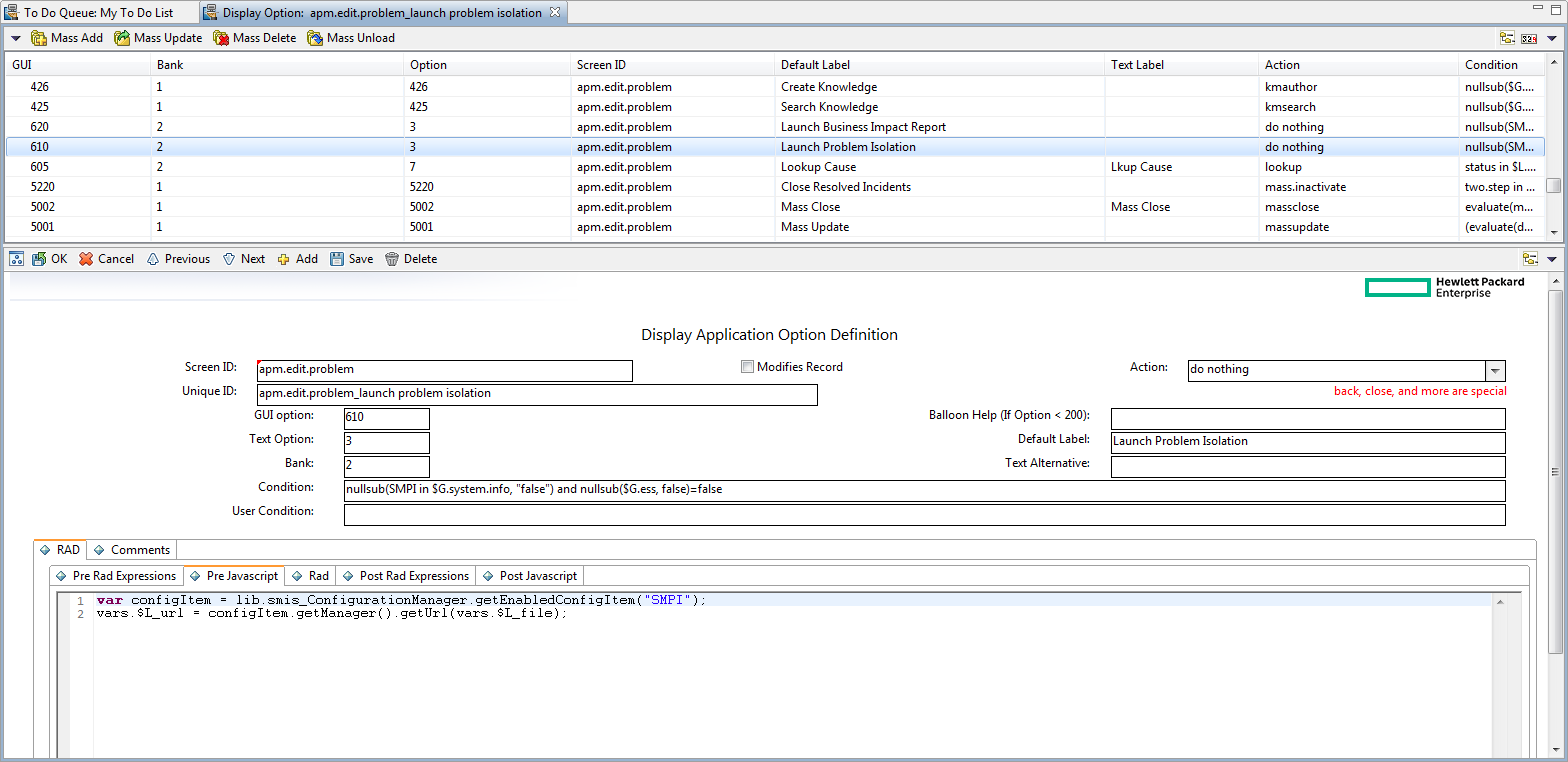
The following examples show you some of the values you can retrieve or set. This is not an exhaustive list:
-
To get the enabled instance of the integration:
var configItem =lib.smis_ConfigurationManager.getEnabledConfigItem(<templateName>);For example:
var configItem =lib.smis_ConfigurationManager.getEnabledConfigItem(SMPI) -
To get a URL from the manager:
vars.$L_url = configItem.getManager().getUrl(vars.$L_file); -
To get a parameter value:
var paramValue = configItem.getConfParamaterValue(paramName) -
To set the property of a UI element:
Each integration has global variables, which can be used in RAD expressions like
SMBSM in vars.$G.system.info. If an integration has global parameters, they can be used the same way, for example:PI in vars.$G.system.info. You can use these global variables to set the property of a UI element (for example, to set a menu item to be visible/invisible, or to set a button to be enabled/disabled).
Register an integration template in SMIS
You need to register an integration as a template in SMIS before it is available in the template list in SMIS. You can view or edit an integration template after it is registered in SMIS.
Register an integration template
To register an integration as a template, follow these steps:
-
Register the general information of the integration template.
- Log on to Service Manager as a system administrator.
- From Database Manager, open the SMISRegistry.g form.
-
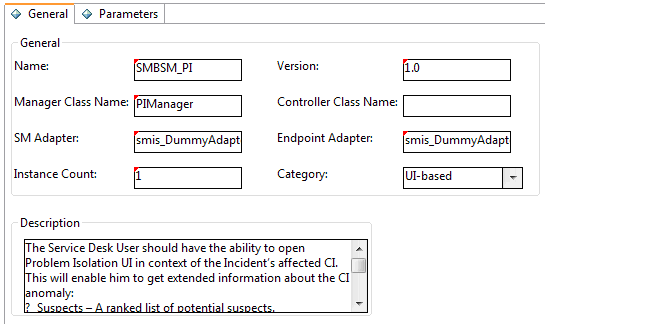
On the General tab, enter the following information of the integration:
Field Description Name Name of the integration template. Version Version of the integration template. Manager Class Name Script name of the manager of the integration. Controller Class Name Script name of the controller of the integration. If this field is left blank, a default controller is used. SM Adapter Name of the Service Manager adapter. Endpoint Adapter Name of the endpoint adapter. Instance Count Maximum allowed number of instances of the integration. Category Category of the integration (Schedule-based or UI-based). See the following screenshot for an example.
-
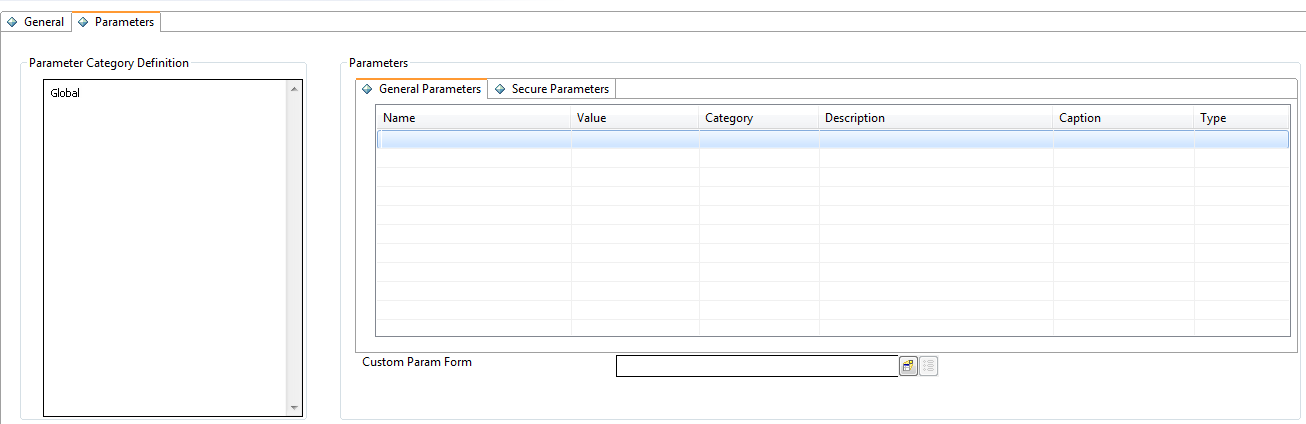
Enter parameters required for the integration.
- Select the Parameters tab.
- If necessary, enter parameter categories for the integration.
-
On the General Parameters and Secure Parameters tabs, enter parameters of the integration.
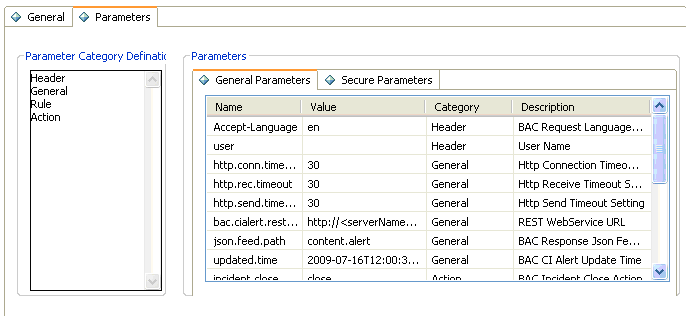
Note Newly added parameter categories are not available in the
Categorylist until the form is saved and then reopened.There is a default
Globalcategory. SMIS will initialize all parameters of this category to global variables, which can be used in Service Manager. These parameters can only be set to true or false.
-
Edit the out-of-box mappings.
-
On the General tab, click the Go to Configure Field Mapping link. The Registry Field Mapping page opens.
-
On the Field Mapping tab, add or edit field mappings.
-
On the Field Mapping tab, click Edit Callback to edit callbacks, or click Clear Callback to delete callbacks.
-
On the Value Mapping tab, add or edit value mappings.
-
Click Finish.
Note The default fields in the drop-down list are defined in the
getFieldsmethod of the Service Manager adapter and endpoint adapter. Each mapping value can be calculated by combining the direct mapping value, default value, value mapping table, and callback value. For information about the processing logic of mapping, see Processing Logic of the Mapping Functionality. -
View or edit a registered integration template
Once you have registered an integration template in SMIS, a record is created in the SMISRegistry.g form. You can view or edit the integration template.
To view or edit a registered integration template, perform the following steps:
- Log on to Service Manager as a system administrator.
- From Database Manager, open the SMISRegistry.g form.
-
Select the Parameters tab, and remove the Global category from the Parameter Category Definition pane.
Note The Global category is a default category, which displays on the Parameters tab by default. If you do not clear it before performing a search, the search returns only those records with global parameters.
-
Click Search. A list of integration templates displays.
-
Select a record to view or edit the details.
Export an integration template into an unload file
After you have registered an integration template in SMIS, you need to export it into an unload file, which you can then import into a testing system or production system.
To export an integration template into an unload file, follow these steps:
- Create an unload script for the integration template. This unload script must include all the changes you made to the system when developing the integration template.
- Go to Tailoring > Unload Script Utility. Select the unload script you created and export it into an unload file.
For more information, see the Service Manager help.


