


Add fields to Task Planner
You can add fields to Task Planner, and determine whether they are mandatory or not. Additional fields are associated with a specific type of task file (for example, the change task file), and can be configured at both the file and task category level. This determines whether the additional field is displayed whenever Task Planner is started for that type of task file, or whether the field is displayed once the user has entered a value in the Task category field.
Note You cannot remove or modify the fields that are present by default (that is, the Title, Task Category, Open In Phase, Close By Phase, Task template, Task Condition, and Assignment Rule fields).
The following example adds the Assignment Group field in the requestTask table to Task Planner.
To add a field to Task Planner, follow these steps:
- Click Tailoring > Process Designer > Configuration > Predefined Additional Task Fields.
- Select requestTask from the File Name drop-down list, and then click the New icon.
-
If you want to configure an additional field at the file level, leave the Task Category Name field empty. If you want to configure an additional field that applies only to a specific task category, click Fill to select a task category in the Task Category Name field.
Note If one field is defined at both the file and category levels, the setting in the category level overrides the setting in the file level.
- Click Add Field.
- In the Field Name drop-down list, select the field that you want to add to Task Planner. For example, select Assignment Group.
- If you want this additional field to be mandatory, select the Mandatory option.
-
If this field has a link definition defined, select the Is Record in Table? check box. For example, a link definition exists for the Assignment Group field because the values of this field should be retrieved from the assignment table.
The Record Information area appears. If only one relationship record of this field exists in Relationship Manager, this area is automatically populated with the relationship information. If multiple relationship records exist, you need to click the Fill icon in the Relationship Id field to select the correct relationship record. If no relationship records of this field exist in Relationship Manager, no relationship information is displayed.
See the following table for more information.
Field Description Example value Relationship Id This is the Id of the relationship record, which you can find in Relationship Manager by performing a search. For example, for the Affected CI (logical.name) field in cm3t, enter table name cm3t and field name logical.name, and then click Search. 5914 Table This is the name of the other table in the relationship record. assignment Field This is the name of mapping field in the other table. name You can define a query by clicking Edit Query so that only values that meet the specified conditions will be available for selection in Task Planner. For example, you can specify this query:
( Time Zone = "US/Pacific" )
Caution If you want to add an array field (for example, Affected CI) to Task Planner, do not select the Is Record in Table option. Additionally, in Task Planner, you cannot select values for the field by clicking Fill; instead, you can only manually enter values by using one of the following formats depending on the array type:
- array character {"a","b"}
- array number {1,2}
- array datetime {'09/02/15 13:35:42'}
- array boolean {true, false}
-
Click OK. The field is now added.
Tip You can click Edit Field to edit the field or click Delete Field to delete the field. You can also click Add Field to add more fields.
- Click Save to save the record.
- Verify that the field is added to Task Planner.
- Go to Request Fulfillment > Configuration > Request Models, and open a request model record by performing a search. For example, open the out-of-box Application Access request model.
- Go to the Task section and click Edit to open Task Planner.
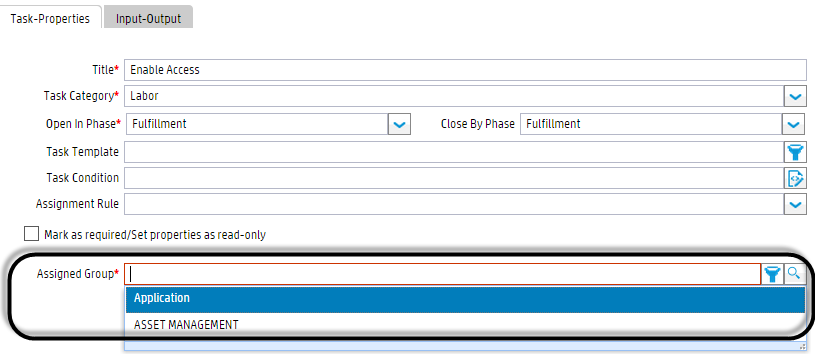
Select a task. For example, select the out-of-box Enable Access task. The field you added (Assignment Group in this example) is displayed on the Task-Properties tab. If you click Fill in this field, a list of values based on the query conditions you set is displayed.
- If you select a value for the field and then save the request model record, the task record is automatically populated with this field value when created later.