


Method 2: Automatically export/import multiple UNL files
The following flow chart illustrates how the operator migrates the delta data by using method 2.
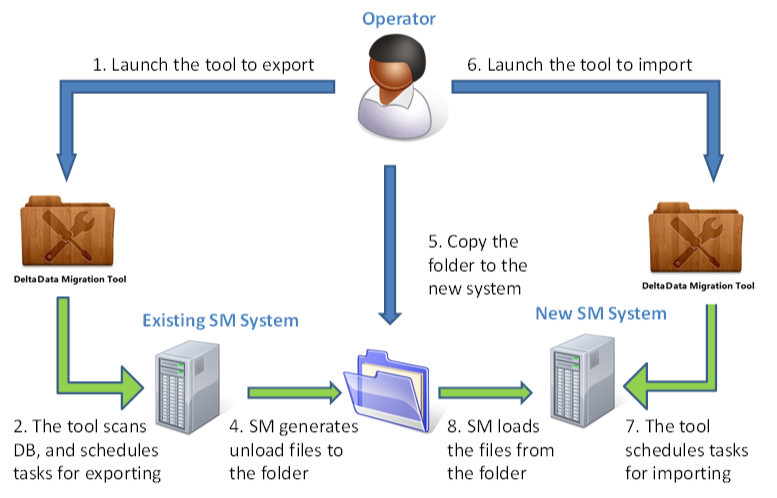
To export the delta data by using method 2, follow these steps:
- Log in to the original Service Manager system.
- Open Tailoring > ScriptLibrary. Type DeltaMigration_Export in the Name field, press Enter, and then click Execute.
- Click Next on the welcome page, and then select Method 2: Automatically export/import multiple UNLs.
- Click Next to check the steps of using method 2.
- Click Next to specify a folder for the exported delta data, and then specify the time range of the delta data.
- Click Next to verify the provided migration suggestions after the tool checks the tables. You can ignore some tables even if they contain some delta data.
- Click Next to verify the final confirmation for the migration. The message diaplays the number of the tables that will be migrated and the time that the exporting will take.
- Click Next to start background schedule tasks to export the delta data.
-
Click Finish to exit the tool when the overall progress reaches 100%.
Note To check the export status, go to the selected folder and open Overall Export Status Report.html.
- Copy the whole folder to the new Service Manager system.
To import the delta data by using method 2, follow these steps:
- Log in to the new Service Manager system as an administrator.
- Open Tailoring > ScriptLibrary. Type DeltaMigration_Import in the Name field, press Enter, and then click Execute. A welcome page appears showing the instructions for migration.
- Click Next on the welcome page.
- Click Next, and then specify the folder that contains the exported delta data.
-
Click Next to select the tables to migrate. If the table structures are different, HPE recommends that you click Click here to check the table structure mismatch… link, to acknowledge the detailed difference, the risk, and then decide if you migrate or not.
Note If the table structure mismatch may introduce risks, and you decide not to migrate, then try to migrate the data in these tables by other methods to avoid data loss. For more information about how to do this, see How can I handle skipped tables?.
- Click Next to check the final confirmation for the migration. The message displays the number of the tables that will be imported.
- Click Next to start background schedule tasks to import the delta data.
-
Click Finish to exit the tool when the overall progress reaches 100%.
Note To check the importing status, go to the selected folder and open Overall Import Status Report.html.
Note If tables are ignored during the export operation because they have no last modification time field, then check if a full-table migration is needed.