


Set up mirrored IDOL
The default Service Portal configuration is to have each application node maintain its own instance of IDOL. This is problematic in a distributed cluster system because the IDOL instances are not synchronized in any way. To solve this problem, you can mirror the IDOL content servers so they are kept in sync across multiple distributed Service Portal nodes.
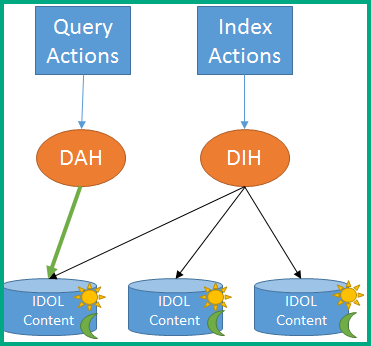
A distributed IDOL setup is composed of a few different components, the important ones are as follows: Distributed Index Handler (DIH), Distributed Action Handler (DAH), and Content Servers. Mirroring the data between IDOL content servers allows for high availability by having multiple identical servers. If one server goes down, we can failover to another that is an exact copy and continue seamlessly.
The following figures show a simple mirroring architecture where the DIH replicates all changes to every IDOL content server. In this solution, the DAH uses a single IDOL instance as a primary server and only uses others as a backup if the primary fails. All actions are queued for the failed servers. Once the failed servers are up again, all queued actions are replayed, but the primary server is not reverted to the original.
Before failure
During failure

After failure

Set up load balancing
The default of the Distributed Service Portal installation is to use an identical IDOL configuration on each node and rely on NGINX for load balancing. By configuring each instance of the Service Portal Search service to point to its local IDOL instance (that is identically configured), Search will point to the same IDOL server no matter which instance of Search is used, and seamlessly failover to the same IDOL if the primary goes down.
Change IDOL configurations
The IDOL configuration is identical on all of the Service Portal nodes.
Important Use the actual IP addresses or host names of the machines in the configurations. Do not use 127.0.0.1 or localhost so that the configuration files can be copied across servers without errors.
The Distributed Service Portal scripts implement the following changes to the main IDOL server configuration file /opt/hp/SmartAnalytics/IDOL/IDOLServer.cfg on each Service Portal node:
-
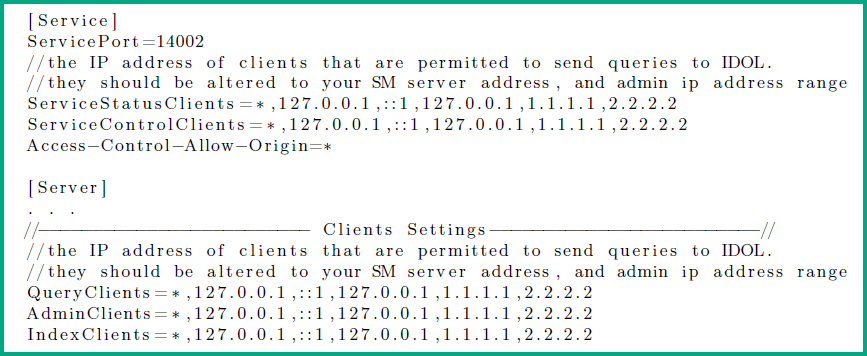
Whitelist all the IP addresses of all servers.
The following figure shows an example, where IP addresses 1.1.1.1, and 2.2.2.2 have been added in 5 locations.
-
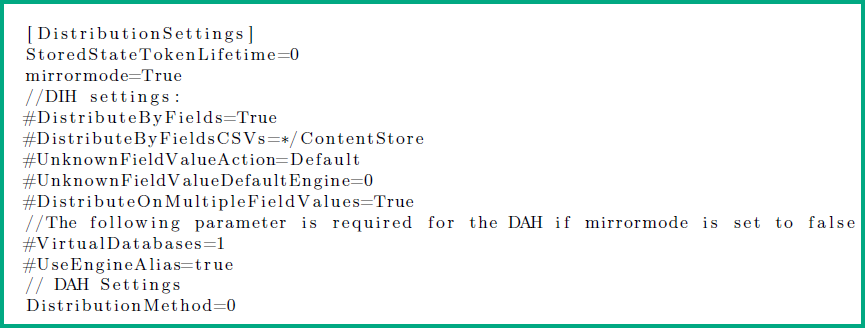
Enable mirror mode and remove any non-mirror mode configurations.
Here, the mirrormode parameter is set to True, all the DIH settings are commented out, and "DistributionMethod=0" is added.
-
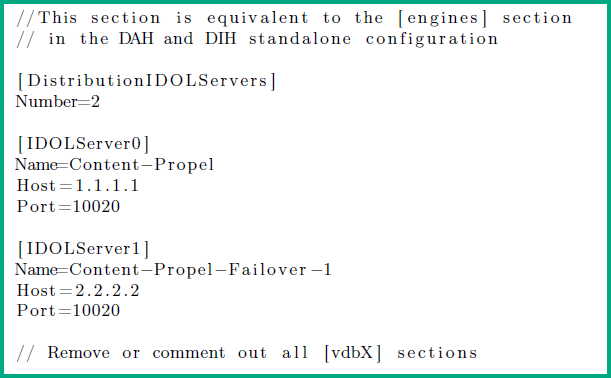
Configure IDOL servers and remove Virtual Database Configurations.
- The "Number" field MUST equal the total number of Configured IDOL Servers.
- Each [IDOLServerN] section must be sequential starting at 0.
- IDOL will choose the first Server (having the lowest sequential number) as the primary.
- Do not use localhost or 127.0.0.1 for the Host so that the file can be copied around to the servers without trouble.
The following figure shows an example.
-
As a precautionary measure, IDOL will not allow a user to switch from mirror mode to non-mirror mode or vice versa, because it will result in data loss. Assuming you are fine with losing all your data (indexes) stored in IDOL, delete the /SmartAnalyitcs/IDOL/dih/main directory on each of the servers before restarting the service.
In the context of Service Portal, a simple catalog reindex will suffice for repopulating data indexes in IDOL:
# cd /opt /hp/ propel/catalog
# java -jar lib/catalog.jar reindex
-
Restart the idol services:
# cd /opt/hp
# service idolserver restart
For testing purposes, you can disable a single Service Portal IDOL content instance to manually trigger the failover:
# cd /opt/hp
# service idol-content-propel stop
Note Currently, the NGINX configuration does not have a health check for both the Search service and DAH/DIH endpoints. Until the health checks are correctly configured, this solution will not support high availability if the DAH/DIH fails.
Tip Next, you will need to replace the Service Portal generated certificates for the Service Portal cluster. See Replace Service Portal generated certificates.