Searching the Help
To search for information in the Help, type a word or phrase in the Search box. When you enter a group of words, OR is inferred. You can use Boolean operators to refine your search.
Results returned are case insensitive. However, results ranking takes case into account and assigns higher scores to case matches. Therefore, a search for "cats" followed by a search for "Cats" would return the same number of Help topics, but the order in which the topics are listed would be different.
| Search for | Example | Results |
|---|---|---|
| A single word | cat
|
Topics that contain the word "cat". You will also find its grammatical variations, such as "cats". |
|
A phrase. You can specify that the search results contain a specific phrase. |
"cat food" (quotation marks) |
Topics that contain the literal phrase "cat food" and all its grammatical variations. Without the quotation marks, the query is equivalent to specifying an OR operator, which finds topics with one of the individual words instead of the phrase. |
| Search for | Operator | Example |
|---|---|---|
|
Two or more words in the same topic |
|
|
| Either word in a topic |
|
|
| Topics that do not contain a specific word or phrase |
|
|
| Topics that contain one string and do not contain another | ^ (caret) |
cat ^ mouse
|
| A combination of search types | ( ) parentheses |
|
- Create the Dashboard Contents in the Studio
- About Templates
- Scorecard Template
- Perspective Templates
- Objective Templates
- KPI Templates
- Metric Templates
- Folders
- Activate Scorecards, Perspectives, Objectives, Metrics, and KPIs Templates
- Create Active Scorecards, Perspectives, Objectives, Metrics, or KPIs
- Scorecard Configuration Details
- Perspective Configuration Details
- Objective Configuration Details
- Objective KPIs
- Delete a Node
- KPI and Metric Formula and Filter, Threshold, Value, Trend, and Score
- KPI or Metric Configuration and Calculation Details
- KPI or Metric Formula
- KPI or Metric Filter
- KPI or Metric Business Context
- Calculation
- Recalculation
- Calculation Scheduling
- Calculation and Recalculation Monitoring
- Synchronization of Changes in the Studio with Display in the Dashboard and the Explorer tab
KPI or Metric Configuration and Calculation Details
You can activate a KPI or a Metric by dragging the KPI or Metric template to the Active KPIs pane. You can then modify the active copy in the Active KPIs pane.
You can create a KPI or a Metric directly in the Active KPIs pane. For details, see Create Active Scorecards, Perspectives, Objectives, Metrics, or KPIs.
For details about KPIs, see KPI and Metric Formulas, Filter, Threshold, Value, Trend, Score, and Decimal Precision.
To learn about Shared KPIs, see Shared KPIs.
Click a KPI or a Metric in the Active KPIs pane to display the Configuration Details tab and the Calculation Details tab for the selected KPI.
 Impact of changes to configurations in the Studio on the display in Dashboard and the EXPLORER tab
Changes in the STUDIO have impacts on the display in Dashboard and EXPLORER. For details, see Synchronization of Changes in the Studio with Display in the Dashboard and the EXPLORER tab.
 Use Case - Display and modify a KPI or a Metric properties
In this section, you will learn how to modify a KPI configuration. Click the Studio to open the Studio.
- Click the Studio button (top right corner) to open the Studio.
- In the Active KPIs pane, select the KPI you'd like to modify.
-
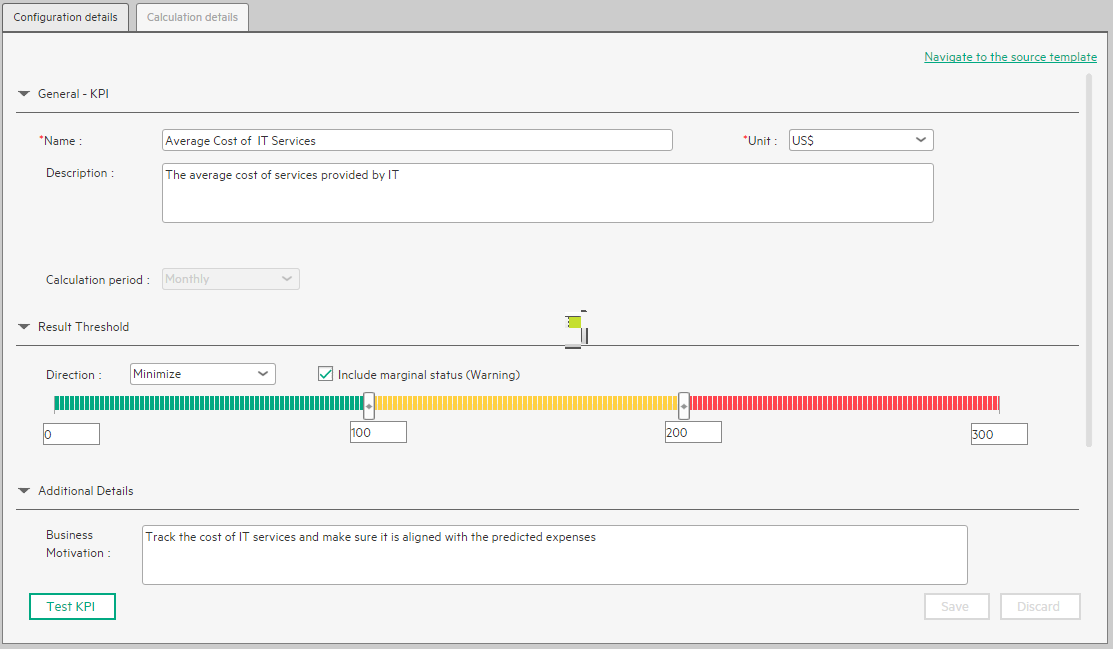
In the Configuration Details pane:
-
In the General – KPI area, you can change the KPI name, you can select a different unit or enter a custom unit. You can change the Calculation period.
- In the Result Threshold area, you can change the threshold direction, include the marginal status, and set the threshold boundaries by dragging the handles.
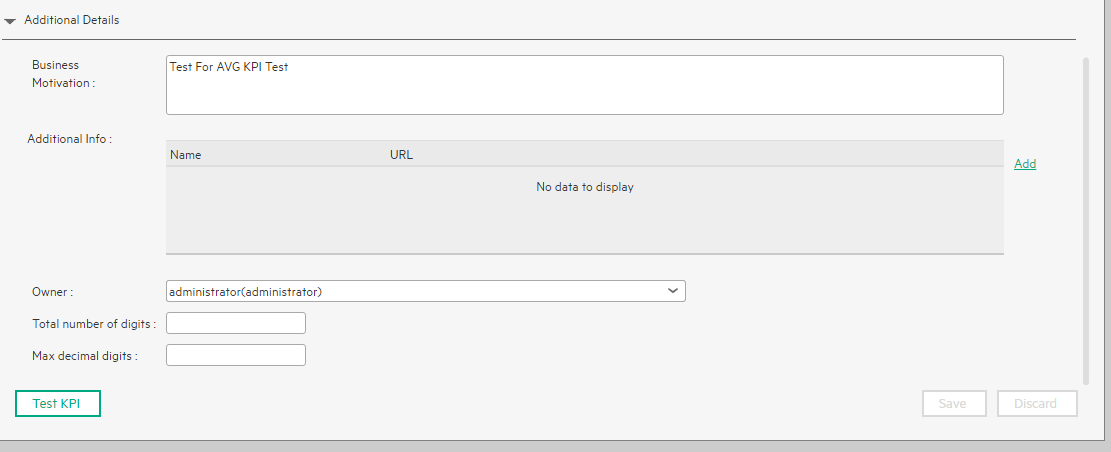
- In the Additional Details area, you can add to the KPI, additional information that will be shown in the Dashboard and the Explorer tab. In the Business Motivation enter the relevant motivation.
-
In the Additional Info area, you can add information that will be displayed with the KPI. It can be a URL, a Dashboard page, or a report.
You can also set an owner for the KPI. The owner will receive the annotations set for the KPI in the Dashboard page or in the Explorer tab.
-
Save your changes.
-
-
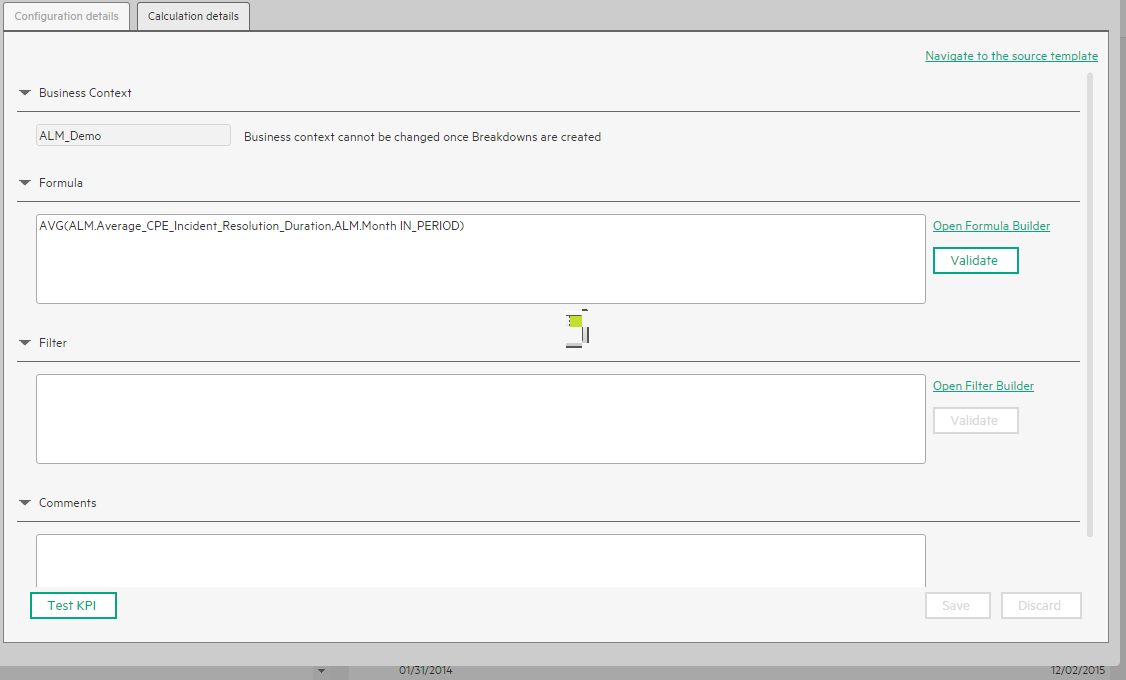
In the right pane, click the Calculation Details tab.
-
Click Open Formula Builder to modify the KPI formula.
How to modify the formula is detailed in another section.
- Click Open Formula Filter to modify the KPI filter.
- In the Comments field, add any additional information.
-
- Remove the current formula and start creating your own formula.
- Click Save to save your changes.
-
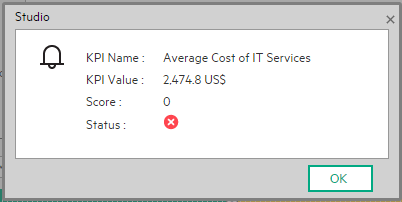
Use the Test KPI button to check if the result you are getting according to the configuration, meets your expectation. If not, modify it and check it again.
Movie: To display the relevant movie, open the ITBA application, click Help in the top right corner of the application main page and select the Movies option. Select the relevant movie.
 Use Case - Create a New Metric
In this section you will learn how to create a new Metric.
- Click the Studio button (top right corner) to open the Studio.
- In the Active KPIs pane, select the Public Metrics and KPIs directory and click the Create a new entity
 icon and select Metric.
 -
Name the new Metric, enter a description, set the units and the calculation period. Click Create to complete the Metric creation.
For more details, see KPI or Metric Configuration and Calculation Details.
- Click the Calculation Details tab to select the relevant Business Context and to set the formula and filter. Once you are done, click Create .
- To find out the expected result for the Metric you created, click the Test Metric button. If the result does not meet your expectations, modify the Metric formula and check again to check the expected result.
-
Once the Metric you created is ready to be calculated, launch the Engine by clicking Calculate now. For more details, see Calculation.
The engine will calculate the new Metric result and you will be able to view it in the Dashboard.
Movie: To display the relevant movie, open the ITBA application, click Help in the top right corner of the application main page and select the Movies option. Select the relevant movie.
 Change a KPI or an Objective Calculation Period
The calculation result of an Objective is based on its KPIs, so the Calculation Period of an Objective and of its KPIs must be the same. If an Objective has KPIs you cannot change its Calculation Period and you cannot change its KPIs Calculation Period directly. To change the Calculation Period of the Objective or of its KPIs, go to STUDIO:
-
In the Active KPIs, unassign the KPI from the Objective as follows:
- Right-click the KPI and select Delete.
-
Select Un-assign this specific KPI from the Objective, and click Yes.
The KPI is then moved to the Public Metrics and KPIs folder.
- Change the Calculation Period of either the Objective or of the KPI to match.
- Click the Objective and click Add KPI. Select the relevant KPI and click the arrow to move the KPI to Assigned KPIs, and click OK.
 Calculation Details Tab

User interface elements are described below (when relevant, unlabeled elements are shown in angle brackets):
|
UI Element |
Description |
|---|---|
| Navigate to the source template |
Moves the cursor to the template that was used to create the current KPI, in the KPI Library pane. The details of the template are displayed in the Configuration Details pane. |
| Test KPI |
After you make changes to the KPI configuration, click Save to save your changes. The Test KPI button is enabled. Click it to test the changes you made to the KPI configuration. The KPI value is calculated and displayed in a popup window. The window displays the new value, score, and status of the modified KPI. The result is not saved to the database.
The button is disabled for KPI Breakdowns. |
| Save |
Click to save the changes. |
| Discard | Click to discard the changes you have made since the last Save operation. |

|
Click to refresh the display. |
|
Business context
|
The box displays the Context you selected. You can use additional variables and entities by creating Contexts using Context Designer. For details, see Semantic Layer - Context Designer Note If you have assigned to a KPI a Context created with the Context Designer, and then you modify the Context name in the Context Designer, make sure that you assign the modified Context to the KPI in the Studio otherwise the KPI becomes invalid as it uses a Context that does not exist. |
| Select business context |
Click to open the Business Context dialog box, where you select the Business Context. That selection determines the business entities that are the basis of the calculation of the KPI value and defines the entities used in the formula. For details, see SAP BusinessObjects Enterprise Contexts (Universes) This link is displayed only when no KPI Breakdown has been defined for the KPI. If the KPI already has a Breakdown KPI then a message indicates why you cannot change the Context. |
|
Formula
|
The formula used to calculate the value of the KPI. |
| Open Formula Builder | Click to open the Formula Builder dialog box where you can build the relevant formula to calculate the value of the KPI. For user interface details, see KPI or Metric Formula |
| Validate |
Click to validate the formula that appears in the Formula box.
|
|
Filter
|
Specify the filter to limit the range of data used for the KPI's calculation. |
| Open Filter Builder | Click to open the Filter Builder dialog box where you can build the relevant filter that limits the range of the data the KPI calculation is based on. For user interface details, see KPI or Metric Filter |
| Validate |
Click to validate the filter.
|
| Comments | Enter a description of the formula and its purpose in your own words. |
 Configuration Details Tab


User interface elements are described below (when relevant, unlabeled elements are shown in angle brackets):
|
UI Element |
Description |
||||||||||||
|---|---|---|---|---|---|---|---|---|---|---|---|---|---|
| Navigate to the source template |
Moves the cursor to the template that was used to create the active KPI/Metric, in the KPI/Metric Library pane. The details of the template are displayed in the Configuration Details pane. This option is disabled for KPI/Metric Breakdowns. |
||||||||||||
| Test KPI/Metric |
After you change the KPI/Metric configuration, click Save to save your changes. The Test KPI/Metric button is enabled. Click it to test the changes you made to the KPI/Metric configuration. The KPI/Metric value is calculated and displayed in a popup window. The window displays the new value, score, and status of the modified KPI/Metric. The result is not saved to the database.
Note The button is disabled for KPI/Metric Breakdowns. For details on calculations, see Activate Scorecards, Perspectives, Objectives, Metrics, or KPIs Using Templates. |
||||||||||||
| Save | Click to save the changes. | ||||||||||||
| Discard | Click to discard the changes you have made since the last Save operation. | ||||||||||||

|
Click to refresh the display. | ||||||||||||
| General - KPI
Name |
|
||||||||||||
| Result Threshold |
Note This section is not relevant for Metrics.
|
||||||||||||
| Additional Details |
|
We welcome your comments!
To open the configured email client on this computer, open an email window.
Otherwise, copy the information below to a web mail client, and send this email to SW-Doc@hpe.com.
Help Topic ID:
Product:
Topic Title:
Feedback:


 Click to delete the selected additional information.