


Restore content data
User Role: Administrator
Important The content data restore process described in this document does not apply to the following scenario:
- The original content sever is running alive and the system performs a scheduled backup
- You click the Full Reindex button, the system performs a full re-index
- The content server crashes before the next scheduled backup
In this case, skip both this topic and Reindex delta data, and then perform a full re-index again to restore data on the content server.
To restore content data during a disaster recovery process, follow these steps:
-
Depending on which content server is crashed, you may need to stop either the KMUpdate scheduler or the SMIDOL* in SMIS:
- If the crashed content server is related to Hot Topic Analytics or Smart Ticket (by default, Content1), stop the SMIDOL* in SMIS by following the instructions as described in Service Manager Help Center > Troubleshooting: Smart Analytics background schedule in SMIS.
- If the crashed content server is related to Smart Search (by default, Content2 or Content3), stop the KMUpdate scheduler by following the instructions as described in Service Manager Help Center > Stop a process.
-
Clear the corrupted data on the crashed content server.
-
Open the crashed content server (for example, <Smart Analytics Installation>/Content1), and then remove all folders except the main folder. See the following screenshot as an example:
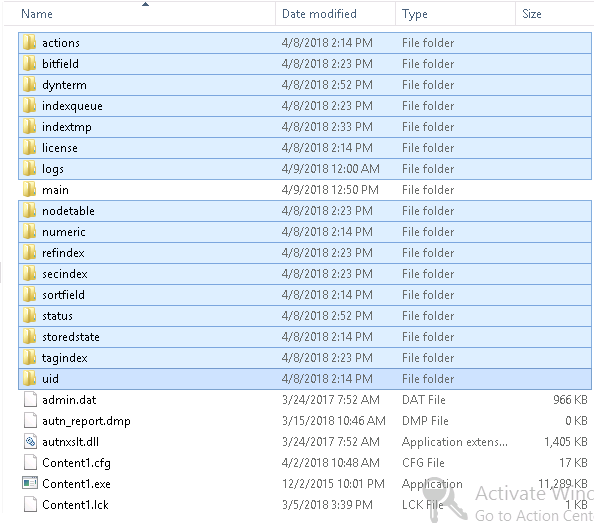
-
Open the main folder, and then remove all files except qssp.db. See the following screenshot as an example:

-
-
Start the service of the crashed content server in Windows services. For example, SM Smart Analytics Content1.
-
From the System Navigator, click System Administration > Ongoing Maintenance > Smart Analytics > Configuration.
-
Click More > Restore Smart Analytics Data.
-
Click Add and Start Task to open the Add a New Restore Task wizard. You need to provide the following information:
Field Description Task name Specify a name for the restore task. Endpoint Specify the host name of the corresponding IDOL content server. For example, http://abc.softwarelab.net/. Note that this URL must end with a slash (/).
Tip You can check the host name by using Smart Analytics Assistant.
Port Specify the port number of the crashed content server.
Tip You can check the port number by using Smart Analytics Assistant. Follow these steps:
- Type SAA in the Service Manager command line, and then press Enter. The system displays configuration and status of all IDOL components.
- Check the corresponding port number in Smart Ticket & Hot Topic Content and Smart Search Content.
Restore File Name Specify the name and path of the latest restored file. For example, C:\idolbak\content1\backup5. Task Type Select Restore Content from the drop-down list. -
Click Next.
-
Review the restore task details, and then click Finish.
-
The system displays the restore task on top of the task list.
-
Start the KMUpdate scheduler, or start the SMIDOL* instance in SMIS.
Note If the restored data consists of knowledge articles that are expired after the latest backup date, you need to run the DREEXPIRE command (such as http://<IDOLhost>:<indexPort>/DREEXPIRE) to manually retire these articles. Alternatively, you can wait till the system performs the next expiration schedule.
Note Consider the following scenario:
- The original content severs (content2 and content3) are running alive and the system performs a scheduled backup.
- You install another content server (for example, content4) so that the data is distributed in the three content servers.
- Content2 or Content3 crashes before the next scheduled backup and you perform data restore.
- The data is restored to content2 or content3 only. This is not consistent with the situation before data restore.
In this case, do the following:
- Clear the data on the three content servers.
- Restore content data to content2 and content3.
- Redistribute the data on the three content servers.
Note The current version of IDOL has a limitation that the system does not respond to the status checking request during the restore process. In this case, you have to check the IDOL log to get the restore status. Follow these steps:
- Open the content.cfg file with a text editor, and then update
LogLevel=normaltoLogLevel=full. -
Navigate to the %SmartAnalytics directory%/content<X>/logs directory, and then open the application.log file with a text editor.
-
Check the following messages:
06/06/2018 16:35:34 [1] 00-Always: Recovering from backup...06/06/2018 16:35:34 [1] 10-Full: Copying "Main" files from C:\IDOLBackup\main to C:\IDOLInstallation\main<-These messages indicate the progress.06/06/2018 16:35:34 [1] 10-Full: Copying "Status" files from C:\IDOLBackup\status to C:\IDOLInstallation\status06/06/2018 16:35:34 [1] 10-Full: Copying "Dynterm" files from C:\IDOLBackup\dynterm to C:\IDOLInstallation\dynterm06/06/2018 16:36:20 [1] 10-Full: Copying "Nodetable" files from C:\IDOLBackup\nodetable to C:\IDOLInstallation\nodetable06/06/2018 16:36:59 [1] 10-Full: Copying "Refindex" files from C:\IDOLBackup\refindex to C:\IDOLInstallation\refindex06/06/2018 16:36:59 [1] 10-Full: Copying "Numeric" files from C:\IDOLBackup\numeric to C:\IDOLInstallation\numeric06/06/2018 16:37:00 [1] 10-Full: Copying "Bitfield" files from C:\IDOLBackup\bitfield to C:\IDOLInstallation\bitfield06/06/2018 16:37:00 [1] 10-Full: Copying "Geospatial" files from C:\IDOLBackup\geoindex to C:\IDOLInstallation\geoindex06/06/2018 16:37:00 [1] 10-Full: Copying "Secindex" files from C:\IDOLBackup\secindex to C:\IDOLInstallation\secindex06/06/2018 16:37:00 [1] 10-Full: Copying "TagIndex" files from C:\IDOLBackup\tagindex to C:\IDOLInstallation\tagindex06/06/2018 16:37:01 [1] 10-Full: Copying "SortField" files from C:\IDOLBackup\sortfield to C:\IDOLInstallation\sortfield06/06/2018 16:37:01 [1] 10-Full: Copying "IndexQueue" files from C:\IDOLBackup\indexqueue to C:\IDOLInstallation\indexqueue06/06/2018 16:37:01 [1] 10-Full: Copying "storedstate" files from C:\IDOLBackup\storedstate/current to C:\IDOLInstallation\storedstate\current06/06/2018 16:37:01 [1] 10-Full: Copying "storedstateref" files from C:\IDOLBackup\storedstate to C:\IDOLInstallation\storedstate06/06/2018 16:37:01 [1] 30-Normal: Recovered from backup successful. <-This message does not indicate a full completion because the engine starts after this. It may take a long time or a short while depending on your configuration. -
Navigate to the %SmartAnalytics directory%/content<X>/logs directory, and then open the index.log file with a text editor.
-
Check the following messages:
06/06/2018 16:35:31 [1] 30-Normal: Index Queue Command: DREINITIAL?Path=D:\IDOLBackup06/06/2018 16:37:36 [1] 30-Normal: Index command finished. Took 124.91 s<- This message indicates a full completion.


