Searching the Help
To search for information in the Help, type a word or phrase in the Search box. When you enter a group of words, OR is inferred. You can use Boolean operators to refine your search.
Results returned are case insensitive. However, results ranking takes case into account and assigns higher scores to case matches. Therefore, a search for "cats" followed by a search for "Cats" would return the same number of Help topics, but the order in which the topics are listed would be different.
| Search for | Example | Results |
|---|---|---|
| A single word | cat
|
Topics that contain the word "cat". You will also find its grammatical variations, such as "cats". |
|
A phrase. You can specify that the search results contain a specific phrase. |
"cat food" (quotation marks) |
Topics that contain the literal phrase "cat food" and all its grammatical variations. Without the quotation marks, the query is equivalent to specifying an OR operator, which finds topics with one of the individual words instead of the phrase. |
| Search for | Operator | Example |
|---|---|---|
|
Two or more words in the same topic |
|
|
| Either word in a topic |
|
|
| Topics that do not contain a specific word or phrase |
|
|
| Topics that contain one string and do not contain another | ^ (caret) |
cat ^ mouse
|
| A combination of search types | ( ) parentheses |
|
- Reports User Interface
- Agent Status Report
- Application Breakdown Report
- Application License Report
- Asset Report
- Auditing Report
- Changed Application Report
- Changed Views Report
- CI Change Report
- CMDB Utilization Report
- Compare Archives Report
- Compare CIs Report
- Compare Snapshots Report
- Configuration Manager Policy Report
- Database Breakdown Report
- Delete Candidates Report
- Dependency Report
- Discovery Errors Report
- Generic Breakdown Report
- Gold Master Report
- Hardware Component Summary Report
- Impact Analysis Report
- Job List Dialog Box
- Migration Progress Report
- Network Device Breakdown Report
- Node OS Breakdown Report
- Node Summary Report
- Node Summary by VLAN Report
- Number of Changes Report
- Recognized Applications Report
- Report Properties Dialog Box
- Reports Page
- Rulebase Support Report
- Scan File Status Report
- Scanner Execution Details Report
- Schedule Report/Snapshot Dialog Box
- Service Discovery Errors Report
- Software Utilization Report
- Solaris Zone Report
- Topology Report
- UD Agent Status Reports
- View Change Report
- VMware Host Report
- VMware Virtual Center Report
- Zone-Based Discovery Errors Report
- Report Toolbar Options
Compare Snapshots Report
This report enables you to compare two snapshots of a specific view taken at different times. It enables you to visualize the differences between the views by comparing the statuses of the view at the times the snapshots were taken.
| Report Example | Click thumbnail to view full size image. |
| To access |
Select Managers > Modeling > Reports. In the Custom Reports pane, do one of the following:
Note You can also take and compare snapshots in IT Universe Manager (for details, see Save Snapshot Dialog Box). |
| Important information |
Note Snapshots taken in a version prior to UCMDB 10.00 cannot be compared with snapshots taken in UCMDB 10.00 or higher. |
| Relevant tasks | |
| See also |
User interface elements are described below (unlabeled elements are shown in angle brackets):
| UI Element (A-Z) | Description |
|---|---|

|
Expand All. Expands the entire hierarchical tree structure of the CIs you selected. |

|
Collapse All. Collapses the hierarchical tree structure of the CIs you selected. |

|
Previous Difference. Finds the previous occurrence of an item marked as changed. |

|
Next Difference. Finds the next occurrence of an item marked as changed. |

|
Show Configuration Files Differences. Shows the difference between the content of the two configuration files. Configuration files use the .xml, .txt or .ini extensions. Select a CI of the CIT Configuration File in both panes and click the Show Differences button. A window opens displaying the differences (marked in blue) in the configuration files. |

|
Show Only Different CIs in Tree. In the <Properties panes>, displays only the part of the tree structure containing CIs that do not match. |

|
Show Only Different Attribute Values. In the <Properties panes>, toggles between displaying all the attribute values of the selected CI or only the attribute values that have changed. |

|
Synchronize Selection. Enables you to select a CI on one side and have its corresponding CI automatically selected on the other side. The default state for the Synchronize Selection button is selected. Deselecting this button allows you to select different CIs from each of the two trees. This enables you to compare two different CIs and see their different properties. |

|
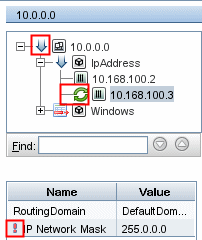
Contains An Updated Item. Indicates that a CI's attribute value has changed. For example, a Contains an Updated Item icon is displayed next to the 10.0.0.0 CI in the figure below since the attribute of its child CI 10.168.100.3 icon has changed.
|

|
Deleted Item. Indicates that a CI has been deleted from the view. |

|
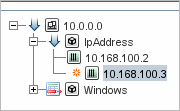
New Item. Indicates that a new CI has been added to the view.
|
|
|
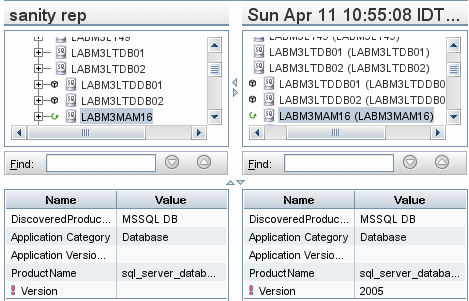
Updated Item. Indicates that the attribute value of a CI has changed. For example, the figure below shows that the CIs LABM3MAM16 displays the Updated Item icon because it was updated with a new Version value, as indicated by the Show Only Different Attribute Values
|
| <Left and right panes> | Displays a hierarchical tree structure of all the CIs in the view for that snapshot version. The left side always represents the older of the two versions. |
| <Properties pane> |
Displays the attributes of the selected CI. The Properties pane contains the following fields:
|
| <Shortcut Menu> | Right-click a CI in the report to access the IT Universe Manager shortcut menu. For details, see IT Universe Manager Shortcut Menu. |
| <Toolbar> | For details, see Report Toolbar Options. |
| Available Snapshots |
Displays the current status and previously saved snapshots of the view selected in the View with Snapshots field. Select the two snapshots you want to compare. By default, snapshots that have been empty for 3 months are hidden. Note Visible when the Show Report Parameters button is pressed. |
| View with snapshots |
Displays the name of the view whose snapshots you want to compare. Only views for which snapshots have been taken are displayed. Note Visible when the Show Report Parameters button is pressed. |
We welcome your comments!
To open the configured email client on this computer, open an email window.
Otherwise, copy the information below to a web mail client, and send this email to cms-doc@microfocus.com.
Help Topic ID:
Product:
Topic Title:
Feedback:


 button
and select Compare Snapshots Report.

