
Searching the Help
To search for information in the Help, type a word or phrase in the Search box. When you enter a group of words, OR is inferred. You can use Boolean operators to refine your search.
Results returned are case insensitive. However, results ranking takes case into account and assigns higher scores to case matches. Therefore, a search for "cats" followed by a search for "Cats" would return the same number of Help topics, but the order in which the topics are listed would be different.
| Search for | Example | Results |
|---|---|---|
| A single word | cat
|
Topics that contain the word "cat". You will also find its grammatical variations, such as "cats". |
|
A phrase. You can specify that the search results contain a specific phrase. |
"cat food" (quotation marks) |
Topics that contain the literal phrase "cat food" and all its grammatical variations. Without the quotation marks, the query is equivalent to specifying an OR operator, which finds topics with one of the individual words instead of the phrase. |
| Search for | Operator | Example |
|---|---|---|
|
Two or more words in the same topic |
|
|
| Either word in a topic |
|
|
| Topics that do not contain a specific word or phrase |
|
|
| Topics that contain one string and do not contain another | ^ (caret) |
cat ^ mouse
|
| A combination of search types | ( ) parentheses |
|


![]()
![]()

- Content Administrator
- Business Analytics components
- Data Management - Best Practices
- Data Management - Install Content Pack
- Customize an Existing Content Pack
- Data Management - Connect Data Source
- Data Management - Configure Consolidation - Management
- Data Management - Add New Configuration
- Data Management - Configure Consolidations - Edit
- Data Management - Run ETL - Content Flow Management
- Data Management - Activate CAPs
- Semantic Layer - Context Management
- Semantic Layer - Data Loader Scheduler
- Semantic Layer - Excel or .CSV File Loader
- SAP BusinessObjects Enterprise Contexts (Universes)
- Import or Export Contexts, Data, KPIs, Metrics, Trees, Pages, or Components
After a Content Pack (CP) is activated, the Content Pack Manager notifies the Content Flow Manager to create a job stream for the CP instance. The job stream includes a series of predefined steps. Each step is an individual job such as an extractor job or an ETL job. The job executes the backend process to pull the data from the data source to the Data Warehouse.
Each CP instance has an individual job and each job can run in parallel.
You can schedule the runs of the CP instances at specific times and you can also schedule the run of a CP instance to start only after a specified CP instance run has completed.
Note Do not modify the consolidation entity configuration when ETL is running or when the KPI engine is running.
Click ADMIN > Data Management > Run ETL.

Tip If you integrate with both CSA and AWS
 ETL (Extract Transform Load)
E - The extract process extracts delta data from the source systems and writes it to delimited flat files on the file system. The data warehouse uses the Change Data Capture (CDC) technique for extracting data from the source tables.
T - The transformation process transforms data into the format of the target tables and populates the load-ready target staging tables. The Transformation layer contains load-ready tables that match the internal structure of the data warehouse target tables.
L - The load process adds new records, updates existing records, and flags deleted records in the data warehouse target layer fact and dimension tables.
The Content Flow Manager supports 2 types of job streams:
- CP instance job stream - The Content Flow Manager executes the CP extractor job, the CP ETL job, and the archive job one by one, pulling data from the data source and loading it into non-consolidation tables. You can schedule this job stream using the Content Flow Management page. For details, see Data Management - Run ETL - Content Flow Management.
- Consolidation job stream - This job stream is created by default. It executes the consolidation job, moving all data from the non-consolidation tables to the consolidation tables. You can schedule the consolidation job stream using the Consolidation Management.
Content Flow Management - High Level Diagram
The diagram below shows how each individual component works with the Content Flow Manager which acts like a coordinator of all other components.
The Content Flow Manager communicates with the Content Pack Manager to get activated content information (CP connection, credential). It also calls the Data Collection Service to start the extractor job for generating the flat file. After that, it calls the ETL service to start the ETL job.
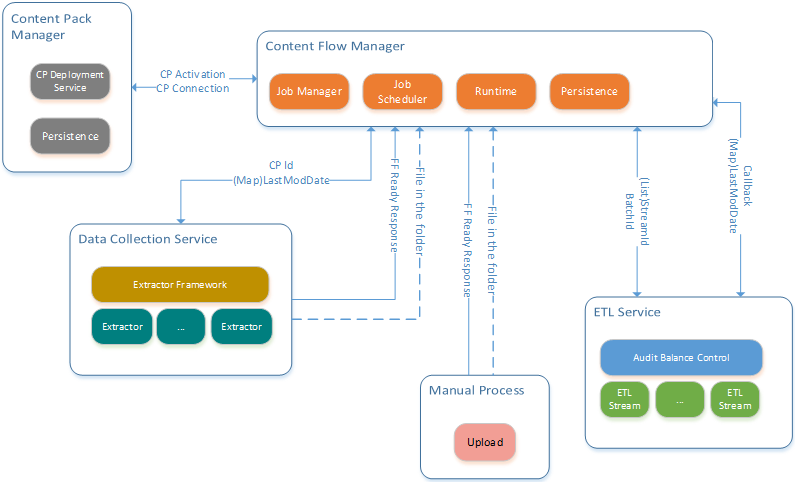
After the CP instance activates, the Content Pack Manager notifies the Content Flow Manager to create a job stream for this CP instance in the back-end. The job stream is composed of a series of predefined steps, each step is an individual job such as an extractor job or an ETL job. The job executes the back-end process to pull the data from the data source to the Data Warehouse.
For details, see Data Management - Configure Consolidation.
The DCS (Data Collection Service) provides the Content Flow Manager with an API that is used to kick off the Extractor job.
The ETL Service provide the Content Flow Manager with API that is used to kick off the ETL run time Job.
- Each ETL run time job is a job instance that contains all related ETL streams under 1 CP instance. The ETL run time job can be for a consolidation or a non-consolidation job.
- Each ETL stream is an instance that maps to 1 specific entity under 1 CP instance. The CP instance contains all related ETL steps under 1 entity.
- Each ETL step is an instance that maps to a specific ETL script (such as EXT, SSI, MSI ….).

Run a job instance using the Content Flow Manager
In the ITBA application:
- Click ADMIN > Data Management > Run ETL.
- Click Scheduler for the relevant instance.
-
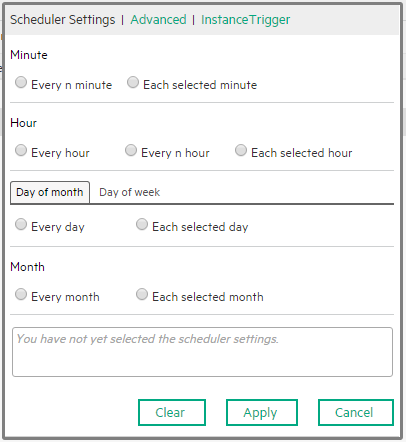
Enter the relevant time stamp for scheduling the job instance run. You can select the options to create the CronExpression in the Scheduler Settings tab, or create the CronExpression directly in the Advanced tab, or select the job instance that is a precondition to the current job instance in the Instance Trigger tab. The CronExpression is build in the box below the options. Click Apply.
- In the Content Flow Management page, verify that the job instance run is scheduled properly.
View the details of the job instance run
In the ITBA application:
- Click ADMIN > Data Management > Run ETL.
-
Click the
 button for the relevant job instance run (you might have to use the scroll bar to see the button). The list of the job instance runs of the instance is displayed. Use the filter to select the runs you want to display. For details, see <Execution Details> Page.
-
Click the
button for the relevant job instance run. The list of the job instance run steps is displayed. For details, see <Step Details> page.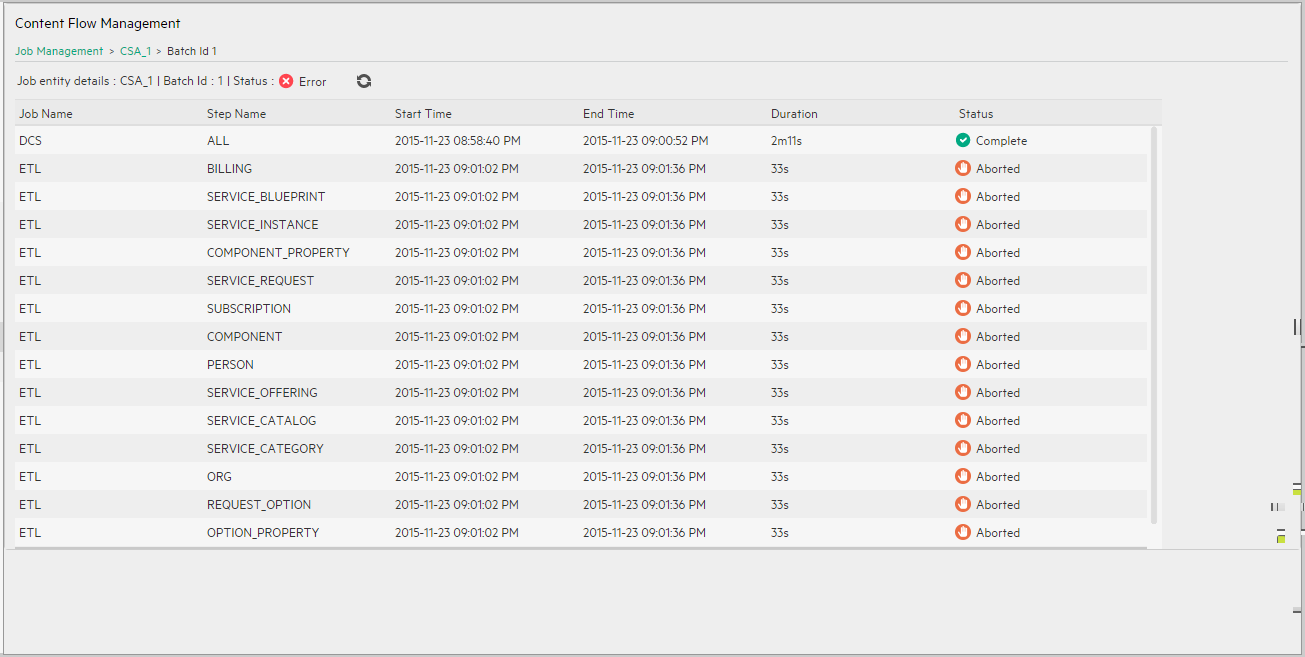
Use-Case - Trigger Business Context calculation from Content Flow Manager
The Administrator wants to trigger the Service Manager Business Context calculation after the ETL stream of the SM instance completes successfully.
-
The Administrator clicks ADMIN > Semantic Layer > Data Loader Scheduler, selects one data load task and in the Set Calculation column, clicks Set (If no existing data load task, click Add Schedule button to create a new data load task).
- The Administrator clicks ADMIN > Data Management > Run ETL, selects the SM instance and in the Set Calculation column clicks Set.
- In the Automatic Engine Calculation Settings dialog box, he selects Trigger the engine to calculate automatically business contexts once stream completes successfully. The list of available Business Contexts become available.
- The Administrator selects the Service Manager Business Context and clicks the arrow to move it to the Selected Business Contexts area.
-
The Admin clicks Apply.
In the Content Flow Management page, Service Manager appears in the table in the Set Calculation column.
Once the stream completes successfully, the engine automatically starts to calculate the Service Manager Business Context.
Use-Case – Trigger Business Context calculation from Data Loader Scheduler
The Administrator wants to trigger the MyBusinessContext Business Context calculation after the automatic data loader loading data from an Excel file completes successfully.
- The Administrator clicks ADMIN > Data Management > Run ETL, selects the relevant instance that imports the data from the Excel file, and in the Engine Calculation column clicks Set.
- In the Automatic Engine Calculation Settings dialog box, he selects Trigger the engine to calculate automatically business contexts once stream completes successfully. The list of available Business Contexts become available.
-
The Administrator selects the MyBusinessContext Business Context and clicks Apply.
The MyBusinessContext string appears in the table in the Engine Calculation column.
Once the data load completes successfully, the engine automatically starts to calculate the MyBusinessContext Business Context.

Content Flow Management page
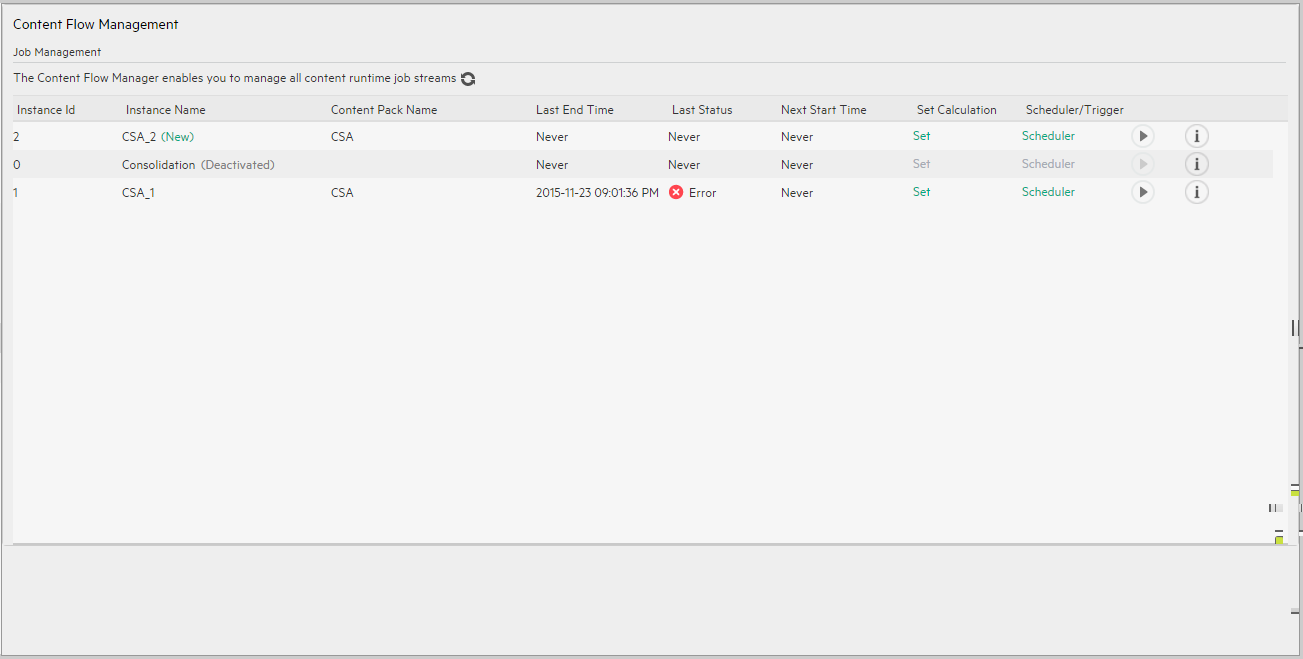
User interface elements are described below (when relevant, unlabeled elements are shown in angle brackets):
| UI Element |
Description |
|---|---|
| Instance Name | The name of the Content Pack instance. |
| Content Pack Name | The name of the Content Pack. |
| Last End Time |
<timestamp>. The timestamp of when the last run ended. Never. The job instance has never run. |
| Last Status |
Never. The job instance has never run. |
| Next Start Time |
<timestamp>. Indicates when the next run will take place. Never. Indicates that the job instance does not have a schedule. |
| Set Calculation |
The Engine and the ETL mechanism are working as a separate modules under the same application. They work separately. You can schedule the automatic engine calculations for the approximate time the ETL finishes running. But when the ETL fails to complete the calculation runs anyway based on older data instead of fresh data brought in by the ETL run. The Engine Automatic Calculation Settings dialog box enables you to trigger the engine to calculate automatically the selected Business Contexts as soon as the stream completes successfully.
Trigger the engine to calculate automatically business contexts once stream completes successfully. Click to calculate automatically the selected Business Contexts as soon as the stream completes successfully.
Use the arrows to move the Business Contexts to the Selected Business Contexts area. Note If you configure the triggering of the same Business Context from the calculation scheduler in the STUDIO, or in the Engine Automatic Calculation Settings dialog box in Content Flow Management, there could be a situation when the engine tries to calculate the same Business Context at the same time. When the triggering is manual, the system notifies you that the calculation of this business context is running and to try again later. When the scheduling is automatically triggered, the engine runs the calculation of the Business Context only after the previous was run ended. For details on scheduling the calculation in the STUDIO, see Calculation Schedulingin the. |
| Scheduler/Trigger |
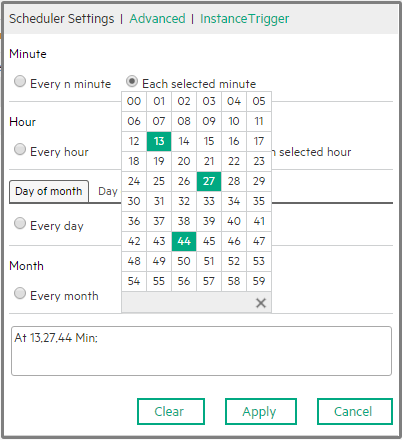
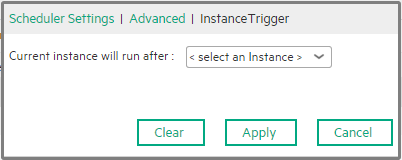
Click Scheduler to add a schedule or to edit an existing schedule. The following dialog box opens. Select the Schedule Settings, the Advanced tab, or the Instance Trigger tab.
|
|
Use the dialog box to build the CronExpression that specifies the triggering schedule of the job. When you select:
|
|
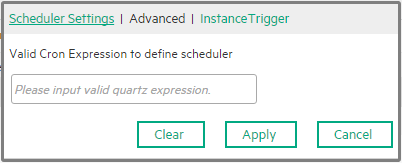
Specify the Cron Expression you want to use to define the schedule. The CronExpression consists of seven sub-expressions that describe individual details of the schedule, when to trigger it, and when to stop. Syntax: <seconds> <minutes> <hours> <day-of-month> <month> <day-of-week> <year>
Examples:
Note Some scheduling requirements are too complicated to express with a single trigger - such as "every 5 minutes between 9:00 am and 10:00 am, and every 20 minutes between 1:00 pm and 10:00 pm". The solution in this scenario is to simply create two triggers, and register both of them to run the same job. |
|
|
Specify the instance that must be completed before running the current instance.
Example: While configuring ppm02, you set, in the scheduler Instance Trigger, that the Current instance will run after ppm01, then every time ppm01 completes, ppm02 starts running automatically. |
|

|
Click to run the Scheduler. |

|
This button is displayed when the Scheduler is running. Click the button to abort the run. |
|
|
Click to display the details of the run. For details, see below. |
 Error. Indicates that an error occurred in the last job instance run.
  Aborted. Indicates that the job instance run did not take place because no schedule was specified or because the run was aborted manually.
 Complete. Indicates that the job instance has completed.
 Processing. Indicates that the job instance is processing.
 Timeout. Indicates that the job instance is in timeout.
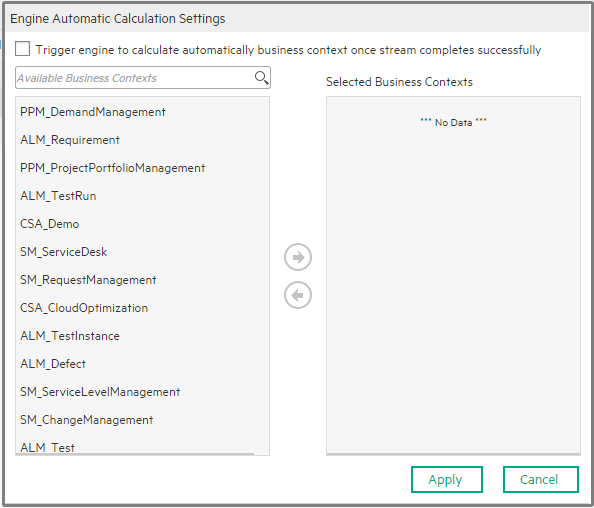
 Enter the relevant string to search for specific Business Contexts.
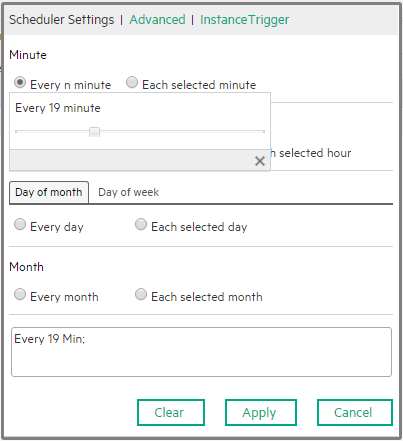
<Execution Details> Page
User interface elements are described below (when relevant, unlabeled elements are shown in angle brackets):
| UI Element |
Description |
|---|---|
| <breadcrumbs |
The breadcrumbs display the name of the job instance that was run. Click Job Management to return to the Content Flow Management page. |
| Status |
Select the status for which you want to filter the list of the job instance runs:
|
| From | Click  to select the starting date of the search. to select the starting date of the search. |
| To | Click to select the end date of the search. |
| Search | Click to filter the list of job instance runs. |
| Batch Id | The ID of the batch job instance run. |
| Call Time |
The time when the job instance run has been created. |
| Start Time | The time when the job instance run executed. It the run is aborted before it starts, the column is empty. |
| End Time |
The time when the job instance run completed or was aborted. |
| Duration | The time it took to run the job instance. |
| Status |
Waiting. Indicates that the job instance is waiting. |
|
|
Click to display the steps of the job instance run. For details, see below. |
 Displays only the aborted runs.
 Displays only the completed runs.
 Displays only the runs with errors.
 Displays only the runs that are currently processing.
 Displays only the runs with timeout.
 Complete. Indicates that the job instance has completed.
<Step Details> page
User interface elements are described below (when relevant, unlabeled elements are shown in angle brackets):
| UI Element |
Description |
|---|---|
| <breadcrumbs |
The breadcrumbs display the name of the job instance that was run and the batch ID of the step. The batch ID is the execution ID. It is incremented each time the step is run. Click Job Management to return to the Content Flow Management page or click the instance name to return to the Content Flow Management job run details page. |
| <Summary> | The summary line shows: the name of the run, the batch ID of the step, the status. |

|
Click to refresh the display. |
| Job Name |
The name of the job can be:
|
| Step Name |
The name of the step. The entity name is relevant only for ETL jobs in CP job instances. The entity name is not relevant for Consolidation jobs, so for this type of job, the value of Entity name is NA. |
| Start Time | The time when the job step run was started. |
| End Time |
The time when the job step run completed. |
| Duration | The time it took to run the job step. |
| Status |
|
We welcome your comments!
To open the configured email client on this computer, open an email window.
Otherwise, copy the information below to a web mail client, and send this email to SW-Doc@hpe.com.
Help Topic ID:
Product:
Topic Title:
Feedback: