
Searching the Help
To search for information in the Help, type a word or phrase in the Search box. When you enter a group of words, OR is inferred. You can use Boolean operators to refine your search.
Results returned are case insensitive. However, results ranking takes case into account and assigns higher scores to case matches. Therefore, a search for "cats" followed by a search for "Cats" would return the same number of Help topics, but the order in which the topics are listed would be different.
| Search for | Example | Results |
|---|---|---|
| A single word | cat
|
Topics that contain the word "cat". You will also find its grammatical variations, such as "cats". |
|
A phrase. You can specify that the search results contain a specific phrase. |
"cat food" (quotation marks) |
Topics that contain the literal phrase "cat food" and all its grammatical variations. Without the quotation marks, the query is equivalent to specifying an OR operator, which finds topics with one of the individual words instead of the phrase. |
| Search for | Operator | Example |
|---|---|---|
|
Two or more words in the same topic |
|
|
| Either word in a topic |
|
|
| Topics that do not contain a specific word or phrase |
|
|
| Topics that contain one string and do not contain another | ^ (caret) |
cat ^ mouse
|
| A combination of search types | ( ) parentheses |
|


![]()
![]()

- System Administrator
- Logon
- Splash Screen
- Launch or Stop the Business Analytics Application
- Configure CAC
- Licenses
- About Users, Roles, Resources, Permissions, LDAP, and Dimension Permissions
- Users and Roles - User Management
- Users and Roles - Role Management
- Users and Roles - Resource Management
- Users and Roles - LDAP Management
- LDAP in BusinessObjects
- Users and Roles - Dimension Permissions
- Settings
- Settings - Data Warehouse
- Settings - Foundation
- Settings - Single Sign On
- Settings - Pages
- Settings - Website
- Settings - Dashboard Settings
- Settings - Engine Settings
- Settings - Score Thresholds
- Settings - BA Settings
- Apache Web Server
- Security Recommendations
- LW-SSO
- Cryptography
- Set Up Java
- Localization and Globalization
- Xcelsius Reports
- Browsers and BOE Reports
- Notifications - Entity Report
- External Tools
- Migrate from a Development or Test Environment to Production
- Vertica Back Up
- Business Analytics Back Up
- Disaster and Recovery
Users and Roles - Role Management
You can define user roles and application permissions in the ADMIN tab. You can also assign resources to specific permissions.
Select ADMIN> Users and Roles > Role Management.

 Roles and Permissions
Each role contains set of permissions. Permissions define which actions can be performed by the user. For example, you can create a role that enables its users to create pages or view specific ones. In some cases, actions can be performed according to the resource attached to a permission.
Note Users that are created in the ADMIN tab and require permissions to view reports pages, must be assigned those permissions in SAP BusinessObjects Enterprise.
Resources
A resource is a logical group of one or more ITBA application data items (for example pages). Once you define resources, you attach the resources to a permission. For example, you can specify that the CIO has View permissions for CIO resources, while the Administrator has View permissions for all resources.
Tip It is recommended to define resources prior to defining roles. For details, see Users and Roles - Resource Management.
Pre-Defined Roles
Note Every out-of-the-box Scorecard has its own dedicated resource and role.
ITBA roles can be assigned any permissions. ITBA roles are available with the following out-of-the-box permissions:
| Pre-Defined Role (from A-Z) | Description | Permissions | Module | ||||||||||||||||||||||||||||||||||||||
|---|---|---|---|---|---|---|---|---|---|---|---|---|---|---|---|---|---|---|---|---|---|---|---|---|---|---|---|---|---|---|---|---|---|---|---|---|---|---|---|---|---|
| Administrator |
The application administrator. When a user with the Administrator role activates a CAP, everyone get permissions to view, edit, delete all the Scorecards in the CAP. |
All Permissions | IT Business Analytics | ||||||||||||||||||||||||||||||||||||||
| Scorecard Administrator |
Creates and manages specific Scorecards and Pages. Only a user with the Scorecard Administrator role can view the created Scorecard. Once a Scorecard is created, the system automatically generates a resource for the Scorecard and a role called GEN_<Scorecard name>. This Scorecard can then only be managed by the Scorecard creator and users with the relevant GEN_<Scorecard name> role. In Dashboard, a user can only see a Scorecard when he has the relevant permission. If a component is configured with a specific Scorecard, Perspective, Objective, KPI, or KPI Breakdown, the user cannot see it, and the following message appears: When a user with the Scorecard Administrator role activates a CAP, only the user gets permissions to view, edit, delete all the Scorecards in the CAP. When a user with the Scorecard Administrator role drags a KPI from the Public Metrics and KPIs directory into a Scorecard in the Studio, a clone of the KPI is added to the Scorecard and the original KPI remains in the Public Metrics and KPIs directory to be available for other Scorecard Administrators. If a user with the Administrator role drags a KPI from the Public Metrics and KPIs directory into a Scorecard in the Studio, the KPI is added to the Scorecard and is removed from the Public Metrics and KPIs directory. |
Administer Pages Cascade Scorecard Explorer Access Manage Annotation Manage Page Select KPI Studio Data Set |
IT Business Analytics | ||||||||||||||||||||||||||||||||||||||
| Viewer |
Note The Viewer user list of permissions cannot be modified (by any user). |
|
Pre-Defined Permissions
| ITBA Application Elements | Create and Edit | View |
|---|---|---|
| Studio |
|
|
| Explorer | N/A |
|
| Admin |
|
|
|
|
|
|
|
|
|
|
|
|
|
|
|
|
|
|
|
|
| Dashboard |
|
|
|
|
|
|
|
|
| Annotations (in Dashboard and Explorer) |
|
|

Create a role
- Select ADMIN> Users and Roles > Role Management.
- In the Roles area, click
 to create a new role.
 - Enter the name and description for the role.
- Click OK to save your role.
After creating a role, follow the procedure for attaching permissions and resources.
Edit role details
- Select ADMIN> Users and Roles > Role Management.
- In the Roles area, select a role.
- In the Role Details area, click Edit Details.
- Edit the role as required and click OK.
Attach permissions
- Select Admin > Users and Roles > Role Management.
- In the Roles area, select a role.
- In the Role Details area, click
 . The Assign Permission to Role wizard opens.
 - Select a permission from the list.
- Attach a resource to the selected permission, if required.
- Complete the wizard procedure to save your assignments.
- Log off from ITBA and log on again to complete the permission assignments.
Add a resource to a permission
- Select ADMIN> Users and Roles > Role Management.
- In the Roles area, select a role.
- In the Permissions list select a permission.
- Click
 to open the Assign Resources to Permissions page in the Assign Permission to Role wizard.
 - Select a permission and use the arrows to move the required resources from the Available Resources list to the Selected Resources list.
Use Case - Permissions
For details, see Permissions .

Role Management Page
Click  to refresh the page.

-
User interface elements are described below (when relevant, unlabeled elements are shown in angle brackets):
UI Element
Description
Create Role. Creates a new role.

Enter the Role Name and Role Description and click OK.

Delete Role. Deletes the selected role.
Click Refresh to refresh the display.
When in ITBA, when you navigate to another tab and then return to Admin > Users and Roles, the display is not automatically refreshed. To refresh the display, click
in the toolbar.<Role List> A list of roles currently defined in the ADMIN tab. When you select a role, the details appear in the Role Details area and Permissions list.
For a list of pre-defined roles, see Pre-Defined Roles.
-
User interface elements are described below (when relevant, unlabeled elements are shown in angle brackets):
UI Element
Description Role Name The name of the selected role. Role Description The description of the selected role. Edit Details Edits the selected role name and description.

Attach permission. Assigns selected permissions to roles. You select permissions using the Assign Permission to Role wizard. For user interface details, see Assign Permission to Role Wizard.

Manage permission. Modifies the selected permission. Opens the Assign Resources to Permissions page in the Assign Permission to Role wizard. For user interface details, see Assign resources to permissions page.
Detach permission. Removes the selected permission from the role.
Permissions List The list of permissions and resources for the selected role. Permission The permission sets and permissions attached to the selected role. Resources The list of resources for each permission.
Not Applicable. None of the available resources apply to this permission. For details, see Users and Roles - Resource Management.
<Resource Name>. The permission is attached to a specific resource.
All. The permission is applicable to all resources.
Assign Permission to Role Wizard
This wizard enables you to assign permissions to the selected role, as well as assign resources to the permissions. Click to access the wizard.
| Wizard Map |
The Assign Permission to Role wizard contains: Select Permission Page > Assign Resources to Permissions Page > Confirmation Page. |
-

This page may lead directly to the Confirmation page depending on whether the selected permission has resources attached.
User interface elements are described below (when relevant, unlabeled elements are shown in angle brackets):
UI Element
Description <Permissions tree> Select a permission from the tree.
Displays the pre-defined permissions. For details, see Pre-Defined Permissions.
-
Assign resources to permissions page
This page only appears if the permissions are applicable for a resource.
Note Click
to access this page directly.
User interface elements are described below (when relevant, unlabeled elements are shown in angle brackets):
UI Element
Description Permission A tree containing the permissions. 
Select a permission and use the arrows to move the required resources from the Available Resources list to the Selected Resources list.
Available and Selected Resources Each permission can be applicable for specific resources, for all resources, or not applicable to a resource. -
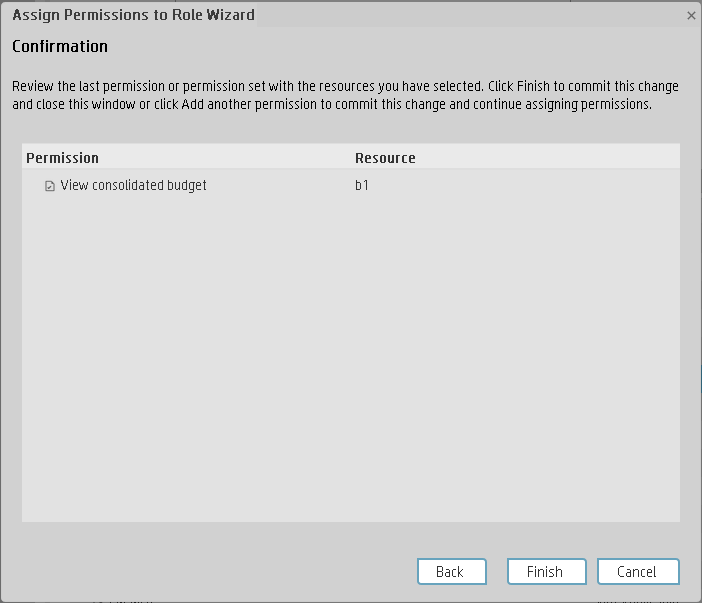
User interface elements are described below (when relevant, unlabeled elements are shown in angle brackets):
UI Element
Description Permission The permissions assigned to this role. Resource The list of resources associated with the each permission. Add another Click to commit the current permission and continue in the wizard to add another permission. The Select Permission Page opens.
Finish Click to commit the assigned permissions and finish wizard functions. Cancel Click to cancel the current assignment. All previous actions in the wizard are still valid.
We welcome your comments!
To open the configured email client on this computer, open an email window.
Otherwise, copy the information below to a web mail client, and send this email to SW-Doc@hpe.com.
Help Topic ID:
Product:
Topic Title:
Feedback: