
Searching the Help
To search for information in the Help, type a word or phrase in the Search box. When you enter a group of words, OR is inferred. You can use Boolean operators to refine your search.
Results returned are case insensitive. However, results ranking takes case into account and assigns higher scores to case matches. Therefore, a search for "cats" followed by a search for "Cats" would return the same number of Help topics, but the order in which the topics are listed would be different.
| Search for | Example | Results |
|---|---|---|
| A single word | cat
|
Topics that contain the word "cat". You will also find its grammatical variations, such as "cats". |
|
A phrase. You can specify that the search results contain a specific phrase. |
"cat food" (quotation marks) |
Topics that contain the literal phrase "cat food" and all its grammatical variations. Without the quotation marks, the query is equivalent to specifying an OR operator, which finds topics with one of the individual words instead of the phrase. |
| Search for | Operator | Example |
|---|---|---|
|
Two or more words in the same topic |
|
|
| Either word in a topic |
|
|
| Topics that do not contain a specific word or phrase |
|
|
| Topics that contain one string and do not contain another | ^ (caret) |
cat ^ mouse
|
| A combination of search types | ( ) parentheses |
|


![]()
![]()

This section describes the integration, contexts, KPIs, Metrics, and reports, if any, associated with the integration with the Application Lifecycle Management data source. The purpose of the integration of ALM as a data source is to bring quality management information into the Data Warehouse.
The data warehouse is connected to ALM through high-level integration processes. A set of database views enables the extraction of the main ALM objects.
For details about Application Lifecycle Management (ALM), see http://www8.hp.com/us/en/software-solutions/alm-software-development-testing/index.html.
Note To locate ALM documentation in the HPE Manual Site, you may have to input QC in the search field.
Tip The integration of ITBA with ALM is not supported while:
- ALM is using Common Access Card (CAC).
- ALM is using an external authentication access method.
Select ADMIN > Data Management > Connect Data Source then click Activate to activate the integration processes for the ALM data source.

 Content Packs and their functionality
To learn about Content Packs and their functionality, see Data Management - Connect the Data Sources .
Important Information
-
ALM supports multiple instances of the Content Pack.
-
DCS Integration: An extractor using the Data Collection Service mechanism that extracts entities from the source and generates corresponding flat files. For details, see Data Collection Service (DCS) .
-
All fields are case-sensitive.
-
Port 8080 / 8443 must be available.
ALM Adapter Limitations
- To control the data extraction page size from the Data Warehouse server side, set the alm.page.size parameter to 1000 in $HPBA_HOME/ContentPacks/ALM/EXTRACTOR/extractor-alm/setting.properties.
- The ALM Adapter transfers the relevant information from the ALM data source. In the ALM Site Administration, select the Site Configuration tab and make sure that the REST_API_MAX_PAGE_SIZE configuration is at least 2000 pages. In the ALM activation page in ALM, the alm.page.size setting should be equal to or less than the REST_API_MAX_PAGE_SIZE setting.

Activate the Integration
-
Prerequisites:
-
Port 8080 / 8443 must be available.
-
-
Select ADMIN > Data Management > Install Content Pack then click the install button relevant for the data source.
-
Select ADMIN > Data Management > Connect Data Source then click Add data source.
-
The Add Data Source page opens. Select the ALM data source type.
-
Select or enter the configuration parameters.
-
Click Next to proceed to the validation page.
Connect to ALM on a Secured Connection
-
Export the ALM SSL certificate to a file. For details, see the ALM Hardening Guide.
-
After the installation procedure is finished, reveal the ALM certificate to Data Warehouse, you import the SSL certificate trusted by the ALM server into the JDK key store using the keytool.exe tool provided by the JDK by running the command :
On the server side (glassfish): Run the $HPBA_Home/jdk/jre/bin/keytool" -importcert - alias <alias> -file <path_to_certificate>" –keystore"<JRE>/lib/security/cacerts" - trustcacerts -storepass changeit command.
-
Select the Is secured toggle-button in the activation parameters screen.
-
Change the port to a secured port (default is 8443).
Note
-
The default password for JVM keystore is changeit. If this password was not changed before, use the default keystore password for certificate import.
-
In Connect Data Source, the specified machine name must be identical to the name of the machine for which the certificate is issued.
ALM Customization
ALM Demand Management provides system parameter fields. You can change name and data length of these parameter fields in ALM Demand Management, depending on your purpose and requirements.
To support all customers’ KPIs, all ALM customized fields of Demand Management are populated to the Data Warehouse and added as place holders in the universe. You can use these fields in BA KPI formulas.
Related Dimension Tables and Views
Related Dimension Tables
- REQUIREMENT_PLHD_DIM
- PROJECT_PLHD_DIM
- DEFECT_PLHD_DIM
- TEST_PLHD_DIM
- TESTINSTANCE_PLHD_DIM
- TESTRUN_PLHD_DIM
- TESTSET_PLHD_DIM
Related Views
- REQUIREMENT_PLHD_DIM_V
- PROJECT_PLHD_DIM_V
- DEFECT_PLHD_DIM_V
- TEST_PLHD_DIM_V
- TESTINSTANCE_PLHD_DIM_V
- TESTRUN_PLHD_DIM_V
- TESTSET_PLHD_DIM_V
Consolidate Between ALM and PPM
If you are integrating ALM and PPM data sources, the consolidation process between ALM and PPM identifies ALM releases as child- projects of PPM projects.You can map which release of the ALM domain is connected to the specific PPM project. The manual mapping must be performed before running ETL.
To configure ALM and PPM consolidation:
-
Navigate to $HPBA_HOME/ContentPacks/ALM/EXTERNAL/.
-
Open the ALM_RELEASE_MAPPING.csv file.

-
Note Do not remove the header row. In addition, if the spreadsheet has a dummy row under the header row, do not edit or delete the dummy record. This record tells the ETL process what data type to use when processing the column.
-
Save your additions and changes.
Configure ALM Reopen Events
You can configure a defect's reopen event by mapping which defect status changes can trigger a reopen event. When you configure the file, all of these status changes are marked as reopen events. This allows for a dynamic configuration of reopen events mapping.
To configure reopen event mapping:
-
Navigate to $HPBA_HOME/ContentPacks/ALM/EXTERNAL.
-
Open the ALM_DEFECT_REOPEN_MAPPING.csv file.
-
Enter the required defect status, for example, old_value = Fixed, new_value= Open. All records that match this pattern will be marked as reopen event.
-
Save your additions and changes.
Note Configuration must be done prior to running ETL. If data is processed without this configuration, no reopen events will be calculated (besides the out-of-the-box ones).
Configure ALM_PAGE_SIZE
In the ALM Site Administration, select the Site Configuration tab and make sure the REST_API_MAX_PAGE_SIZE configuration is at least 2000. I

ALM Activation Page
The data warehouse is connected to ALM through high-level integration processes. A set of database views enables the extraction of the main ALM objects.
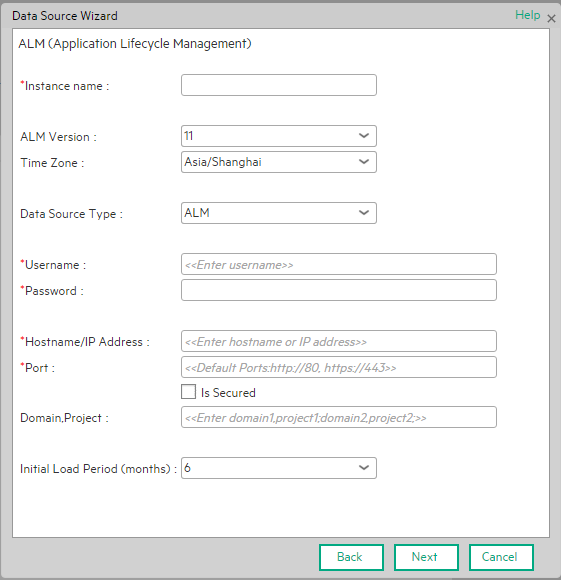
Mandatory fields are marked with a red asterisk.
User interface elements are described below:
|
UI Element |
Description |
|---|---|
| Instance name | Enter a name for the data source instance you are activating. |
| ALM Version |
Select the relevant version. For details, see the .. |
| Time Zone | Select the time zone for the data source. |
| Data Source Type | Select the data source type. |
| Username | Enter the username used to log on to ALM. |
| Password | Enter the password used to log on to ALM. |
| Hostname/IP Address |
Enter the hostname of the server on which ALM is installed. Note In the case of SSL secured connection, the server hostname must be identical to the name to which the certificate was issued. |
| Port |
Enter the server port number. Default port for http protocol: 80 Default port for https protocol: 443 |
| Is Secured |
Select the option to use the https protocol. Default protocol is http. |
| Domain,Project |
Enter the domain and project pair, separated by a semicolon ";". Example domain1,project1;domain2,project2;domain3,project3. A * represents all projects. For example: domain1,*;domain2,project2. This means the ALM extractor extracts all projects under domain1, and only project2 under domain2. Note If you do not specify the domain and project pair, the ETL extracts data from all domains and projects. |
| Initial Load Period (months) | Select the number of months from which you want the initial data loaded. |

ALM-Related KPIs and Metrics
For a list of the ALM-related KPIs and Metrics, see KPIs and Metrics.
Place Holder Mapping
The place holder entities: DEFECT_PLHD, REQUIREMENT_PLHD, PROJECT_PLHD columns are listed below with their corresponding context columns:
| DEFECT_PLHD | |
|---|---|
| DEFECT_PLHD.BG_USER_05 | OpenClose |
| DEFECT_PLHD.BG_USER_06 | SecurityImpact |
| DEFECT_PLHD.BG_USER_14 | LastDate |
| DEFECT_PLHD.BG_USER_15 | CloseInDate |
| DEFECT_PLHD.BG_USER_16 | OpenInDate |
| DEFECT_PLHD.BG_USER_22 | NewInDate |
| DEFECT_PLHD.BG_USER_24 | FixedInDate |
| DEFECT_PLHD.BG_USER_27 | GlobalID |
| DEFECT_PLHD.BG_USER_34 | DevelopmentEngineer |
| DEFECT_PLHD.BG_USER_36 | InvestigationEngineer |
| DEFECT_PLHD.BG_USER_41 | SourceIncidentID |
| DEFECT_PLHD.BG_USER_43 | IssueType |
| DEFECT_PLHD.BG_USER_44 | CustomerCompany |
| DEFECT_PLHD.BG_USER_45 | CustomerEmail |
| DEFECT_PLHD.BG_USER_63 | ResolutionNote |
| DEFECT_PLHD.BG_USER_64 | CustomerNote |
| DEFECT_PLHD.BG_USER_71 | ReopenCount |
| DEFECT_PLHD.BG_USER_83 | Regression |
| DEFECT_PLHD.BG_USER_84 | EscalationStatus |
| DEFECT_PLHD.BG_USER_89 | Workaround |
| DEFECT_PLHD.BG_USER_95 | Team |
| PROJECT_PLHD | |
| PROJECT_PLHD.REL_USER_04 | ReleaseState |
| PROJECT_PLHD.REL_USER_05 | PRS_ID |
| PROJECT_PLHD.REL_USER_06 | PRS_MR_Date |
| PROJECT_PLHD.REL_USER_10 | ReleaseType |
| REQUIREMENT_PLHD | |
| REQUIREMENT_PLHD.RQ_USER_52 | EstimatedCompletedDate |
| REQUIREMENT_PLHD.RQ_USER_50 | ActualCompletedDate |
| REQUIREMENT_PLHD.RQ_USER_01 | Status |
| REQUIREMENT_PLHD.RQ_USER_20 | Team |
| REQUIREMENT_PLHD.RQ_USER_44 | QAStatus |
| REQUIREMENT_PLHD.RQ_USER_47 | ActualStartDate |
| REQUIREMENT_PLHD.RQ_USER_49 | ActualEndDate |
| REQUIREMENT_PLHD.RQ_USER_48 | ActualImpDate |
We welcome your comments!
To open the configured email client on this computer, open an email window.
Otherwise, copy the information below to a web mail client, and send this email to SW-Doc@hpe.com.
Help Topic ID:
Product:
Topic Title:
Feedback: