
Searching the Help
To search for information in the Help, type a word or phrase in the Search box. When you enter a group of words, OR is inferred. You can use Boolean operators to refine your search.
Results returned are case insensitive. However, results ranking takes case into account and assigns higher scores to case matches. Therefore, a search for "cats" followed by a search for "Cats" would return the same number of Help topics, but the order in which the topics are listed would be different.
| Search for | Example | Results |
|---|---|---|
| A single word | cat
|
Topics that contain the word "cat". You will also find its grammatical variations, such as "cats". |
|
A phrase. You can specify that the search results contain a specific phrase. |
"cat food" (quotation marks) |
Topics that contain the literal phrase "cat food" and all its grammatical variations. Without the quotation marks, the query is equivalent to specifying an OR operator, which finds topics with one of the individual words instead of the phrase. |
| Search for | Operator | Example |
|---|---|---|
|
Two or more words in the same topic |
|
|
| Either word in a topic |
|
|
| Topics that do not contain a specific word or phrase |
|
|
| Topics that contain one string and do not contain another | ^ (caret) |
cat ^ mouse
|
| A combination of search types | ( ) parentheses |
|


![]()
![]()

Integration with Azure
The purpose of the integration of Azure as a data source is to bring Azure information into the Data Warehouse.
The integration with Azure provides a general idea on how much money is spent on each Virtual Machine daily by different usage types. In addition, if the diagnostics function is enabled, you can also view the CPU utilization and Memory.
The data extracted from Azure is correlated to the data available in the KPIs and reports available in the CSA CAP. For details, see CSA_Demo and CSA CAPs .
For details about Microsoft Azure, see https://azure.microsoft.com/en-us/.
Select ADMIN > Data Management > Connect Data Source then click Add data source and select Azure to activate the integration processes for the Azure data source.

 Content Packs and their functionality
To learn about Content Packs and their functionality, see Data Management - Connect the Data Sources.
Important Information
-
The Azure Content Pack supports multiple instances.
-
DCS Integration: An extractor using the Data Collection Service mechanism that extracts entities from the source and generates corresponding flat files. For details, see Data Collection Service (DCS) .
-
All fields are case-sensitive.
Azure Usage Data.
For performance reasons, the ETL job extracts only, at most, 1 month of data for the initial and delta loads.
Utilization Data.
For performance reasons, the ETL job extracts only, at most, 1 week of data for the initial and delta loads.
Azure utilization data is based on the latest Microsoft Azure preview portal function. Make sure you switch on Diagnostic for the Microsoft Azure Cloud VM instances, to have utilization data returned by the Microsoft Azure Cloud Service API.
Limitation:
- You can create Virtual Machines, storage, web apps, and a lot of other components with one subscription ID under a global account of Azure. If the Virtual Machine type is Windows, BA can obtain the name of the Cloud Services and provide its utilization data. If the Virtual Machine type is Linux, BA cannot obtain the name of the Cloud Services and provide its utilization data. The impact is on the SERVICE_PROVIDER_UTILIZATION_FACT entity.
- In Azure, you can enter your VM name when creating the VMs, and it is possible to use the same VM name for different Cloud Services. Due to the above limitation, the deployment ID is not displayed in the storage table, making it impossible to know the VM from which the metric data originates. So it is recommended not to create VMs with the same name.
-
When using CSA with Azure Content Pack version: 14.12, and the OOTB design : CSL_BP_MICROSOFT_AZURE_COMPUTE_3.20_CP3.0, Azure usage related data is displayed in the CSA-Resource Usage and Utilization for Consumer and CSA_Resource Usage and Utilization for Resource Supplier Manager reports, but Azure CPU utilization data is not available and is not displayed in these reports.

Create an application in Azure portal
-
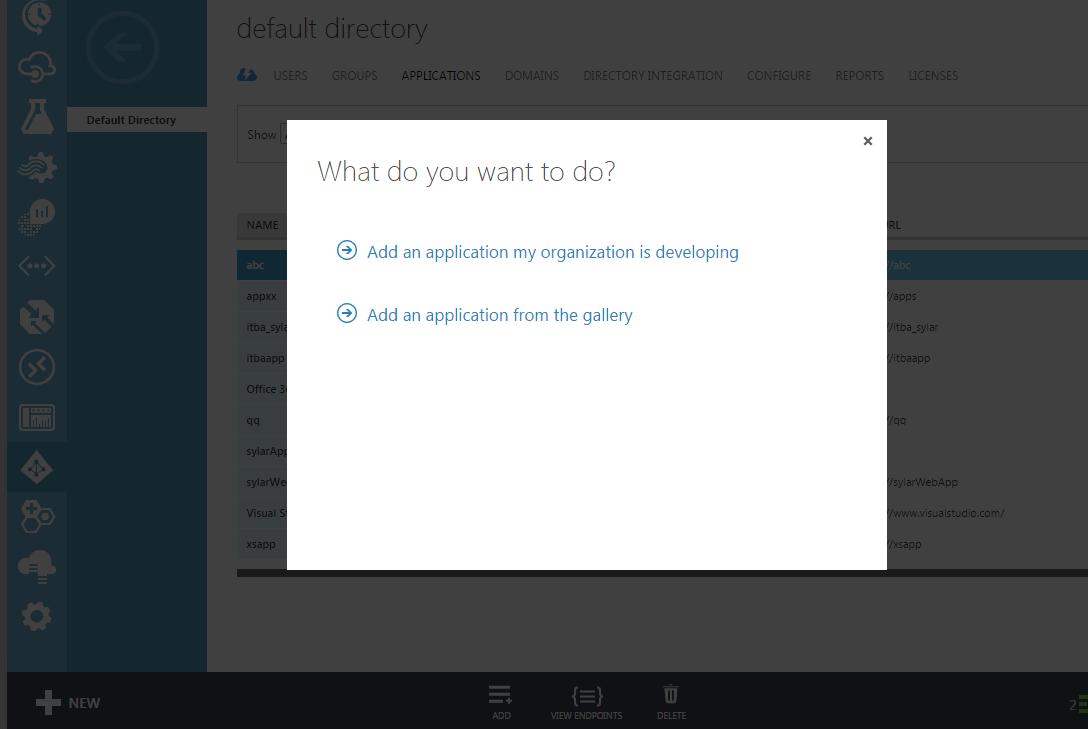
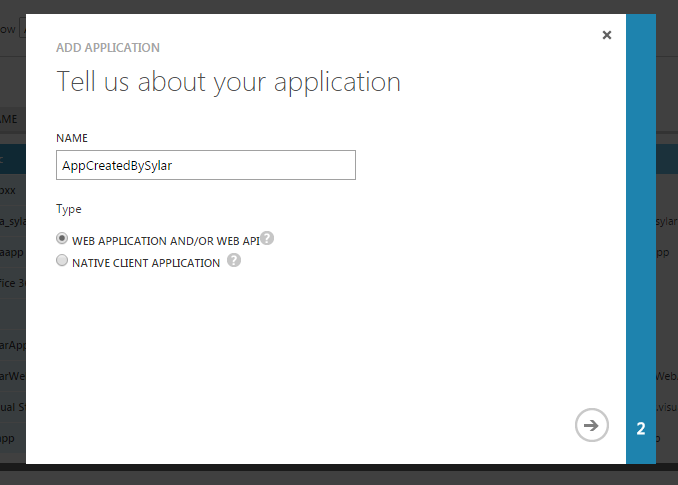
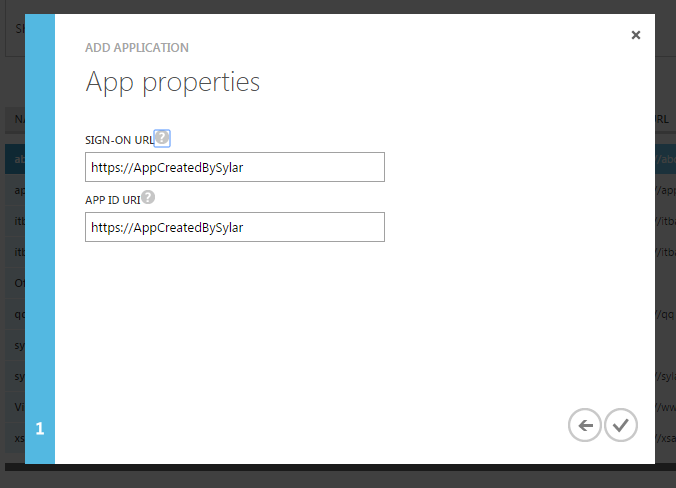
To create an application in the Azure portal, open: https://manage.windowsazure.com/ and click ACTIVE DIRECTORY > Default Directory > APPLICATIONS > ADD > Add an application my organization is developing.
-
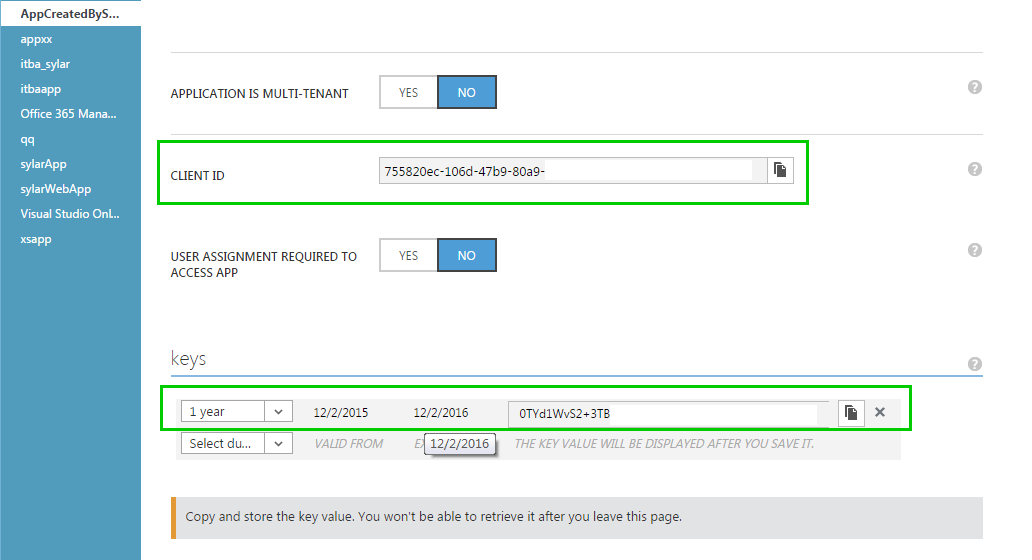
Click <Application_just_created> > CONFIGURE > keys > Select Duration > Save to get the key as App password; and the CLIENT ID as App id. They are used when configuring the data source in ITBA.
Assign permission to subscriptions in the Azure portal
-
To assign permissions to subscriptions in the Azure portal, open: https://portal.azure.com/ and click Subscriptions , select the relevant subscription for which the customer wants to view data in ITBA, click Access (Roles) > Reader .
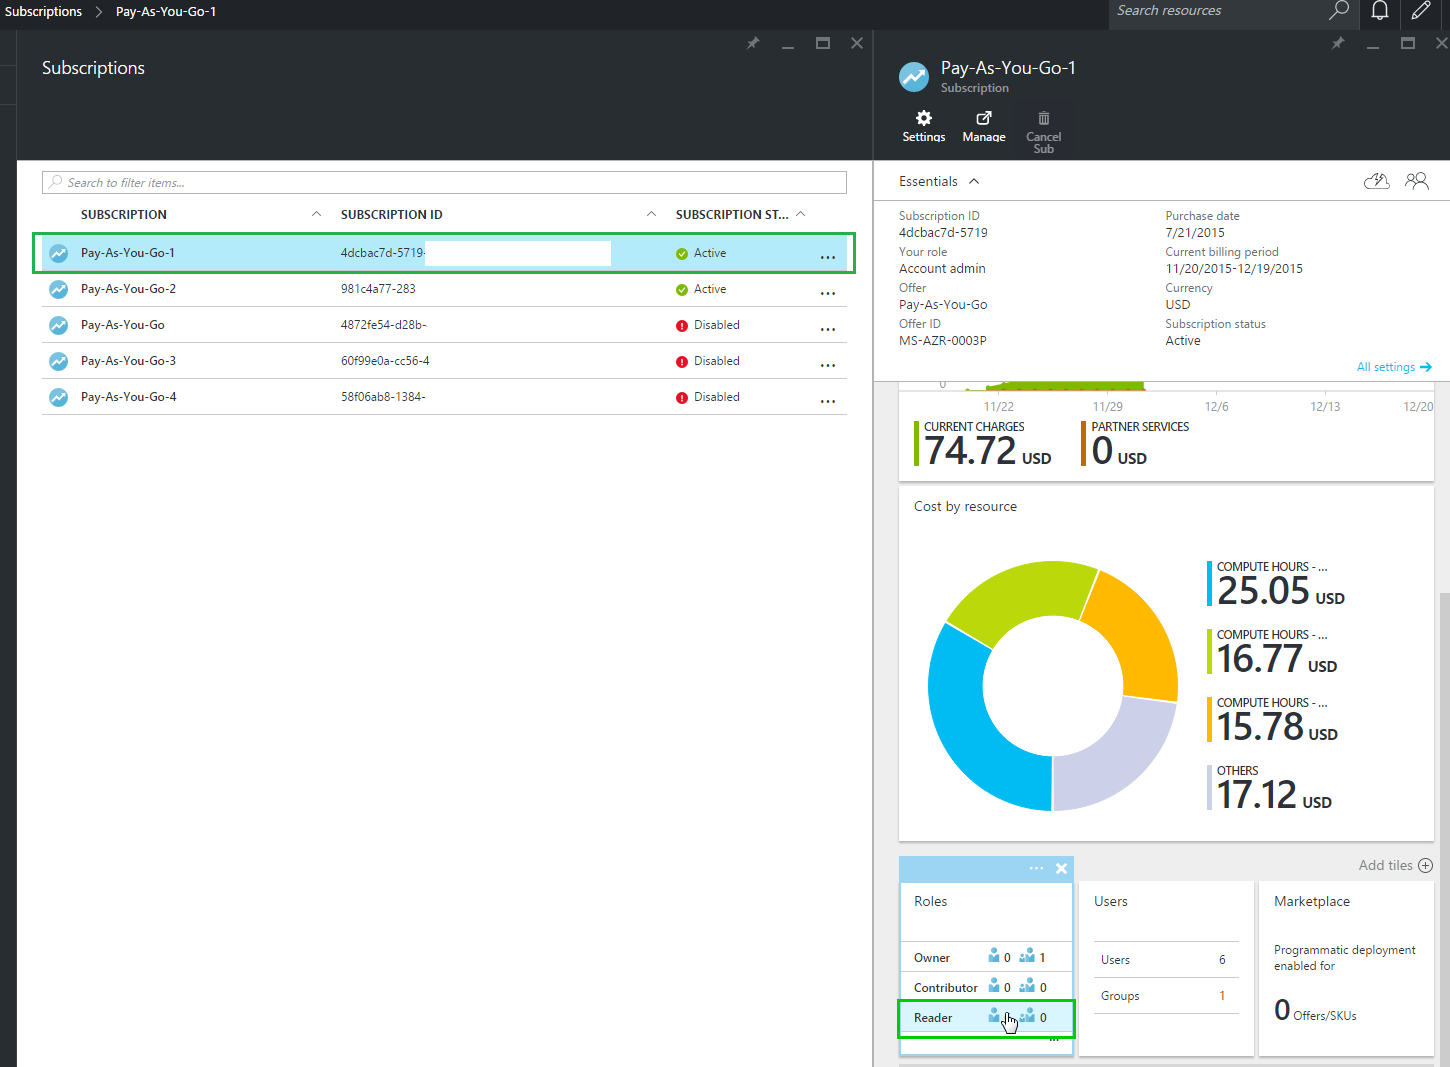
-
Click Add and select the application that the customer created for ITBA and click Select.
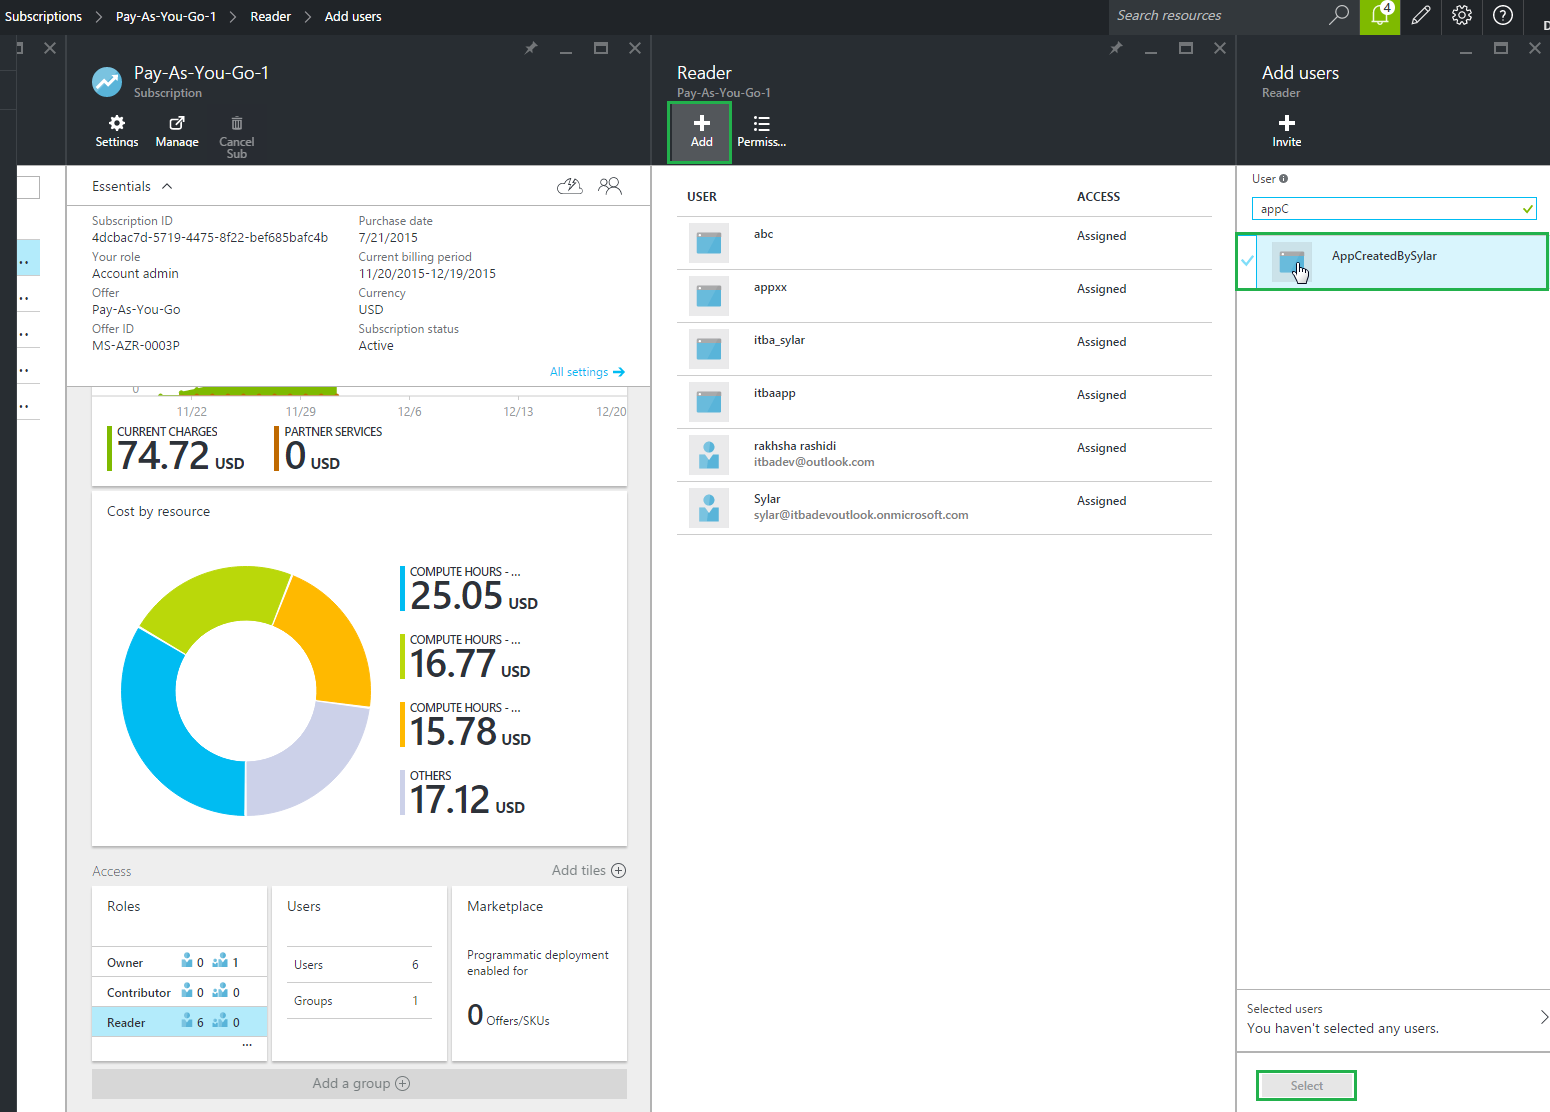
Note If, in ITBA, you want to view data from multiple subscriptions you must assign the permissions to each subscription separately using the above procedure.
Create the certificate and bind all subscriptions
-
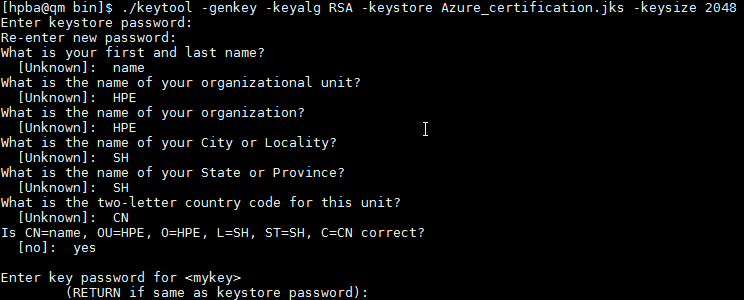
Generate a self-signed certificate using the JDK keytool:
-
After ITBA is installed, log on to the ITBA Linux server and use the following command in the command line to generate the certificate:
cd $HPBA_HOME/jdk/bin
keytool -genkey -keyalg RSA -keystore <certificatename>.jks -keysize 2048
where <certificatename> is the name of the certificate you want to create.
-
Enter the keystore password and the requested information.
-
Convert <certificatename>.jks to <certificatename>.cer and <certificatename>.pfx. using the following command:
keytool -importkeystore -srckeystore <certificatename>.jks -srcstoretype JKS -
destkeystore <certificatename>.pfx -deststoretype PKCS12
-
Enter destination keystore password. Remember this password which will be used in the Connect to Data Source page.
Use the same password for destination keystore and source keystore.

-
Enter the following command:
keytool -export -file <certificatename>.cer -keystore <certificatename>.jks
Enter the keystore password.

-
-
In the Azure Management Portal accessed via https://manage.windowsazure.com/, select SETTINGS > MANAGEMENT CERTIFICATES > UPLOAD.
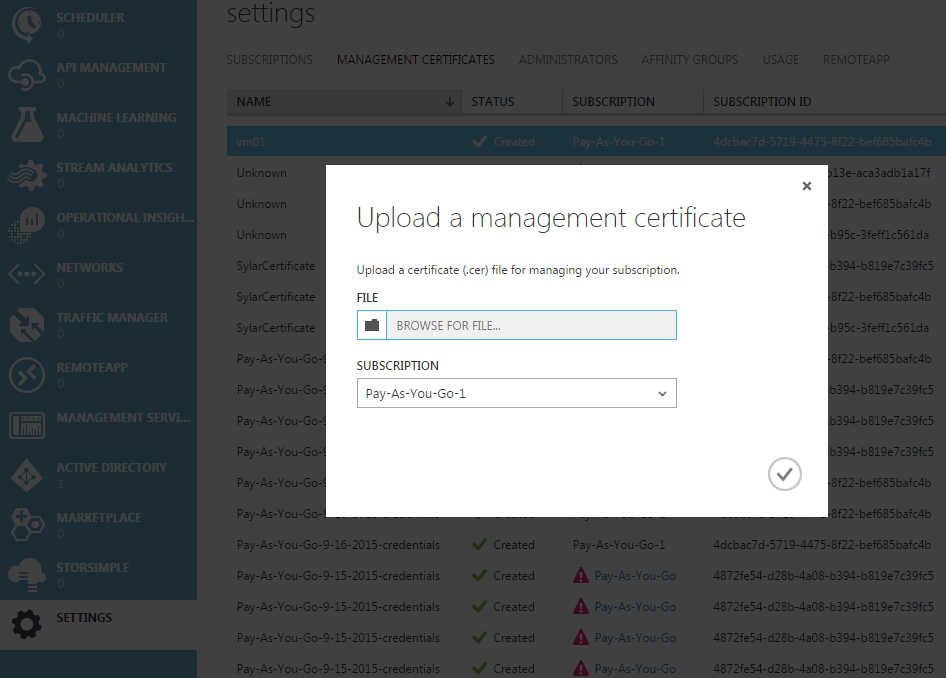
- Upload <certificatename>.cer for each subscriptions.
Activate the Integration
-
Select ADMIN > Data Management > Connect Data Source then click Add data source.
-
The Add Data Source page opens. Select the Azure data source type.
-
Select or enter the configuration parameters.
-
Click Next to proceed to the validation page.
Note If you want to display Azure utilization data returned by the Microsoft Azure Cloud Service API, make sure you switch on Diagnostic for the Microsoft Azure Cloud VM instances.

Azure Activation Page
The following is an example of the Azure Activation page.
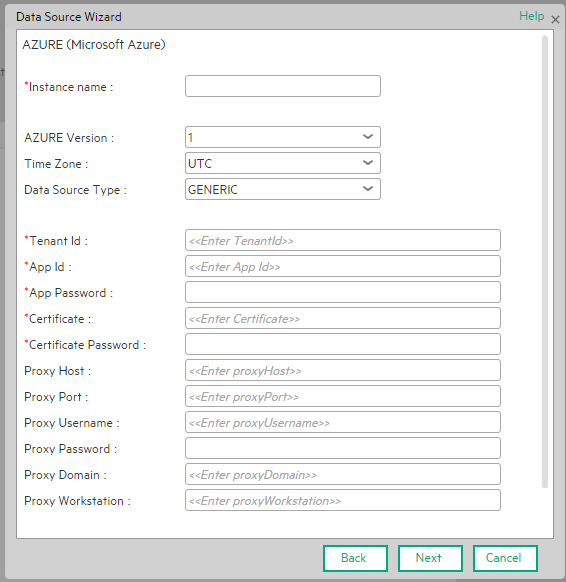
User interface elements are described below:
|
UI Element |
Description |
|---|---|
| Instance name | Enter a name for the data source instance you are activating. |
| Azure Version |
Select the relevant Azure version. For details, see the .. |
| Time Zone | Time zone must be UTC. |
| Data Source Type | GENERIC. This parameter is read only. |
| Tenant ID | The unique ID of the organization in Azure AD that has granted access for your app. |
| APP ID |
The unique identifier for your application. You must use this if your application accesses data in another application, such as the Microsoft Azure AD Graph API. Input the CLIENT ID that you obtain after creating the relevant application in the Azure portal. Note In Azure, one Global ID can have multiple subscriptions. To get consumption data for an Azure subscription, APP ID is required. If you want to get consumption data for all subscriptions under the Global ID, all subscriptions are required to be authorized for the same APP ID, which will be added to the DCS page. |
| APP Password | If your app reads or writes data from/to Microsoft Azure AD, such as data that is made available through the Graph API, your app need a key. The APP Password is the key that you obtain after creating the relevant application in the Azure portal. |
| Certificate |
Once you have created a management certificate, (a .cer file with only the public key) you can upload it into the portal. When the certificate is available in the portal, anyone with a matching certificate (private key) can connect through the Management API and access the resources for the associated subscription. The absolute path to the .pfx certification file on the ITBA Linux server. For example, /home/ITBA/Azure_certification.pfx. |
| Certificate Password | The keystore password of the .pfx certification. |
| Proxy Host | The proxy host. |
| Proxy Port | The proxy port. |
| Proxy Username | The Proxy user name. |
| Proxy Password | The Proxy password. |
| Proxy Domain | The Proxy domain. |
| Proxy Workstation | The Proxy workstation. |
| Initial Load Period (month) |
Select the number of months from which you want the initial data loaded. The Initial load period is 1 month for usage and 1 week for utilization. |

![]() Azure-Related KPIs and Metrics
Azure-Related KPIs and Metrics
The KPIs and Metrics related to the Azure data source are provided in the CSA and CSA_Demo CAPs. For details, see CSA_Demo and CSA CAPs .
We welcome your comments!
To open the configured email client on this computer, open an email window.
Otherwise, copy the information below to a web mail client, and send this email to SW-Doc@hpe.com.
Help Topic ID:
Product:
Topic Title:
Feedback: