


This section describes how to configure Automatic Assignment Rules using the Automatic Assignment Rules screen.
Administration > Monitoring > Automatic Assignment Rules
Alternatively, click Automatic Assignment Rules.
Learn more
An assignment defines which instance of a CI is to be monitored against the values defined for the corresponding CI type referenced in a management template or aspect.
There are two different methods for creating assignments:
-
Manual Assignment
When creating manual assignments, you manually select the CI to be monitored using the management template or aspect from a list of compatible objects.
-
Automatic Assignment
You can define automatic assignment rules; if a CI is modified or newly discovered, Monitoring Automation automatically evaluates any auto-assignment rules defined for its CI type.
If an automatic assignment rule evaluates to true, Monitoring Automation automatically assigns the items specified in the rule to the modified or newly discovered CI, and starts the corresponding deployment jobs.
There are several locations in the user interface where assignments can be created, deployed and managed:
-
You can create and deploy manual assignments for management templates, aspects, and policy templates using the Assignments and Tuning screen.
You can create automatic assignment rules using the Automatic Assignment Rules screen.
-
You can view automatically created assignments for management templates and aspects in the Assignments and Tuning screen.
-
You can assign management templates and aspects directly from the Management Templates and Aspects screen.
-
You can assign policy templates directly from the Policy Templates screen.
- You can manage the deployments jobs generated by assignments using the Deployment Jobs screen.
A view is a query that selects the CIs based on their CI type and their relations with other CIs. Management templates are assigned to one of the CIs in a particular view that is identified when the management template is created (see Configure Management Templates).
- The CI to which the management template is assigned is called the root CI of the management template.
- Related CIs are all CIs found by following the defined target paths starting from the root CI. Related CIs are not limited to the view; the view is only relevant with regard to defining the root CI.
When an automatic assignment rule is created or changed, it is immediately evaluated. If matching CIs are found, the corresponding assignments will be created. After this initial evaluation, the evaluation of the rule is triggered in the following cases:
- Every time a CI is added, changed, or deleted.
- Every time a CI attribute is changed.
- After a configurable time interval elapses. The time interval is configured in the Infrastructure Settings screen. Scheduled evaluation guarantees that automatic assignments are created in case of issues with CI change notifications.
If you create an automatic assignment rule for a management template, OMi automatically assigns the management template and the aspects it contains to the root CI and all its related CIs as they appear on the network, saving you from having to create the assignments manually.
For example, you could create a view called Insurance Applications that selects CIs of CI type Insurance App and include the view in a management template called Monitor Business Applications.
To use the management template to monitor instances of Insurance App, you can create an automatic assignment rule for the management template Monitor Business Applications using the Automatic Assignment Rules screen, selecting Insurance Applications as the Target View, and management template Monitor Business Applications as the assigned item.
OMi then automatically assigns the aspects contained in the Monitor Business Applications management template to all instances of all CI types in the Insurance Applications view as soon as they are discovered, even if they are added to the RTSM after the initial automatic assignment was created.
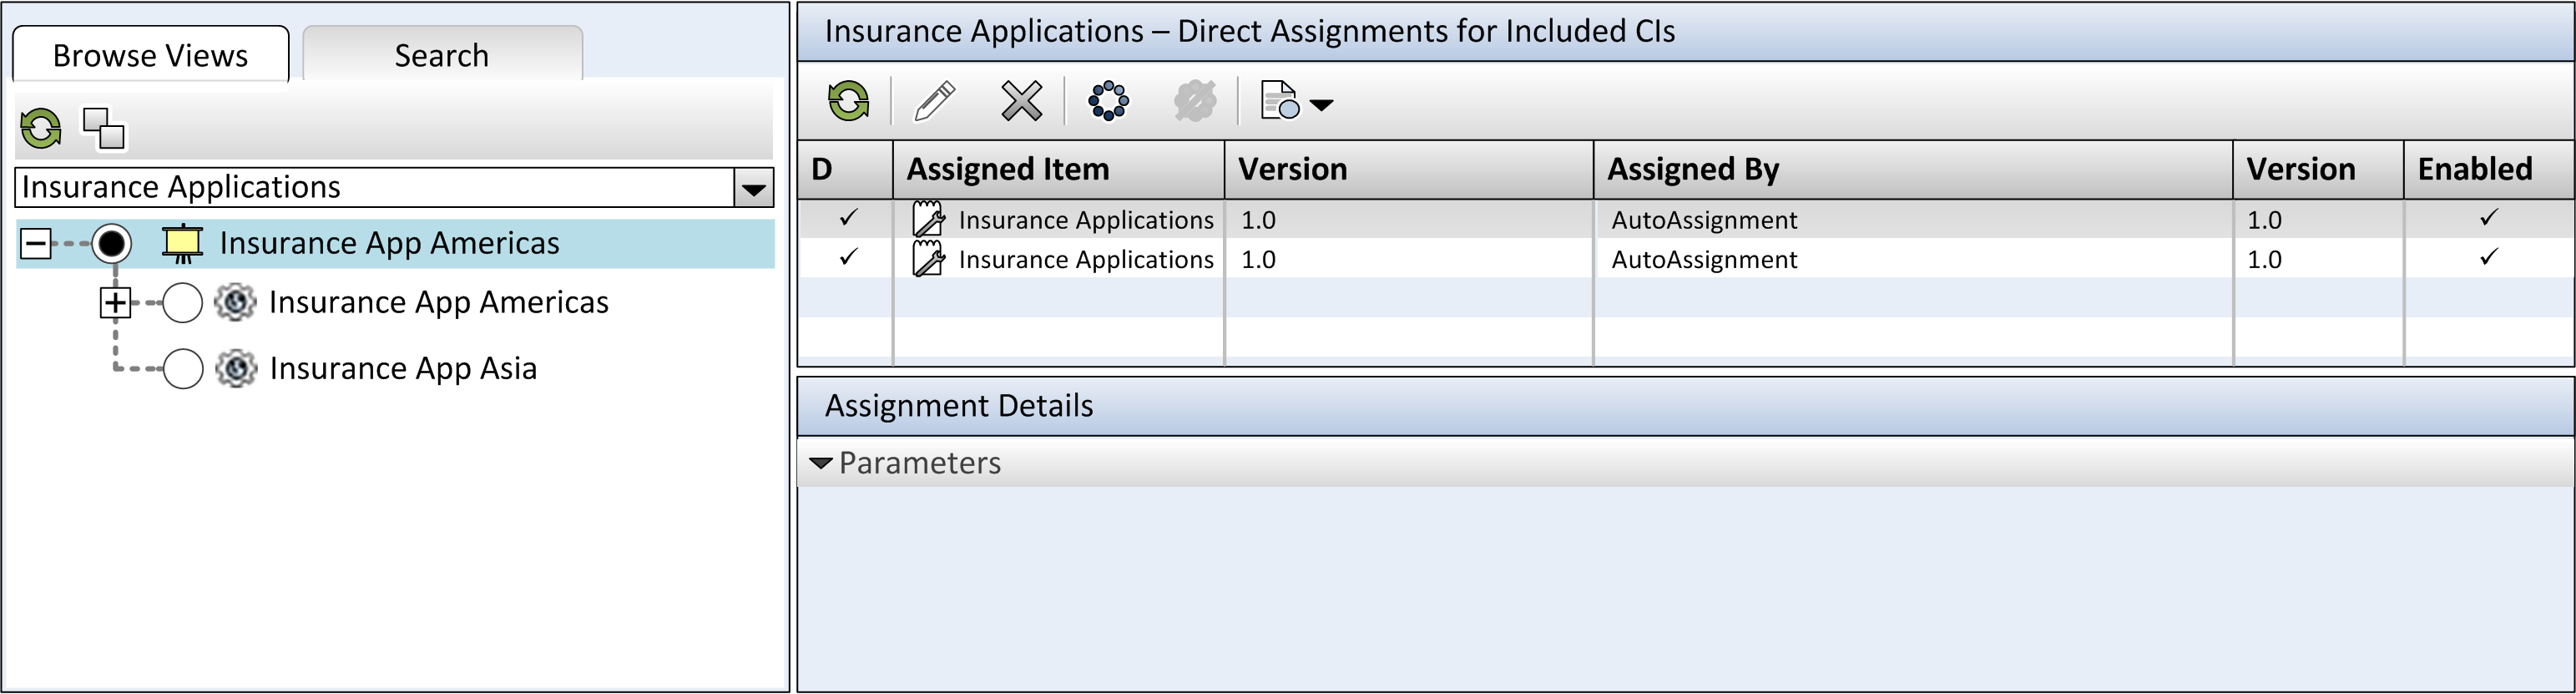
The following figure shows the Assignments and Tuning screen after the management template was assigned to the instance Insurance App Americas and Insurance App Asia.
Note that the column Assigned By shows the value AutoAssignment to indicate that the assignment was created by an automatic assignment rule. For such an assignment, if the column Enabled has the value ![]() , the automatic assignment rule is carried out as soon as the rule evaluates to true. A value of
, the automatic assignment rule is carried out as soon as the rule evaluates to true. A value of ![]() indicates it is never carried out.
indicates it is never carried out.
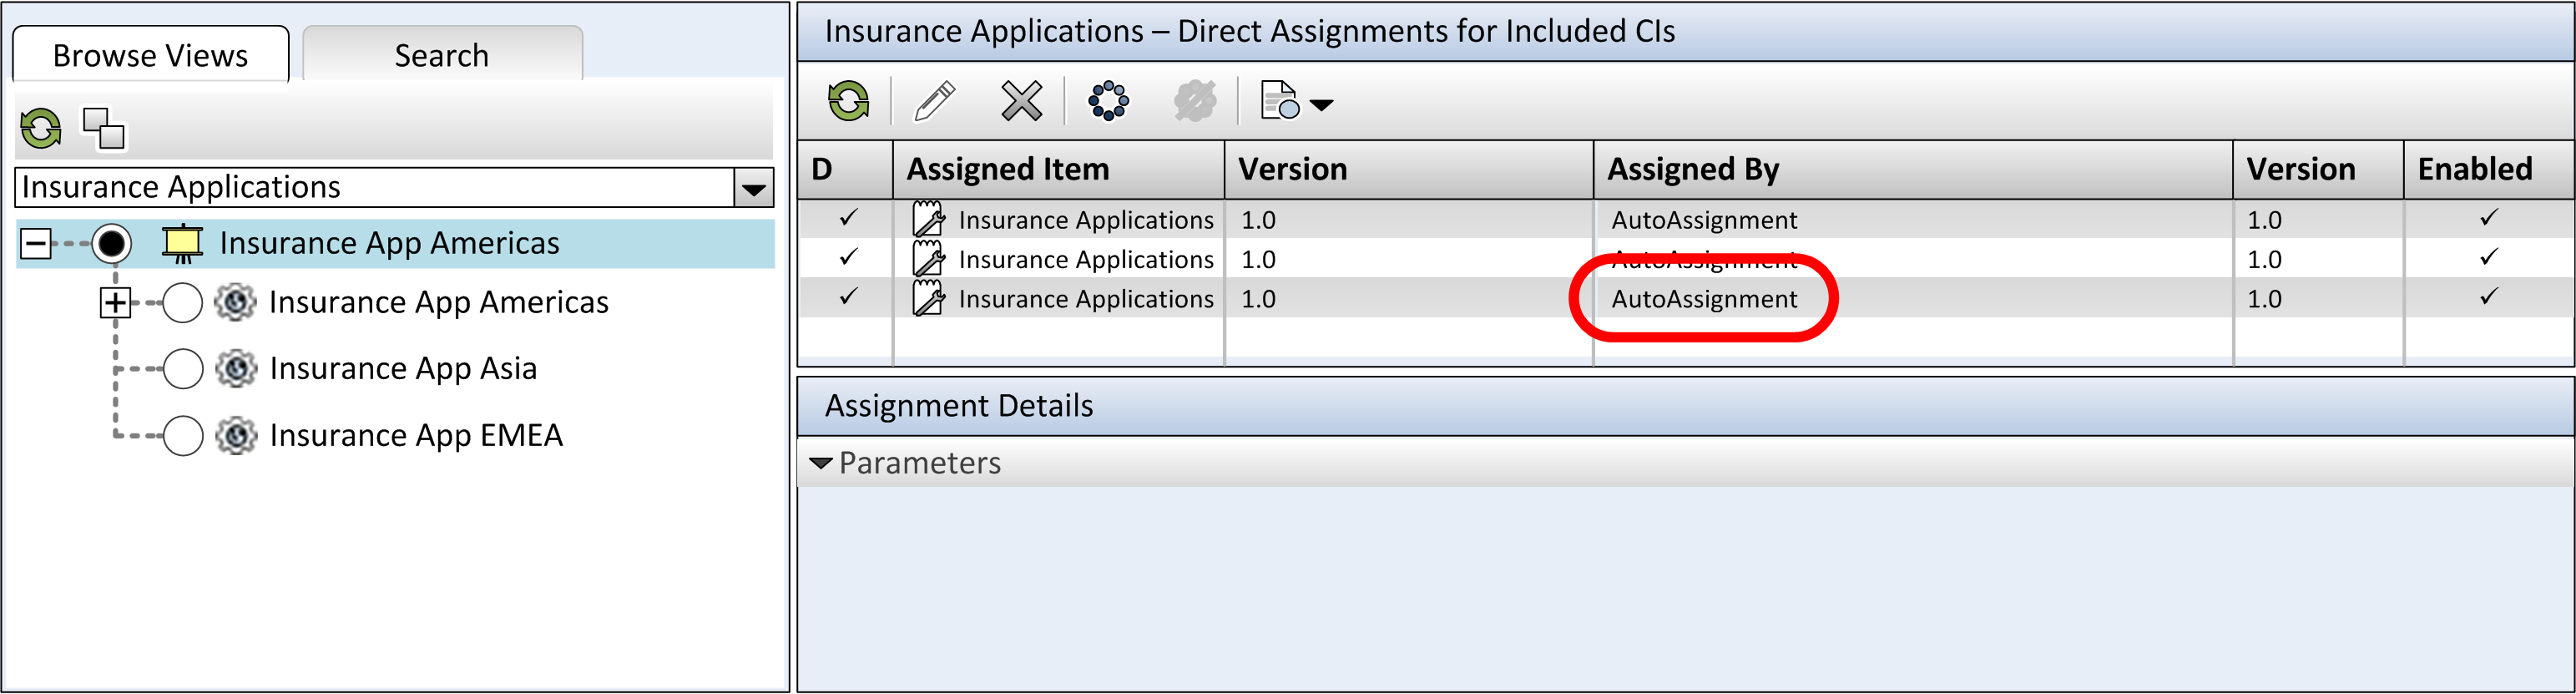
Now a new instance called Insurance App EMEA comes online and shows up in the RTSM. This instance, which has the CI type Insurance App, matches the criteria of the Insurance Applications view, and OMi automatically starts monitoring it by assigning the management template Monitor Business Applications. The Assignments and Tuning screen changes as shown in the following figure:
If two different management template/aspect assignments created by an automatic assignment rule contain different versions of the same policy template, the assignment with a higher policy template version is deployed (this is due to the fact that HPE Operations Agents can only handle one version of a policy template). The removal of the assignment containing the highest policy template version triggers the deployment of a previous template version contained in another assignment.
Example: An older version of an Oracle management pack contains a management template assignment Essential Oracle Monitoring with the aspect Monitor Availability version 1.0. A newer Oracle management pack is created that contains a management template assignment Essential System Monitoring with the same Monitor Availability aspect that has a higher version number (1.1).
The assignment containing the latest aspect version is deployed while the other one is ignored. If the assignment containing the management template Essential System Monitoring with the aspect version 1.1 is removed, the assignment containing Essential Oracle Monitoring with an older aspect version (1.0) will be used instead.
If newer versions of a management template or aspect exist, you can update the related automatic assignment rules to contain any existing version. Note that only the rules for one assigned item can be updated in one step. If you select the rules of different assigned items, the update operation is disabled.
Note If required, you can also update the automatic assignment rules to any existing version of a management template or aspect, not necessarily to the latest one.
In addition, you can get an overview of all automatic assignment rules that do contain the latest version of the assigned item and may therefore require an update by choosing to display a list of items that require an update.
Note Deleting an automatic assignment rule does not result in automatic removal of the assignments created by that rule. To remove the actual assignments, go to the Assignments and Tuning screen, select the appropriate CI and delete the assignments from the list.
When you work with Automatic Assignment Rules — for example, when you add, modify, or delete them — different actions are triggered.
- Adding a rule. When you add an automatic assignment rule, a list of direct assignments is created. If there are two or more rules which assign the same aspect or management template to the same CI, it will result in just one direct assignment. When you manually remove this direct assignment, the assignment will be recreated after a maximum of 12 hours because all assignments and automatic assignments are recalculated twice a day by default.
- Adding/deleting/modifying a CI whose CI type is included in an auto assignment rule. Direct assignments for that CI are added/deleted/modified accordingly.
- Modifying the view of an automatic assignment rule. If, by modifying the view of an automatic assignment rule, CIs are newly added that were not part of the view before, direct assignments are created for these new CIs. If CIs are excluded that used to be part of the view, no changes take place, and the direct assignments remain.
- Updating the aspect or management template version of a rule. When you update the aspect or management template version of a rule, all direct assignments matching the rule are updated. You can check Use paramater values from existing assignments in the assignment wizard to take over parameter values from the existing assignment.
- Changing parameter values of a rule. When you change the parameter values of a rule, direct assignments that match the rule are updated.
- Disabling a rule. Disabling a rule has no impact on the direct assignments that were created by that rule. Disabling a rule flags that rule as being currently inactive, and the rule does not create new direct assignments (for example for newly added CIs).
- Enabling a rule. When you enable a rule, it is recalculated; this has the same effect as adding rule.
- Deleting a rule. When you delete a rule, no direct assignments that were created by that rule are deleted or otherwise impacted. This is a known limitation. If you want to clean up the effects from a rule that is no longer used, you must manually delete the direct assignments that were created by that rule. Ideally, one aspect or management template should only be linked with one specific rule, and you should not have manually created direct assignments for that aspect or management template. Otherwise, it is impossible to find out which assignments to remove and which to keep.
Tasks
-
Go to the Automatic Assignment Rules screen:
Administration > Monitoring > Automatic Assignment Rules
Alternatively, click Automatic Assignment Rules.
The screen consists of the Auto-Assignment Rules pane at the top, and a parameter list at the bottom.
-
Click
 New Assignment in the toolbar of the Auto-Assignment Rules pane. Select
  Assign Management Template to create an automatic assignment rule for a management template or
  Assign Aspect to create an automatic assignment rule for an aspect.
The Create Auto-Assignment Rule wizard opens at Select Target View.
-
Select a view containing the CIs for which you want to create an automatic assignment, and click Next to go to Select Item to Assign.
-
In step Select Item to Assign, click the management template or aspect that you want to automatically assign to all CIs with a CI type appearing in the selected view.
The list shows only the management templates that have a root CI type that appears in the view that you selected or, in case an aspect is auto-assigned, compatible aspects.The latest version of the management template or aspect that you want to assign is selected by default. If required, select a different version in column Version.
Click Next to go to Required Parameters.
Note If there are no mandatory parameters that require editing for this assignment, you are automatically taken to the Parameter Summary screen.
-
Step Required Parameters lists all mandatory parameters in the management template that do not yet have a value. As they are mandatory, however, all listed parameters must be given a value before the management template can be deployed.
If all required values are specified, you can choose one of the following actions:
- Click Finish to assign the configuration object to the selected CI and close the wizard or dialog.
- Click Next to go to Parameter Summary, where you can override the default value of any parameter, including those that are not required.
Note To access step Configure Options, click Next in this step, and Next again in step Parameter Summary. Not applicable when updating assignments.
To change a parameter, double-click it, or select it in the list and click
 Edit.
Edit. -
For standard parameters, the Edit Parameter dialog opens.
To set a specific default parameter value, specify Value in the range that is valid for this parameter. This value overrides any default values defined in the configuration object.
To use the default value from the configuration object, select Use Default Value.
-
For instance parameters, the Edit Instance Parameter dialog opens.
Add instance values and specify dependent parameter values for each instance value.
Click OK.
-
Optional. In step Parameter Summary, specify a value for each parameter that needs to be monitored against a different value than the default value. See the previous step for the information on how to change a parameter.
Click Next to go to the Configure Options, or Finish to save the assignment and close the wizard.
-
Optional. In step Configure Options, clear the Activate Auto-Assignment Rule check box if you do not want to activate the automatic assignment rule immediately. You can activate automatic assignment rules at a later time using the Automatic Assignment Rules screen at Administration > Monitoring > Automatic Assignment Rules.
-
Click Finish to save the changes and close the wizard. The assignment rule is added to the list of auto-assignment rules.
As soon as the automatic assignment rule evaluates to true for a newly discovered CI, OMi creates an actual assignment for the CI, and starts the deployment jobs required to transfer the monitoring configuration to the nodes. After a policy template has been deployed, the OMi server specified in the Default Virtual Gateway Server for Data Collectors URL infrastructure setting becomes the owner of the policy on the node.
An assignment may trigger an event to be sent to OMi if one of the following situations applies:
- A deployment job fails.
- An auto-assignment fails.
- An auto-assignment succeeds. This behavior can be configured in the Infrastructure Settings.
You can check if the automatic assignment rule successfully created the expected assignments as follows:
-
In the Views browser, select the view you identified when creating your automatic assignment rule.
-
Expand the view, and select a node that corresponds to the root CI type of the assigned item. Assignments created as a result of Automatic Assignment Rules are shown in the list of assignments at the top of the right pane, and have the value
AutoAssignmentin the column Assigned By.
You can consider the following options for tuning the assignment:
- Use the Automatic Assignment Rules screen to tune the parameter values for all assignments triggered by the automatic assignment rule.
- Use the Assignments and Tuning screen to tune, redeploy, delete, enable, disable, or update individual assignments.
To update the existing automatic assignment rules to a newer version of a management template or aspect:
-
In the Automatic Assignment Rules screen, select the rules that you want to update.
-
Right-click the automatic assignment rule you want to update and select Update Assigned Item from the drop-down menu. Alternatively, click
 Update Assigned Item. The Update Assigned Item wizard opens at Update Options.
 -
Select the version you want to update the assigned item to (by default, the latest version of a management template or aspect is preselected) and specify one of the following options:
-
To use parameter values from existing automatic assignments, select Use parameter values from existing assignments.
-
To use default parameter values from the new management template or aspect version, select Use default parameter values from version selected above.
-
-
Click Next to go to Required Parameters. If you selected Use parameter values from existing assignments, only the new mandatory parameters that do not have a default value are listed. If you selected Use default parameter values from version selected above, all mandatory parameters from the selected management template or aspect version that do not have a default value are displayed. These parameters must be edited before proceeding to the next step of the wizard.
To change a parameter, double-click it or select it from the list and click
Edit. The Edit Parameter dialog opens. Make the required changes and click Next to go to Parameter Summary or Finish to save the changes and close the wizard.If there are no mandatory parameters that require editing for this automatic assignment, you are automatically taken to the Parameter Summary screen.
-
Optional. Parameter Summary displays the following:
-
All new parameters if you selected Use parameter values from existing assignments.
-
All parameters from the selected configuration object version if you selected Use default parameter values from version selected above.
Review the parameter values and make the required changes by double-clicking a parameter or selecting it from the list and clicking
Edit.-
For standard parameters, the Edit Parameter dialog opens.
To set a specific default parameter value, specify Value in the range that is valid for this parameter. This value overrides any default values defined in the configuration object.
To use the default value defined in the configuration object, select Revert to the initial assignment value.
Click OK to continue.
-
For instance parameters, the Edit Instance Parameter dialog opens.
Add instance values and specify dependent parameter values for each instance value. Click OK.
-
-
Click Finish to save the changes and close the wizard. The automatic assignment rule is updated to the specified version of the assigned item.
Note The ![]() Update Filter button switches between displaying the automatic assignment rules that do not refer to the latest version of the assigned item and therefore require an update (Show Rules That Require an Update) and all existing rules (Show All Rules).
Update Filter button switches between displaying the automatic assignment rules that do not refer to the latest version of the assigned item and therefore require an update (Show Rules That Require an Update) and all existing rules (Show All Rules).
UI Reference
| UI Element | Description | ||||||||||||||||||||||||||
|---|---|---|---|---|---|---|---|---|---|---|---|---|---|---|---|---|---|---|---|---|---|---|---|---|---|---|---|
| Automatic Assignment Rules |
Lists all automatic assignment rules. Each line represents an automatic assignment rule; the assignment defined in the automatic assignment rule is created when the rule evaluates to true. After creating or changing an automatic assignment rule, it is immediately evaluated. If matching CIs are found the corresponding assignments will be created. After this initial evaluation, the evaluation of the rule is triggered in the following cases:
Note
The toolbar of the automatic assignment rules list provides the following controls:
The list of assignment rules has the following columns:
|
||||||||||||||||||||||||||
| Parameters |
Lists all parameters defined for the management template or aspect selected in the list of automatic assignment rules. The toolbar provides the following controls:
To sort the list by the values in a particular column, click the column header. At the right side of the sort column the ascending ▼ or descending ▲ sort order indicator is shown. The parameter list has the following columns:
|
| UI Element | Description | ||||
|---|---|---|---|---|---|
| View List |
List all views. Select a view you want to create the automatic assignment rule for. The automatic assignment rule is evaluated on the root CI of the target view. The toolbar provides the following controls:
The list has the following columns:
|
| UI Element | Description | ||||||||
|---|---|---|---|---|---|---|---|---|---|
| List of Items to Assign |
Lists all management templates and aspects that can be assigned to one of the CI types present in the target view. Select one of the objects to be automatically assigned when the rule evaluates to true. The toolbar provides the following controls:
The list has the following columns:
|
| UI Element | Description | ||||||||||||||
|---|---|---|---|---|---|---|---|---|---|---|---|---|---|---|---|
| Required Parameter List |
Lists all mandatory parameters contained in the management template or aspect to be assigned that do not yet have a value. Enter a value for each parameter in the list. The toolbar provides the following controls:
To sort the list by the values in a particular column, click the column header. At the right side of the sort column the ascending ▼ or descending ▲ sort order indicator is shown. The parameter list has the following columns:
|
| UI Element | Description | ||||||||||||||||
|---|---|---|---|---|---|---|---|---|---|---|---|---|---|---|---|---|---|
| Parameter List |
Lists all parameters contained in the management template or aspect. You can enter or change the default of a parameter in the list. The toolbar provides the following controls:
To sort the list by the values in a particular column, click the column header. At the right side of the sort column the ascending ▼ or descending ▲ sort order indicator is shown. The parameter list has the following columns:
|
| UI Element | Description | ||||||||||||||||
|---|---|---|---|---|---|---|---|---|---|---|---|---|---|---|---|---|---|
| Parameter List |
Lists all parameters contained in the management template or aspect to be auto-assigned. The toolbar provides the following controls:
To sort the list by the values in a particular column, click the column header. At the right side of the sort column the ascending ▼ or descending ▲ sort order indicator is shown. The parameter list has the following columns:
|
| UI Element | |||||||||||
|---|---|---|---|---|---|---|---|---|---|---|---|
| Instance Values |
The toolbar provides the following controls:
|
||||||||||
| Dependent Values |
Lists the dependent values for the instance value selected in the Instance Values list. The toolbar provides the following controls:
The list has the following columns:
|
| UI Element | Description |
|---|---|
| Value | Select Value if you want to set a specific default value for the parameter in this assignment. If you select Value you must specify or select a value in the range that is valid for the parameter. The value you specify overrides any default values defined in the policy template, aspect, or management template. |
|
Use Default Value |
The other choice offered is Use Default Value. Select this option if you want to use the default value defined in the policy template, aspect, or management template. |