


A management template provides a complete solution for managing an application or service. Management templates are containers for aspects. Each aspect provides the ability to monitor an aspect of a configuration item (CI). By grouping aspects together, you can create a management solution for several CIs that are related to each other.
Administration > Monitoring > Management Templates & Aspects
Alternatively, click Management Templates & Aspects.
Learn more
The OMi Run-time Service Model (RTSM) is a database of the physical and logical entities in your managed environment (for example hardware, software, services, and so on). Entities in RTSM are represented as configuration items (CIs), of which there are many different types (for example, Computer, CPU, DiskDevice, WebServer, Oracle).
The RTSM supports data flow probes and connections to external data providers, such as Operations Manager and HPE OMi Integration Adapter, thereby enabling automatic population of the database.
You can use views to find a specific CI among the numerous CIs in the database by its CI type and its relation to other CIs. The figure below shows the Systems_Infrastructure view, which is one of the default views provided with OMi.
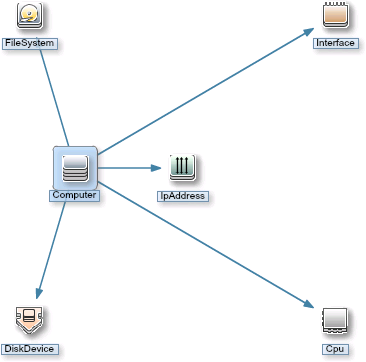
The Systems_Infrastructure view selects CIs of the type Computer, and related CIs of the types Cpu, IpAddress, DiskDevice, Interface, and FileSystem.
When you create a management template, you create a complete management solution for an application or service that consists of several related CIs.
When creating a management template, start with a view that selects the CIs associated with the application or service to be managed.
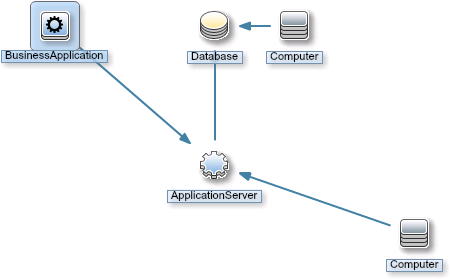
The following graphic shows an example of a view that selects CIs of the type Business Application, and the related CIs of the types Application Server, Database, and Computer.
Before you can create a management template you need a view selecting the CI types to be monitored. If necessary, you can create a new view using the Modeling Studio.
All the items in a management template are versioned. Note the following with respect to version numbers:
-
The version number consists of a major and minor version number, separated by a period, for example:
1.2. - If you modify an existing management template, you create a new version of the management template in the database with a unique version number and version ID. By default, the minor version number increases to the next available higher number automatically after you modify the management template.
- If the version numbers contained in content to be uploaded already exist on the system (for example when applying a Management Pack), the conflicting content is not uploaded and the upload process reports an error.
-
Only one version of an item is assigned to a management template at any one time. You can use the Update to Latest feature to update all items in a management template to the latest version.
Note If you modify a management template that is part of an HPE Operations Management Pack, HPE recommends increasing the minor version number only. The next version of the Management Pack normally uses the next major version number, so adhering to this principle preempts potential version clashes when updating the Management Pack.
To facilitate keeping track of versions it is good practice to specify Change Log information. For detailed information about managing versions see the relevant tasks in the section Tasks.
All versions of an item are visible in the Management Templates & Aspects pane. Expand an item to open a list of all its available versions with the latest version at the top, as shown below for the aspect AspectComputer, which has the two versions 1.0 and 1.1:

When creating a template or aspect, the system proposes version number 1.0 by default, but you can set the version number of the item and all items contained in it as desired. If you want to save the management template with a specific version number, you can select the major and minor version number that you want. It is not possible, however, to replace an existing version of a management template.
Aspects use parameters, which correspond to variables in policy templates, to control how CIs of a certain type are monitored. The value of the parameter is set by an operator for the CI type the aspect is assigned to. The corresponding variable is set and passed to the CI according to the definition in the policy template.
A parameter decouples a value from its physical definition in a policy template. This has the following advantages:
-
A value can be set at deployment time in the application, rather than having to change hard-coded variables in a policy template.
-
A parameter can be deployed conditionally so the value it represents can be used in multiple situations, but needs to be set only once.
-
Parameter values can be set at various levels, allowing defaults to be used on the lower levels. This can greatly reduce the number of values to be set by an operator.
- It is possible to override any configured values by tuning assignments when the monitoring process is started.
-
Parameters can be combined to reuse a value occurring multiple times, removing the need to specify values repetitively. A typical example is a password parameter that is used by several policy templates in an aspect to log on to the same service.
Conditional Deployment
You can use the following criteria for the conditional deployment of a parameter contained in a policy template or an aspect:
-
CI type
Policy templates must be deployed to specific CI types. Conditional deployment allows you to create aspects monitoring CIs governed by the same parameters, but having CI type-specific policy templates, enabling OMi to automatically select the correct policy template for the CI type of a CI when the aspect is assigned to it.
-
OS type
You can configure a policy template to be deployed for specific operating systems. Conditional deployment of several policy templates in a single aspect allows for creating platform-neutral aspects.
As an example, consider the MySQL DBMS, which can run on several platforms. An aspect monitoring process health is configured with conditionally deployed policy templates for Windows, Linux and Solaris. When the aspect is assigned to a MySQL CI that is hosted on a Linux node, OMi automatically deploys the Linux variant of the policy template.
-
CI attribute
You can configure a policy template to be deployed only when a CI attribute has a specific value, enabling OMi to automatically change the policy template for a CI when an attribute reaches a certain value.
Specifying a Default Value
Parameter values are set in the monitoring agents when a policy template is deployed. Parameter values can be defined and changed in the following places:
-
The policy template contains a default value for the parameter.
-
You can override any policy template defaults at aspect level in the aspect's policy template configuration.
-
You can override any aspect-level values at management template level in the management template's aspect configuration.
-
You can override any management template- or aspect-level value when deploying a management template or aspect, unless the parameter is configured as
hiddenorread-only.
Combining Parameters
You can combine several parameters to create a single combined parameter. The value of a combined parameter is passed to all its constituent parameters, enabling using a single value definition for multiple CIs, making it easier to assign and maintain the management template or aspect using it.
For details, see task Combining Parameters and the UI Reference section for the Edit/Combine Parameters dialog.
Tasks
-
In the Configuration Folders pane, select or create the configuration folder in which you want to create a new management template. For details about creating and managing configuration folders, see Configuration folders.
-
To create a new management template, click
 New in the Management Templates & Aspects pane and select
  Create Management Template. The Create Management Template wizard opens at the General tab.
 Note Do not use
New to create a new version of an existing management template. To create a new version of an existing management template, use  Edit Item, specify a new version number in the General tab, make any required changes, and click OK.
 -
The General tab enables you to enter general information about the management template.
Note: Required fields are marked with a red asterisk *; the Next button is inactive until all the required fields are filled in.-
Enter a unique Name for the management template.
-
Optional. Enter a Description for the management template.
-
If required, set the major and minor version numbers for the management template. By default, the major version number of the latest version is selected for new management templates.
-
Optional. Enter your motivation for creating the new management template in the Change Log field.
-
Click Next to accept the values, generate an ID and go to the Topology View tab.
-
-
The Topology View tab is used to define the CI type to which the management template can be assigned and the application topology for the management template. The CI type to which the management template can be assigned is called the root CI type.
Consider the following:
-
The root CI type should occur only once in the topology view to ensure consistency with respect to auto-assignments.
-
All CI types present in the application you want to monitor using the management template must be present in the selected topology view. If such a view does not exist, you must create one.
To define the root CI type:
-
Select a view containing the items you want to manage using one of the following methods:
-
Select a view in the Topology View list.
-
If you need more choices, click the Browse Views button … to the right of the drop-down arrow to the right of the list. The Browse Views dialog opens. Browse the views on the system or, if a suitable view does not exist, click
 Go to Modeling Studio to start the Modeling Studio and create a new view.
-
-
Select a convenient layout from the drop-down list associated with the Layout field. You can zoom in or out using the zoom buttons
 and
and  and scroll the graphic.
 -
In the topology view, click the CI type to which you want to be able to assign the management template. The CI type of the selected CI is selected in the CI Type field and the selected CI is shown with a blue background in the topology view. The selected CI type is now the root CI type of the management template.
Note If multiple CIs of the root CI type exist in the assigned topology view, a message warns you of possible inconsistencies but the CI type is nevertheless configured as root CI type. If inconsistencies are possible, make sure you select a CI type that occurs only once in the selected view before continuing.
Instead of clicking the view, you can select a CI type from the drop-down list associated with the CI Type field.
Click Next to accept the values and go to the Aspects tab.
-
-
The Aspects tab is used to add aspects to the management template. Grouping all relevant aspects together in a single management template generates a complete monitoring solution for a particular application.
-
Select a node in the topology view on the left. All aspects that can be assigned to the selected node's CI type are listed in the list of available aspects on the right, at the top of the pane.
-
Select the aspects to be added to the management template and click
 . The selected aspects are added to the list of selected aspects, at the bottom of the pane.
-
Target is automatically set to the CI type of the node that is selected in the view.
-
By default, the latest version of an aspect is added. If you need to use an older version, select the required Version after adding it.
Note To update all aspects in a management template and the parameters and instrumentation contained in them in one go, use the Update to Latest feature from the Management Templates & Aspects pane.
-
-
To remove aspects from the template, select them in the list of selected aspects and click
 Move Up.
 -
Click Next to accept the values and go to the Parameters tab.
-
- The Parameters tab lists all parameters contained in the aspects you added in the Aspects tab.
- To set parameter values at management template level, select a single parameter and click Edit.
- To facilitate monitoring, it may be useful to combine parameters as described in task How to Combine Parameters. To combine parameters, make sure at least two parameters are selected and click
 Combine.
The Edit/Combine dialog opens, allowing you to set the value of the selected or combined parameter. Set the desired value and click OK to accept the new value.
- To set parameter values at management template level, select a single parameter and click
-
Click OK or Finish to save the management template and close the dialog or wizard.
Tip You may want to consider some special methods when using SiteScope (SiS) templates for monitoring. For recommendations, see Import SiteScope templates.
There are several ways to start the monitoring process:
-
You can assign the template to a CI from Assignments & Tuning:
Administration > Monitoring > Assignments and Tuning
Alternatively, click Assignments and Tuning.
Use this location to deploy a finished solutions to a node in your cloud. The Assignments & Tuning screen also allows you to tune the solution before deployment by overriding the default values configured in the management template. For detailed information, see Assignments and Tuning.
- A template can be automatically assigned if it is included in an auto-assignment rule configured for a certain view in the Automatic Assignment Rules screen. For detailed information, see Automatic Assignment Rules.
-
You can assign and deploy a management template directly from the Management Templates & Aspects pane described in this section.
Use this location to try out a monitoring solution while developing or configuring it.
To assign and deploy a management template from the Management Templates & Aspects pane:
-
Select the management template to be deployed in the Management Templates & Aspects pane and then click the Assign and Deploy button
 . The Assign and Deploy wizard opens.
 -
In step Configuration Item, click the configuration item(s) to which you want to assign the management template. You can select multiple items by holding down the Ctrl or Shift key while selecting them.
Click Next to accept the CIs and go to Required Parameters.
Note If there are no mandatory parameters that require editing for this assignment, you are automatically taken to the Parameter Summary screen.
-
Step Required Parameters lists all mandatory parameters in the management template that do not yet have a value. As they are mandatory, however, all listed parameters must be given a value before the management template can be deployed.
If all required values are specified, you can choose one of the following actions:
- Click Finish to assign the configuration object to the selected CI and close the wizard or dialog.
- Click Next to go to Parameter Summary, where you can override the default value of any parameter, including those that are not required.
Note To access step Configure Options, click Next in this step, and Next again in step Parameter Summary. Not applicable when updating assignments.
To change a parameter, double-click it, or select it in the list and click
Edit. -
For standard parameters, the Edit Parameter dialog opens.
To set a specific default parameter value, specify Value in the range that is valid for this parameter. This value overrides any default values defined in the configuration object.
To use the default value from the configuration object, select Use Default Value.
-
For instance parameters, the Edit Instance Parameter dialog opens.
Add instance values and specify dependent parameter values for each instance value.
Click OK.
When finished, click Next to go to Parameter Summary.
-
In step Parameter Summary, you can specify a value for each parameter on management template level. This value overrides any value defined on a lower level. If no parameters are available, a message informs you of this.
By default, parameters defines as expert parameters are not shown. To show expert parameters, click
 Show/Hide Expert Parameters.
To change a parameter, double-click it, or select it in the list and click
Edit. -
For standard parameters, the Edit Parameter dialog opens.
To set a specific default parameter value, specify Value in the range that is valid for this parameter. This value overrides any default values defined in the configuration object.
To use the default value from the configuration object, select Use Default Value.
-
For instance parameters, the Edit Instance Parameter dialog opens.
Add instance values and specify dependent parameter values for each instance value.
Click OK.
When finished, click Next to go to Configure Options, or click Finish to deploy the management template and close the wizard.
-
-
Optional. In step Configure Options, clear the Enable Assignment(s) check box if you do not want to enable the assignment immediately. You can enable assignments later using the Assignments and Tuning.
Click Finish to close the wizard.
-
OMi creates deployment jobs to transfer the monitoring configuration to the nodes. After a policy template has been deployed, the OMi server specified in the Default Virtual Gateway Server for Data Collectors URL infrastructure setting becomes the owner of the policy on the node.
If you make changes to policy templates or aspects (for example when updating a Management Pack or customizing a policy template or aspect), the policy templates and aspects it contains are added to the database as new versions. Management templates and aspects reference specific versions of aspects, so Management Pack updates require all management templates and aspects referencing the updated aspects and policy templates to be updated as well.
The Update to Latest wizard helps you update your management templates and aspects automatically. The Update to Latest wizard supports several different ways of versioning the updated items. Your use case determines which way works best in a particular situation.
To update all items in a management template or aspect to the latest version in the database:
-
Browse to the appropriate configuration folder and select the management template or aspect to be updated in the Management Templates & Aspects pane. Select a single management template or aspect; updates can only be done on single management templates or aspects.
-
Click
 Update to Latest. The Update to Latest wizard opens.
 -
Set the following options to suit your use case:
-
Versioning alternatives:
-
Update to the latest major and minor version causes both major and minor versions to reflect the latest version.
-
Update to the Latest Minor Version, Keeping All Major Versions limits changes to the minor version number only. If the latest version of an item has a higher major number than the current item, the new version will have the lowest available minor number for the same major number as the current version.
For example, if the current version is
1.5and there are two newer versions with version numbers1.6and2.1:-
Update to the latest major and minor version will update the version number to
2.1. -
Update to the Latest Minor Version, Keeping All Major Versions will update the version number to
1.6.
-
-
Scope of update:
-
Only Update This Object, Not the Contained Object causes only the selected object to be updated to the latest version. Any objects further down in the tree structure are left as the current version.
-
Update this object and all containing objects causes all objects in the entire tree represented by the management template or aspect to be updated to the latest version.
-
-
-
Click Next. A preview of the update is shown as an expanded tree view of the management template or aspect, where items that will be updated are labeled "
(old version > new version)",
and items that will not be updated are labeled
"(current version)".If you want to keep certain items from being updated you can exclude them as follows:
-
Select the item you want to exclude from the update.
-
Click
 Exclude From Update .
Although the versioning label for the item is not changed, the selected item is now excluded from the update as indicated by the label being followed by the exclude from update icon .
Exclude From Update .
Although the versioning label for the item is not changed, the selected item is now excluded from the update as indicated by the label being followed by the exclude from update icon .Note Exclude From Update is only activated for items to be updated, as indicated by the label "
(old version > new version)".
-
Click Reload Preview to apply the manual exclusions. The list is refreshed.
To include a manually excluded item again, select it, and click
Include in Update followed by Reload Preview. -
-
Click Finish to apply the update as shown in the preview.
-
Go to the Automatic Assignment Rules screen:
Administration > Monitoring > Automatic Assignment Rules
Alternatively, click Automatic Assignment Rules.
The screen consists of the Auto-Assignment Rules pane at the top, and a parameter list at the bottom.
-
Click
New Assignment in the toolbar of the Auto-Assignment Rules pane. Select Assign Management Template to create an automatic assignment rule for a management template or  Assign Aspect to create an automatic assignment rule for an aspect.
The Create Auto-Assignment Rule wizard opens at Select Target View.
-
Select a view containing the CIs for which you want to create an automatic assignment, and click Next to go to Select Item to Assign.
-
In step Select Item to Assign, click the management template or aspect that you want to automatically assign to all CIs with a CI type appearing in the selected view.
The list shows only the management templates that have a root CI type that appears in the view that you selected or, in case an aspect is auto-assigned, compatible aspects.The latest version of the management template or aspect that you want to assign is selected by default. If required, select a different version in column Version.
Click Next to go to Required Parameters.
Note If there are no mandatory parameters that require editing for this assignment, you are automatically taken to the Parameter Summary screen.
-
Step Required Parameters lists all mandatory parameters in the management template that do not yet have a value. As they are mandatory, however, all listed parameters must be given a value before the management template can be deployed.
If all required values are specified, you can choose one of the following actions:
- Click Finish to assign the configuration object to the selected CI and close the wizard or dialog.
- Click Next to go to Parameter Summary, where you can override the default value of any parameter, including those that are not required.
Note To access step Configure Options, click Next in this step, and Next again in step Parameter Summary. Not applicable when updating assignments.
To change a parameter, double-click it, or select it in the list and click
Edit. -
For standard parameters, the Edit Parameter dialog opens.
To set a specific default parameter value, specify Value in the range that is valid for this parameter. This value overrides any default values defined in the configuration object.
To use the default value from the configuration object, select Use Default Value.
-
For instance parameters, the Edit Instance Parameter dialog opens.
Add instance values and specify dependent parameter values for each instance value.
Click OK.
-
Optional. In step Parameter Summary, specify a value for each parameter that needs to be monitored against a different value than the default value. See the previous step for the information on how to change a parameter.
Click Next to go to the Configure Options, or Finish to save the assignment and close the wizard.
-
Optional. In step Configure Options, clear the Activate Auto-Assignment Rule check box if you do not want to activate the automatic assignment rule immediately. You can activate automatic assignment rules at a later time using the Automatic Assignment Rules screen at Administration > Monitoring > Automatic Assignment Rules.
-
Click Finish to save the changes and close the wizard. The assignment rule is added to the list of auto-assignment rules.
As soon as the automatic assignment rule evaluates to true for a newly discovered CI, OMi creates an actual assignment for the CI, and starts the deployment jobs required to transfer the monitoring configuration to the nodes. After a policy template has been deployed, the OMi server specified in the Default Virtual Gateway Server for Data Collectors URL infrastructure setting becomes the owner of the policy on the node.
An assignment may trigger an event to be sent to OMi if one of the following situations applies:
- A deployment job fails.
- An auto-assignment fails.
- An auto-assignment succeeds. This behavior can be configured in the Infrastructure Settings.
You can check if the automatic assignment rule successfully created the expected assignments as follows:
-
In the Views browser, select the view you identified when creating your automatic assignment rule.
-
Expand the view, and select a node that corresponds to the root CI type of the assigned item. Assignments created as a result of Automatic Assignment Rules are shown in the list of assignments at the top of the right pane, and have the value
AutoAssignmentin the column Assigned By.
You can consider the following options for tuning the assignment:
- Use the Automatic Assignment Rules screen to tune the parameter values for all assignments triggered by the automatic assignment rule.
- Use the Assignments and Tuning screen to tune, redeploy, delete, enable, disable, or update individual assignments.
-
Select the management template you want to create the report for.
-
Click
 Generate Assignment Report in the Management Templates &Aspects (middle) pane.
 The preconfigured report providing assignment details and listing all CIs assigned to a selected management template is displayed.
You can display additional types of reports from the Assignments and Tuning screen.
UI Reference
| UI Element | Description |
|---|---|
| Name | The name of the management template. |
| Description | A description of the management template. |
| ID | A unique identifier for the management template. |
| Version ID | A unique identifier for this version of the management template. |
| Version |
The current version of the management template. The version is formatted as follows: <Major Version Number>.<Minor Version Number> The major version number is specified in the left-hand field, the minor version number in the right-hand field. |
| Change Log | Text that describes what is new or modified in this version of the management template. |
| UI Element | Description | ||||||||||
|---|---|---|---|---|---|---|---|---|---|---|---|
| Topology View |
The topology view that this management template is linked to. Select a topology view that contains all the CI types to be managed with this management template. You can select a topology view from the Topology View drop-down list, or click the … button to open the Browse Views dialog. If a suitable view does not exist, you can click the |
||||||||||
| Topology Map |
A graphical representation of the selected topology view. The toolbar provides the following controls:
|
||||||||||
| CI Type |
The root CI type for assignment. To set the root CI type, click the node to which you want to assign the management template in the topology view, or select it from the CI Type drop-down list. The selected root CI type is shown in the topology view with a blue background. Note The root CI type should occur only once in the topology view to ensure consistency with respect to auto-assignments. For more information about auto-assignment, see task How to Automatically Assign Management Templates or Aspects. Caution If the management template already has aspects selected in the Aspects screen or tab, clicking a different root CI type causes the aspects to lose their targets. Therefore, only select a different root CI type if you are certain you want to change it, or else you'll have to delete and reselect the aspects manually in the Aspects tab. |
| UI Element | Description | ||||||||||||||
|---|---|---|---|---|---|---|---|---|---|---|---|---|---|---|---|
| Topology View |
Shows the topology view for the management template. The toolbar provides the following controls:
When you click a node in the topology map all aspects matching the CI type of the selected node are listed in the list of available aspects (upper list on the right). |
||||||||||||||
| List of Available Aspects (upper list on the right) |
Lists all aspects matching the CI type selected in the Topology View. To add aspects to the management template:
The toolbar provides the following controls:
The list has the following columns:
The toolbar below the list provides the following controls:
|
||||||||||||||
| List of Selected Aspects (lower list on the right) |
Lists all aspects contained in the management template. To remove an aspect from the template:
The toolbar provides the following controls:
The list has the following columns:
|
| UI Element | Description | ||||||||||||||||||||||||||||||||||
|---|---|---|---|---|---|---|---|---|---|---|---|---|---|---|---|---|---|---|---|---|---|---|---|---|---|---|---|---|---|---|---|---|---|---|---|
| List of Parameters |
Lists all parameters defined in the policy templates assigned to the aspects contained in the management template or aspect. The toolbar provides the following controls:
To sort the list by the values in a particular column, click the column header. At the right side of the sort column the ascending ▼ or descending ▲ sort order indicator is shown. The list has the following columns:
|
| UI Element | Description | ||||||||||||||||||||
|---|---|---|---|---|---|---|---|---|---|---|---|---|---|---|---|---|---|---|---|---|---|
| Name |
The name of the parameter. The parameter list contains parameters defined in any aspect in the management template or aspect structure. You can review the structure of a management template or aspect in the Structure tab of the Details pane. |
||||||||||||||||||||
| Instance Parameter | Read-only. If the checkbox is checked the parameter is an instance parameter, if it is unchecked it is not. | ||||||||||||||||||||
| Description | A description of the parameter. | ||||||||||||||||||||
| UI Order | The position of this parameter in the list of parameters. | ||||||||||||||||||||
| Flags |
Provides the following options:
|
||||||||||||||||||||
| Default Value |
The default value of the parameter. The default value used by OMi observes the following priorities:
A default value is assigned using the control in the default value group shown in the following figure for a parameter using conditional values:
The following table describes how to use the controls in the default value group:
|

 are evaluated in the order in which they appear, and the value corresponding to the first condition evaluating to true is used as default value.
 to define which value should be used. You can either have the system use a constant string value (top radio button) or the value of an attribute of the CI to which the aspect is assigned (bottom radio button).
| UI Element | Description | ||||||
|---|---|---|---|---|---|---|---|
| Condition |
Specify the condition to evaluate. The conditional value is used if all checked choices match the selected options. You can create a condition based on the following choices:
|
||||||
| Value |
Specify the value to be used if the condition is the first condition that is met. Select one of the radio buttons to choose from the following types of values:
|
| UI Element | |||||||||||
|---|---|---|---|---|---|---|---|---|---|---|---|
| Instance Values |
The toolbar provides the following controls:
|
||||||||||
| Dependent Values |
Lists the dependent values for the instance value selected in the Instance Values list. The toolbar provides the following controls:
The list has the following columns:
|
| UI Element | Description |
|---|---|
| Value | Select Value if you want to set a specific default value for the parameter in this assignment. If you select Value you must specify or select a value in the range that is valid for the parameter. The value you specify overrides any default values defined in the policy template, aspect, or management template. |
|
Use Default Value |
The other choice offered is Use Default Value. Select this option if you want to use the default value defined in the policy template, aspect, or management template. |
| UI Element | Description |
|---|---|
|
|
Expand all CIs: Expand all CIs. |
|
|
Collapse all CIs: Collapse all CIs. |
|
|
Toggle between Show Customized Values Only and Show All Values. |
|
|
Expand the category to show the attributes contained in it. |
|
|
Collapse the category to hide the attributes contained in it. |