


Work Flow - Metric Streaming and Visualization of System and Custom Application Metrics
This section provides step-by-step information about metric streaming and visualization for system and custom application metrics in a large scale environment. The end to end work flow comprises several components that work together to provide metric streaming and visualization of system as well as custom application metrics.
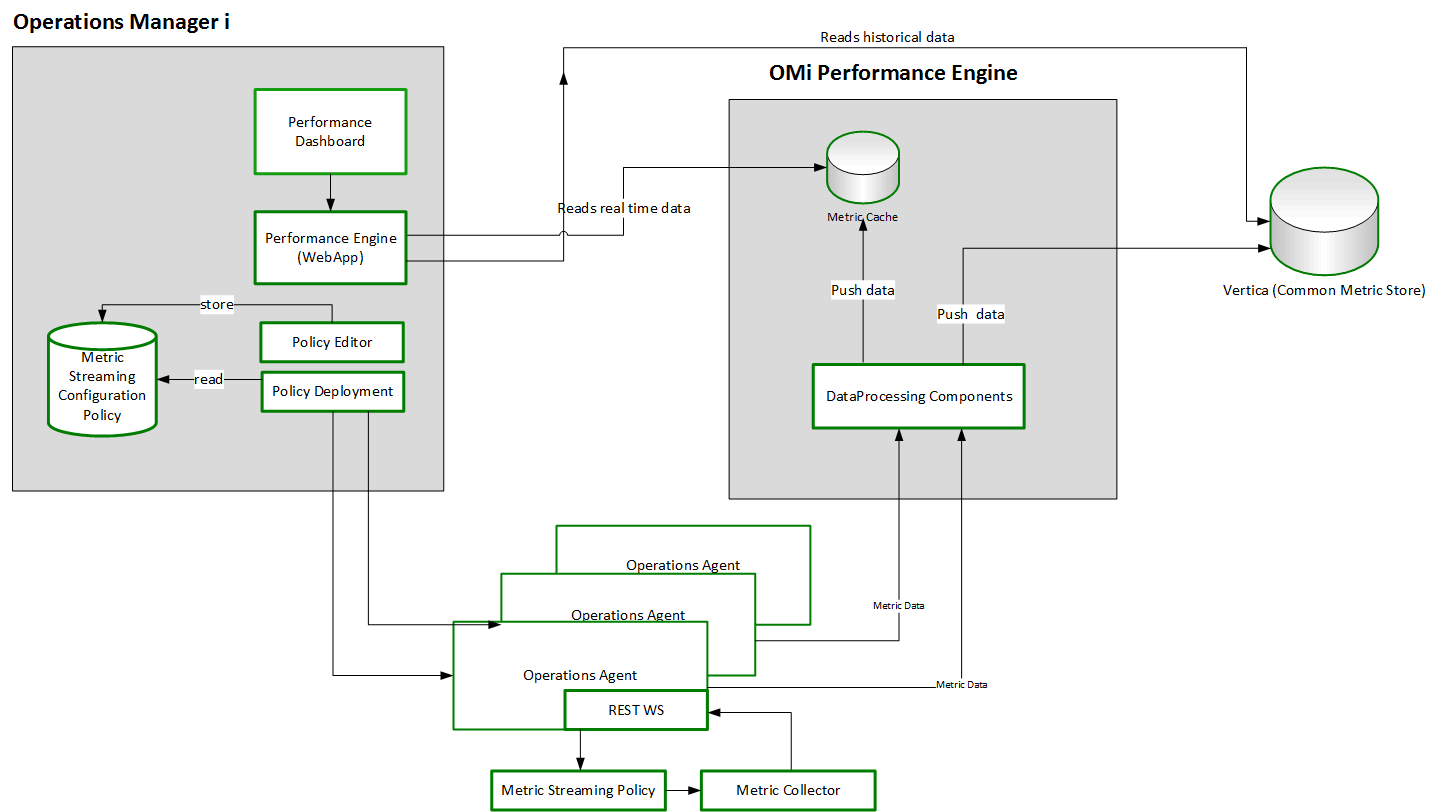
The metric streaming configuration policy is defined in Operations Manager i and deployed to the managed node. Operations Agent streams the metric data to OMi Performance Engine which acts as the central store for storing and analyzing metrics in a large scale environment. The custom application metrics are streamed at short collection intervals from the node. OMi Performance Dashboard reads the metric data from OMi Performance Engine and visualizes the custom application metrics in the performance dashboard.
The work flow provides the following functionalities:
- UI based configuration of custom metrics data collection.
- Out-of-the-box content for real-time data streaming
- Real-time graphing of custom metrics in large scale environment
- Optional configuration of new or existing Vertica database for storing and retrieving historical data
Prerequisites
To visualize custom metrics in a large scale environment, you must install and configure the following components:
| Component | Version |
|---|---|
| Operations Manager i (includes OMi Performance Dashboard) | 10.11 |
|
Operations Agent or Operations Connector |
12.01
10.11 |
| OMi Performance Engine | 10.11 |
|
Depending on your requirement, you can install any of the following OMi Management Packs:
|
2.00 1.20 1.10 1.01 |
Visualizing Custom Application Metrics for Docker Application
Use Case: Consider an environment in which you want to visualize the streaming of custom application metrics for Docker applications in the OMi Performance Dashboard. To visualize custom application metrics, follow these tasks:
Task 1: Adding nodes to OMi console
Note If the node already exists in RTSM, you can skip this step and proceed to Task 2.
Before you begin monitoring, you must add the nodes to the OMi console.
-
Open the Monitored Nodes pane from the Operations Console screen:
Administration > Setup and Maintenance > Monitored Nodes
-
In the Node Views pane, select Predefined Node Filters > Monitored Nodes, click
 and then select Computer > <Select the relevant OS type>. The Create New Monitored Nodes dialog box appears.
 -
Specify the Primary DNS Name, IP Address, Operating System, and Processor Architecture of the node, and then click OK.
The newly created node is saved as a Configuration Item (CI) instance in RTSM.
Note The node with Operations Agent needs to be activated on the OMi Server and certificate must be granted. For more information, see Operations Agent documentation.
Task 2: Deploying discovery aspect
To discover the Docker CIs, deploy the Docker Discovery Aspect by following these steps:
-
Open Management Templates & Aspects pane:
Click Administration > Monitoring > Management Templates & Aspects
-
In the Configuration Folders pane:
Click Configuration Folders > Infrastructure Management > Docker > Docker Discovery Aspect
- Click
 Assign and Deploy Item.
 -
In the Configuration Item tab, select the Computer CI where the application is installed and click Next to go to Required Parameters. You can select multiple items by holding down the CTRL or SHIFT key while selecting the parameters.
- In the Required Parameters tab, click Next.
-
Optional. In the Parameter Summary tab, you can edit the default value of any parameter. To change the default values of the parameters, you can select the parameter and then click
 . The Edit Parameter window opens. Click Value, specify the value, and then click OK.
Note In the Parameter Summary tab, you can override the default values of any parameter. You can specify a value for each parameter at the Aspect level. By default, parameters defined as expert parameters are not displayed. To display expert parameters, click
 Show Expert Parameters.
 - Optional. In the Configure Options tab, if you do not want to enable the assignment immediately, clear the Enable Assignment(s) check box.
- Click Finish.
Note If Docker Discovery Aspect is deleted from the managed node, as a result CIs for this node are also deleted from the RTSM. Other Aspects assignments are also deleted. To restore the node CIs, you must restart opcmsga service on the managed node by using the following command:
ovc -restart opcmsga
Task 3: Deploy the Docker Monitoring Aspects
You can follow steps similar to Task 3 to deploy the following Aspects in the same order:
- Docker Collector Aspect
- Docker Availability Aspect
- Docker Performance Aspect
Note If you are using any other OMi Management Pack, ensure that you deploy all the Aspects.
Note You can modify the parameter value of any Aspect for tuning the monitoring after the deployment using the Assignments & Tuning pane (Administration > Monitoring > Assignments & Tuning).
Task 4: Specify the Infrastructure Settings
You need to check if the Infrastructure Settings are defined for OMi Performance Engine. If the Infrastructure Settings are not defined, you can define these settings.
- In the OMi console, click Administration > Setup and Maintenance > Infrastructure Settings.
- In the Infrastructure Settings page, select the Applications context.
- Select the Performance Engine as the specific context from the drop-down list.
- The Performance Engine Node Infrastructure Setting is displayed. Click .
- You can use this parameter to configure the Performance Engine Node details from which OMi Performance Dashboard must request real time data. In case of the Cluster mode of Performance Engine Deployment, specify the Load balancer host information. By default, the port number is 7387. For example, you can specify
http://<PE HostName>:7387 - You can specify the value as
http://<PE HostName>:<Port Number>and click Save. Alternatively, select Restore Default and Save, to reset the defaults values.
Task 5: Define the metric streaming configuration policy
-
In the OMi console, click Administration > Monitoring > Policy Templates.
-
In the Policy Template Groups pane, select Policy Management > Templates grouped by type > Configuration.
-
Click the Metric Streaming Configuration folder, and then do one of the following:
-
Add a new policy template: in the Policy Templates pane, click the
 New Item button, and then click the
  Add New Policy Template... or Add New Policy Template (Raw Mode) button.
 -
Edit an existing policy template: in the Policy Templates pane, click the
 Edit Item button, and then click the Edit Policy Template or Edit Policy Template (Raw Mode) button. The Metric Streaming Configuration Policy Editor opens.
 -
Open the Metric Streaming Configuration Policy Editor. In the Properties section, enter a Display Name for the policy.
Optional. Change the policy version (Version), provide a description of the policy (Description), enter information about the policy changes (Change Log), and select the operating systems with which the policy is compatible (OS Types).
-
In the Metrics section, choose the host name of the Operations Agent or Operations Connector from which you want to collect metrics data. Click Load Metric Definitions to get a list of all available metrics associated with that Operations Agent or Operations Connector. From the displayed list, select the metrics you want to include in the policy and stream to OMi Performance Engine and OMi Performance Dashboard. If you want to remove all unselected metrics from the list, click Remove Unselected. Unselected metrics and instances are excluded from the policy.
You can repeat this step to include metrics from different agents.Optional. Click
 Add Child next to Metrics to add another data source. Specify the following information:
Data Source Name of the data source from which the metrics data is collected. Collector Optional. Name of the Operations Agent or Operations Connector that collects the metrics data. Collector Executable Optional. Specifies how the metric collection is done by the collector (for example which file is used by Operations Agent or Operations Connector. Collection Interval Interval (in minutes or seconds) at which metrics are collected and streamed to the endpoint. Metric Class Name of the class to which the metric belongs. Original Metric Name Optional. Original name of the metric when retrieved by a third party domain manager. Instances Include either all instances or specific instances. Metric Name Name of the metric. Optional. Click
on the metric class level to add an instance of the metric. -
In the Target Endpoint section, if you have correctly set up the OMi Performance Engine, the URL is automatically retrieved from the Performance Engine server. You must ensure the URL appears in the Target Endpoint.
-
Click Save and Close to save the policy template and exit the editor.
-
Task 6: Deploy the metric streaming configuration policy
-
In the OMi console, open the Policy Templates manager:
Administration > Monitoring > Policy Templates
-
In the Policy Template Groups pane, expand the tree and navigate to the policy template that you want to deploy.
-
In the Policy Templates pane, select the policy template that you want to deploy and click the
 button. The Assign and Deploy wizard opens.
 -
In the Configuration Item page, click the configuration item to which you want to assign the policy template, and then click Next.
-
Specify a value for each parameter:
To change a parameter, double-click it, or select it in the list and click
Edit. -
For standard parameters, the Edit Parameter dialog opens.
To set a specific default parameter value, specify Value in the range that is valid for this parameter. This value overrides any default values defined in the configuration object.
To use the default value from the configuration object, select Use Default Value.
-
For instance parameters, the Edit Instance Parameter dialog opens.
Add instance values and specify dependent parameter values for each instance value.
Click OK. Click Next.
-
-
Optional. In the step Configure Options, clear the Enable Assignment(s) check box if you do not want to enable the assignment immediately. You can enable the assignment later using the Assignments & Tuning manager.
-
Click Finish. OMi creates deployment jobs, which deploy the policy template to the nodes.
After a policy template has been deployed, the OMi server specified in the Default Virtual Gateway Server for Data Collectors URL infrastructure setting becomes the owner of the policy on the node.
Note The Assign and Deploy button is grayed out if the policy template contains a stub instrumentation. Upload the instrumentation by using the Content Manager.
Task 7: Launching and viewing real-time metrics in the OMi Performance Dashboard
By default, out of the box performance dashboards are available for OMi MP for Docker. To launch the performance dashboard for Docker CI, follow these steps:
- In OMi console, click Workspaces > Operations Console > Performance Perspective
- In the View Explorer pane, select View. For example, you can select Docker_Topology for Docker Applications.
- In the View Explorer pane, you can choose a Docker Container CI for which you want to view the performance dashboard.
- In the Performance pane, click
 to view the performance dashboard for Docker CI
 -
Click an item to view the performance dashboard. In addition, you can search for a performance dashboard by specifying the title in the search option.
The performance dashboard appears in the Performance pane. You can now visualize the Docker custom application metrics in the performance dashboard.